- 製品 製品ロケーションサービス
ジオフェンスからカスタム ルート検索まで、ロケーションに関する複雑な課題を解決します
プラットフォームロケーションを中心としたソリューションの構築、データ交換、可視化を実現するクラウド環境
トラッキングとポジショニング屋内または屋外での人やデバイスの高速かつ正確なトラッキングとポジショニング
API および SDK使いやすく、拡張性が高く、柔軟性に優れたツールで迅速に作業を開始できます
開発者エコシステムお気に入りの開発者プラットフォーム エコシステムでロケーションサービスにアクセスできます
- ドキュメント ドキュメント概要 概要サービス サービスアプリケーション アプリケーションSDKおよび開発ツール SDKおよび開発ツールコンテンツ コンテンツHERE Studio HERE StudioHERE Workspace HERE WorkspaceHERE Marketplace HERE Marketplaceプラットフォーム基盤とポリシーに関するドキュメントプラットフォーム基盤とポリシーに関するドキュメント
- 価格
- リソース リソースチュートリアル チュートリアル例 例ブログとリリースの公開 ブログとリリースの公開変更履歴 変更履歴開発者向けニュースレター 開発者向けニュースレターナレッジベース ナレッジベースフィーチャー 一覧フィーチャー 一覧サポートプラン サポートプランシステムステータス システムステータスロケーションサービスのカバレッジ情報ロケーションサービスのカバレッジ情報学習向けのサンプルマップデータ学習向けのサンプルマップデータ
- ヘルプ
Spark アプリケーションを開発します
目的: シンプルな Spark アプリケーションを開発します。
複雑さ: 初心者向け
所要時間: 30 分
ソースコード: ダウンロード
このチュートリアルでは、バージョン付レイヤー からデータを読み取り、 log4j を使用してこのデータをログに記録する、シンプルな Spark アプリケーションを開発、デバッグ、および実行する方法を示します。
このチュートリアルでは、次のトピックについて説明します。
Maven プロジェクトを設定します
チュートリアルの最初にソースコードをダウンロードして任意のフォルダーに保存するか、プロジェクトのフォルダー構造を最初から作成します。
develop-spark-application
└── src
    └── main
        ├── java
        └── resources
        └── scala
この操作は、次の bash 1 つのコマンドで実行できます。
mkdir -p develop-spark-application/src/main/{java,resources,scala}
Maven POM ファイルは 、 Maven 設定の確認 の例のファイルと似ていますが、更新された親 POM と依存関係セクションがあります。
Spark sdk-batch-bom_${scala.compat.version}関連のライブラリを使用する必要があるため、親 POM はです。
<parent>
    <groupId>com.here.platform</groupId>
    <artifactId>sdk-batch-bom_2.12</artifactId>
    <version>2.54.3</version>
    <relativePath/>
</parent>
次の依存関係が使用されます。
-
com.here.platform.data.client:local-support_${scala.compat.version}ローカルデータカタログからデータを読み取る。 -
com.here.platform.data.client:spark-support_${scala.compat.version}プラットフォーム のデータカタログからデータを読み取る。 -
org.apache.spark:spark-core_${scala.compat.version}Java/Scala Spark アプリケーションを実行します -
com.here.platform.pipeline:pipeline-interface_${scala.compat.version}から入力カタログに関する情報を取得PipelineContextします。
依存関係 :
<dependencies>
    <dependency>
        <groupId>com.here.platform.data.client</groupId>
        <artifactId>spark-support_${scala.compat.version}</artifactId>
    </dependency>
    <dependency>
        <groupId>org.apache.spark</groupId>
        <artifactId>spark-core_${scala.compat.version}</artifactId>
    </dependency>
    <dependency>
        <groupId>com.here.platform.pipeline</groupId>
        <artifactId>pipeline-interface_${scala.compat.version}</artifactId>
    </dependency>
    <dependency>
        <groupId>com.here.platform.data.client</groupId>
        <artifactId>local-support_${scala.compat.version}</artifactId>
    </dependency>
    <dependency>
        <groupId>com.here.hrn</groupId>
        <artifactId>hrn_${scala.compat.version}</artifactId>
    </dependency>
</dependencies>
pom.xml 必要なすべての依存関係をファイルに追加したら、次のステップでアプリケーションのコードを記述して実行します。
ソースコードを入力します
前に説明したように、このチュートリアルでは、バージョンレイヤーからデータを読み取り、コンソールに出力する単純な Spark アプリケーションを記述する方法を示します。 データは、 OLP CLI を使用してバッチアプリケーションを実行する前に、バージョン付レイヤー に追加されます。レイヤーから読み取られたすべてのデータは 、 log4j を使用してコンソールに記録されます。 log4j の設定は src/main/resources/log4j.propertiesファイルにあります。
この Spark アプリケーションの実装について見てみましょう。 以下のコード スニペットでは、ローカル コレクションを配布するために JavaSparkContext / SparkContext が使用され、復元力のある分散データセット(RDD)が形成されていることを確認できます。並行して操作できる耐障害性のある要素のコレクションです。 Partition オブジェクトを含む RDD コレクションは parallelizing()queryMetadata 、メソッドの呼び出しを使用して作成 QueryApi されます。このメソッドは、を使用してバージョン付レイヤー からデータをクエリし、このデータを並列化して RDD を取得します。パーティション メタデータ で RDD コレクションを取得したら、次の手順でパーティションをダウンロードし、これらのパーティションを人間が読める文字列にマッピングしてから、コンソールにログを記録します。
アプリケーションの動作の詳細については、次のコードのコメントを参照してください。
Java
Scala
/*
 * Copyright (c) 2018-2023 HERE Europe B.V.
 *
 * Licensed under the Apache License, Version 2.0 (the "License");
 * you may not use this file except in compliance with the License.
 * You may obtain a copy of the License at
 *
 *     http://www.apache.org/licenses/LICENSE-2.0
 *
 * Unless required by applicable law or agreed to in writing, software
 * distributed under the License is distributed on an "AS IS" BASIS,
 * WITHOUT WARRANTIES OR CONDITIONS OF ANY KIND, either express or implied.
 * See the License for the specific language governing permissions and
 * limitations under the License.
 */

import akka.actor.ActorSystem;
import akka.actor.CoordinatedShutdown;
import com.here.hrn.HRN;
import com.here.platform.data.client.engine.javadsl.DataEngine;
import com.here.platform.data.client.javadsl.DataClient;
import com.here.platform.data.client.javadsl.Partition;
import com.here.platform.data.client.javadsl.QueryApi;
import com.here.platform.data.client.spark.DataClientSparkContextUtils;
import com.here.platform.pipeline.PipelineContext;
import java.io.Serializable;
import java.util.ArrayList;
import java.util.Collections;
import java.util.OptionalLong;
import org.apache.spark.SparkConf;
import org.apache.spark.api.java.JavaRDD;
import org.apache.spark.api.java.JavaSparkContext;
import org.slf4j.Logger;
import org.slf4j.LoggerFactory;

public class DevelopSparkApplication {

  private static final Logger LOGGER = LoggerFactory.getLogger(DevelopSparkApplication.class);
  private static final String LAYER_ID = "versioned-layer-custom-data";

  public static void main(String[] args) {

    // Create Spark context
    JavaSparkContext sparkContext =
        new JavaSparkContext(new SparkConf().setAppName("SparkPipeline"));

    // Create pipeline context
    PipelineContext pipelineContext = new PipelineContext();

    // Get input catalog hrn from the pipeline-config.conf file
    HRN inputCatalog = pipelineContext.getConfig().getInputCatalogs().get("sparkCatalog");

    // Create Spark Actor System
    ActorSystem sparkActorSystem = ActorSystem.create("DevelopSparkApplication");

    try {
      // Load the list of available partitions
      // from a catalog layer of a given version as an RDD
      JavaRDD<Partition> layerMetadata =
          queryMetadata(inputCatalog, sparkContext, sparkActorSystem);

      // Create object of the CatalogReader class
      // that allows to read data from the versioned layer
      CatalogReader catalogReader = new CatalogReader(inputCatalog);

      // Read data from the latest version of the catalog,
      // map to human-readable string and save
      // as JavaRDD dataset
      JavaRDD<String> partitionData = layerMetadata.map(catalogReader::read);

      // Log human-readable content
      // from the versioned layer to the console using log4j
      partitionData.foreach(
          partitionContent -> {

            // Fail application if partition content includes `THROW_EXCEPTION` text
            // This condition is used to demonstrate how to create your own Grafana alert
            // and get email if your pipeline failed
            if (partitionContent.contains("THROW_EXCEPTION")) {
              throw new RuntimeException("About to throw an exception");
            }
            LOGGER.info(System.lineSeparator() + partitionContent);
          });

    } finally {
      // Close Spark Actor System
      CoordinatedShutdown.get(sparkActorSystem)
          .runAll(CoordinatedShutdown.unknownReason())
          .toCompletableFuture()
          .join();
    }
  }

  private static JavaRDD<Partition> queryMetadata(
      HRN catalog, JavaSparkContext sparkContext, ActorSystem sparkActorSystem) {

    // Create queryApi for the source catalog
    QueryApi query = DataClient.get(sparkActorSystem).queryApi(catalog);

    // Get latest version of the source catalog
    OptionalLong latestVersion =
        query.getLatestVersion(OptionalLong.of(0)).toCompletableFuture().join();

    ArrayList<Partition> partitions = new ArrayList<>();

    // Get partitions metadata from the versioned layer
    // using the catalog latest version and add
    // their to the partitions list
    query
        .getPartitionsAsIterator(latestVersion.getAsLong(), LAYER_ID, Collections.emptySet())
        .toCompletableFuture()
        .join()
        .forEachRemaining(partitions::add);

    // Distribute a local Java collection to form a resilient distributed dataset
    return sparkContext.parallelize(partitions);
  }
}

// The CatalogReader class is Serializable as instance of this class is executed
// in a Spark lambda and all of the variables it refers to (its closure)
// are serialized to the workers
class CatalogReader implements Serializable {
  private final HRN catalog;

  CatalogReader(HRN catalog) {
    this.catalog = catalog;
  }

  // Download partition_content and map to human-readable string
  String read(Partition partition) {

    // Download partition_content
    byte[] downloadedPartition = readRaw(partition);
    // Map to human-readable string
    String partitionContent = new String(downloadedPartition);

    return partitionContent;
  }

  // Download partition_content
  private byte[] readRaw(Partition partition) {
    return DataEngine.get(DataClientSparkContextUtils.context().actorSystem())
        .readEngine(catalog)
        .getDataAsBytes(partition)
        .toCompletableFuture()
        .join();
  }
}
/*
 * Copyright (c) 2018-2023 HERE Europe B.V.
 *
 * Licensed under the Apache License, Version 2.0 (the "License");
 * you may not use this file except in compliance with the License.
 * You may obtain a copy of the License at
 *
 *     http://www.apache.org/licenses/LICENSE-2.0
 *
 * Unless required by applicable law or agreed to in writing, software
 * distributed under the License is distributed on an "AS IS" BASIS,
 * WITHOUT WARRANTIES OR CONDITIONS OF ANY KIND, either express or implied.
 * See the License for the specific language governing permissions and
 * limitations under the License.
 */

import akka.actor.{ActorSystem, CoordinatedShutdown}
import com.here.hrn.HRN
import com.here.platform.data.client.engine.javadsl.DataEngine
import com.here.platform.data.client.javadsl.{DataClient, Partition}
import com.here.platform.data.client.model.AdditionalFields
import com.here.platform.data.client.spark.DataClientSparkContextUtils
import com.here.platform.pipeline.PipelineContext
import org.apache.spark.{SparkConf, SparkContext}
import org.apache.spark.api.java.JavaSparkContext
import org.apache.spark.rdd.RDD
import org.slf4j.LoggerFactory

import java.io.Serializable
import java.util
import java.util.OptionalLong

object DevelopSparkApplicationScala {

  private val Logger = LoggerFactory.getLogger(classOf[DevelopSparkApplication])
  private val LayerId = "versioned-layer-custom-data"

  def main(args: Array[String]): Unit = {

    // Create Spark context
    val sparkContext = new SparkContext(new SparkConf().setAppName("SparkPipeline"))

    // Create pipeline context
    val pipelineContext = new PipelineContext

    // Get input catalog hrn from the pipeline-config.conf file
    val inputCatalog = pipelineContext.getConfig.getInputCatalogs.get("sparkCatalog")

    // Create Spark Actor System
    val sparkActorSystem = ActorSystem.create("DevelopSparkApplication")

    try {
      // Load the list of available partitions
      // from a catalog layer of a given version as an RDD
      val layerMetadata = queryMetadata(inputCatalog, sparkContext, sparkActorSystem)

      // Create object of the CatalogReader class
      // that allows to read data from the versioned layer
      val catalogReader = new CatalogReaderScala(inputCatalog)

      // Read data from the latest version of the catalog,
      // map to human-readable string and save
      // as JavaRDD dataset
      val partitionData = layerMetadata.map(catalogReader.read)

      // Log human-readable content
      // from the versioned layer to the console using log4j
      partitionData.foreach(partitionContent => {

        // Fail application if partition content includes `THROW_EXCEPTION` text
        // This condition is used to demonstrate how to create your own Grafana alert
        // and get email if your pipeline failed
        if (partitionContent.contains("THROW_EXCEPTION")) {
          throw new RuntimeException("About to throw an exception")
        }

        Logger.info(System.lineSeparator() + partitionContent)
      })
    } finally {

      // Shutdown Spark application
      CoordinatedShutdown
        .get(sparkActorSystem)
        .runAll(CoordinatedShutdown.unknownReason)
        .toCompletableFuture
        .join
    }

  }

  private def queryMetadata(catalog: HRN,
                            sparkContext: JavaSparkContext,
                            sparkActorSystem: ActorSystem): RDD[Partition] = {

    // Create queryApi for the source catalog
    val query = DataClient.get(sparkActorSystem).queryApi(catalog)

    // Get latest version of the source catalog
    val latestVersion =
      query.getLatestVersion(OptionalLong.of(0)).toCompletableFuture.join

    val partitions = new util.ArrayList[Partition]()

    // Get partitions metadata from the versioned layer
    // using the catalog latest version and add
    // their to the partitions list
    query
      .getPartitionsAsIterator(latestVersion.getAsLong, LayerId, AdditionalFields.AllFields)
      .toCompletableFuture
      .join
      .forEachRemaining(part => partitions.add(part))

    // Distribute a local Scala collection to form an resilient distributed dataset
    sparkContext.parallelize(partitions)
  }

}

// The CatalogReader class is Serializable as instance of this class is executed
// in a Spark lambda and all of the variables it refers to (its closure)
// are serialized to the workers
class CatalogReaderScala(val catalog: HRN) extends Serializable {

  // Download partition_content and map to human-readable string
  def read(partition: Partition) = {

    // Download partition_content
    val downloadedPartition = readRaw(partition)

    // Map to human-readable string
    val partitionContent = new String(downloadedPartition)

    partitionContent
  }

  // Download partition_content
  private def readRaw(partition: Partition) =
    DataEngine
      .get(DataClientSparkContextUtils.context.actorSystem)
      .readEngine(catalog)
      .getDataAsBytes(partition)
      .toCompletableFuture
      .join
}
コードが完了すると、リソースを準備してアプリケーションを実行できます。
アプリケーションを実行します
アプリケーションを実行するには、リソースを準備する必要があります。バージョン付レイヤー を使用してカタログを作成し、カスタムデータをレイヤーに配置します。
このチュートリアルでは、アプリケーションをローカルで実行します。したがって、ローカルカタログを作成するだけで十分です。 ローカルカタログを使用するため、このチュートリアルを実行するために外部ネットワークへの認証やアクセスは必要ありません。 これらの名前はローカルマシンに含まれているため、レルム内での命名の競合の影響を受けません。また、任意の名前を使用できます。
バージョン付レイヤー および汎用パーティション分割方式を使用してローカル入力カタログ を作成するに catalog-configuration.json は、 1 つの OLP CLI コマンドを使用してレイヤーを含むカタログを作成できるように、設定を含む設定 ファイルが必要です。 このファイルは、チュートリアルの最初にダウンロードしたアーカイブにあります。 チュートリアルフォルダーのルートから次の OLP CLI コマンドを実行して、ローカルカタログを作成します。
olp local catalog create batch-catalog batch-catalog --config catalog-configuration.json
catalog-configuration.json ファイルの構造は次のとおりです。
{
  "id": "develop-spark-input",
  "name": "Simulated road topology data archive (From tutorial) spark-connector-input",
  "summary": "Archive of simulated road topology data",
  "description": "Archive of simulated road topology data.",
  "layers": [
    {
      "id": "versioned-layer-custom-data",
      "name": "versioned-layer-custom-data",
      "summary": "Simulated data.",
      "description": "Simulated road topology data for versioned-layer-custom-data",
      "contentType": "application/octet-stream",
      "layerType": "versioned",
      "volume": {
        "volumeType": "durable"
      },
      "partitioning": {
        "scheme": "generic"
      }
    }
  ]
}
注
レルムで請求タグが必要な場合 は、layerセクションにbillingTags: ["YOUR_BILLING_TAG"]プロパティを追加して設定 ファイルを更新します。
「 Maven プロジェクトを設定PipelineContextpipeline-config.conf 」の章で説明したように、はファイルから入力カタログ に関する情報を取得するために使用されます。 pipeline-config.conf ファイルの構造は次のとおりです。
pipeline.config {

  output-catalog {hrn = "OUTPUT_CATALOG_HRN"}

  input-catalogs {

    sparkCatalog {hrn = "INPUT_CATALOG_HRN"}
  }
}
チュートリアルでは出力カタログ を使用しませ output-catalog んが、設定 ファイルのフィールドに入力するようにを作成する必要があります。作成しないと、無効なカタログ HERE リソースネーム についてエラーが発生します。
ローカル出力カタログ を作成するに output-catalog-configuration.json は、 1 つの OLP CLI コマンドのみを使用してレイヤーを含むカタログを作成できるように、構成が含まれている設定 ファイルが必要です。 このファイルは、チュートリアルの最初にダウンロードしたアーカイブにあります。 output-catalog-configuration.json ファイルの構造は次のとおりです。
{
  "id": "develop-spark-output",
  "name": "Simulated road topology data archive (From tutorial) spark-connector-input",
  "summary": "Archive of simulated road topology data",
  "description": "Archive of simulated road topology data.",
  "layers": [
    {
      "id": "versioned-layer-custom-data",
      "name": "versioned-layer-custom-data",
      "summary": "Simulated data.",
      "description": "Simulated road topology data for versioned-layer-custom-data",
      "contentType": "application/octet-stream",
      "layerType": "versioned",
      "volume": {
        "volumeType": "durable"
      },
      "partitioning": {
        "scheme": "generic"
      }
    }
  ]
}
チュートリアルフォルダーのルートから次の OLP CLI コマンドを実行して、ローカルカタログを作成します。
olp local catalog create output-batch-catalog output-batch-catalog --config output-catalog-configuration.json
次のステップでは、データを入力カタログ にプッシュします。 これを行うには、チュートリアルフォルダーのルートから次の OLP CLI コマンドを実行します。
olp local catalog layer partition put hrn:local:data:::batch-catalog versioned-layer-custom-data --partitions partition:data/partition_content
その結果、次のコンテンツがバージョン付レイヤー に公開されます。
###########################################
## First HERE Platform Spark Application ##
###########################################
入力および出力カタログが作成され、データがパブリッシュされたら INPUT_CATALOG_HRNOUTPUT_CATALOG_HRNpipeline-config.conf 、ファイルのおよびプレースホルダを、前のコマンド応答のカタログ HRNS に置き換える必要があります。
プレースホルダーを置き換えた後、次のコマンドを使用して、ダウンロードしたチュートリアルのルートからアプリケーションを実行します。
Java
Scala
mvn compile exec:java -D"exec.mainClass"="DevelopSparkApplication" \
  -Dhere.platform.data-client.endpoint-locator.discovery-service-env=local \
  -Dspark.master=local[*] \
  -Dpipeline-config.file=pipeline-config.conf
mvn compile exec:java -D"exec.mainClass"="DevelopSparkApplicationScala"
  -Dhere.platform.data-client.endpoint-locator.discovery-service-env=local \
  -Dspark.master=local[*] \
  -Dpipeline-config.file=pipeline-config.conf
このコマンドには、次のパラメータがあります。
-
exec.mainClass–アプリケーションを実行するためのエントリポイント。 -
here.platform.data-client.endpoint-locator.discovery-service-env=local–ローカルカタログのみを使用するようにデータ クライアント ライブラリ を設定します。 -
spark.master=local[*]–マシン上に論理コアがあるのと同じ数のワーカースレッドで実行されるローカル Spark を構成します。 -
pipeline-config.file=pipeline-config.conf- 入力および出力カタログに関する情報を含む設定 ファイル。
アプリケーションが正常に終了すると、コンソールでバージョン付レイヤー に追加されたデータを確認できます。
デバッガを接続します
この章では、IntelliJ アイデアの機能を使用して Spark アプリケーションをデバッグする方法について説明します。また、コンソールを使用してプログラムを実行する場合にデバッグを開始するプロセスにアタッチする方法についても学習します。
デバッガを設定するに MAVEN_OPTS は、変数を設定する必要があります。 この操作を行うには、実行中のアプリケーションを停止して、次のコマンドを実行します。
JDK 8.
JDK 9 以降
export MAVEN_OPTS=-agentlib:jdwp=transport=dt_socket,server=y,suspend=y,address=5005
export MAVEN_OPTS=-agentlib:jdwp=transport=dt_socket,server=y,suspend=y,address=*:5005
このオプションには、次のパラメータがあります。
-
address–デバッグに使用されるポート。 チュートリアルではポートを使用5005しますが、任意の空きポートを使用できます。 -
server=y–受信したデバッガ接続 ( サーバーとして動作 ) をプロセスがリッスンするように指定します。 -
suspend=y–デバッガが接続されるまでプロセスが待機するように指定します。
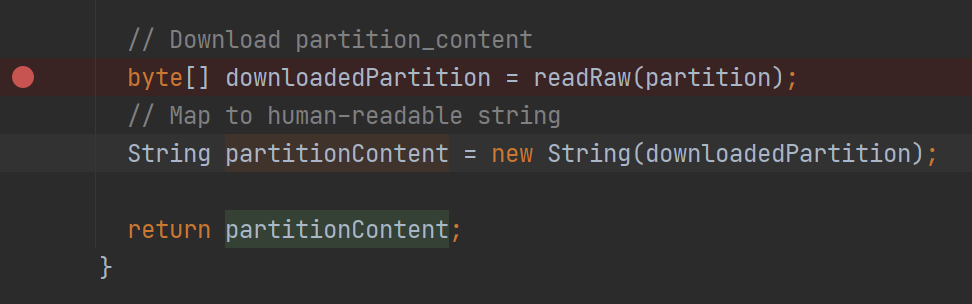
CatalogReader パーティション をダウンロードしてマップするクラスなど、実行中のアプリケーションにアタッチする前にブレークポイントを設定してみましょう。 この行から、ダウンロードしたパーティション についての役立つ情報を多数取得できます。
次のコマンドを使用して、ルートフォルダーからアプリケーションを実行できるようになりました。
Java
Scala
mvn compile exec:java -D"exec.mainClass"="DevelopSparkApplication" \
-Dhere.platform.data-client.endpoint-locator.discovery-service-env=local \
-Dspark.master=local[*] \
-Dpipeline-config.file=pipeline-config.conf
mvn compile exec:java -D"exec.mainClass"="DevelopSparkApplicationScala" \
-Dhere.platform.data-client.endpoint-locator.discovery-service-env=local \
-Dspark.master=local[*] \
-Dpipeline-config.file=pipeline-config.conf
Listening for transport dt_socket at address: 5005 ログに行が表示されていることを確認してください。
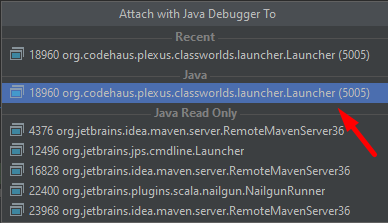
Run > を使用してプロセスにアタッチし Attach to Process 、指定 5050 したポートのプロセスを選択できるようになりました。
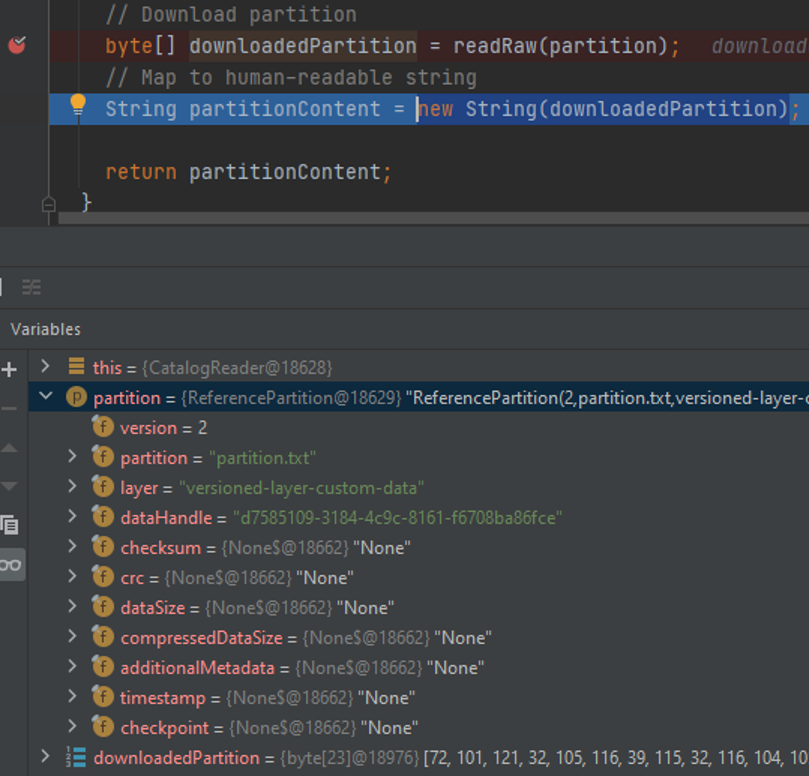
プロセスにアタッチすると、アプリケーションがパーティション のダウンロードを開始するとすぐに、デバッガーがブレークポイントで停止する必要があります。 これで、コードをステップ実行して、変数およびスタックトレースの内容を検査できます。
IntelliJ アイデアでは、デバッガの代わりに標準の Java デバッガを使用することもできます。
Maven 原型を使用したプロジェクト生成
Maven の原型を使用して、 Spark アプリケーションの Maven プロジェクトをブートストラップできます。 この場合、次のタスクが自動的に完了するため、プロジェクトの設定が迅速化されます。
- SDK BOM ファイルが含まれています。
- プラットフォーム のファット JAR を生成する Maven プロファイルを作成します。
HERE Data SDK では、次のアーキタイプを提供しています。
-
batch-direct1ton-java-archetypebatch-direct1ton-scala-archetypeおよび Java および Scala 用の Direct1toN コンパイル用です -
batch-directmton-java-archetypebatch-directmton-scala-archetypeJava および Scala 用の DirectMtoN コンパイル用です -
batch-reftree-java-archetypebatch-reftree-scala-archetypeJava および Scala の RefTree コンパイルの場合に使用します -
batch-mapgroup-java-archetypebatch-mapgroup-scala-archetypeJava および Scala の MapGroup コンパイル用です
バッチ パイプライン デザインパターンについて詳しく は、データ プロセッシング ライブラリ and Compilation Patterns を参照してください。
DirectMtoN コンパイラーを使用して Spark アプリケーションプロジェクトを作成するには、 Java プロジェクトで次のコマンドを使用します。
Linux
窓
mvn archetype:generate -DarchetypeGroupId=com.here.platform \
-DarchetypeArtifactId=batch-directmton-java-archetype \
-DarchetypeVersion=1.0.892 \
-DgroupId=com.here.platform.tutorial \
-DartifactId=develop-spark-application \
-Dversion=1.0-SNAPSHOT \
-Dpackage=com.here.platform.tutorial
mvn archetype:generate -DarchetypeGroupId=com.here.platform ^
-DarchetypeArtifactId=batch-directmton-java-archetype ^
-DarchetypeVersion=1.0.892 ^
-DgroupId=com.here.platform.tutorial ^
-DartifactId=develop-spark-application ^
-Dversion=1.0-SNAPSHOT ^
-Dpackage=com.here.platform.tutorialScala プロジェクトでは、次のコマンドを使用します。
Linux
窓
mvn archetype:generate -DarchetypeGroupId=com.here.platform \
-DarchetypeArtifactId=batch-directmton-scala-archetype \
-DarchetypeVersion=1.0.892 \
-DgroupId=com.here.platform.tutorial.scala \
-DartifactId=develop-spark-application \
-Dversion=1.0-SNAPSHOT \
-Dpackage=com.here.platform.tutorial.scala
mvn archetype:generate -DarchetypeGroupId=com.here.platform ^
-DarchetypeArtifactId=batch-directmton-scala-archetype ^
-DarchetypeVersion=1.0.892 ^
-DgroupId=com.here.platform.tutorial.scala ^
-DartifactId=develop-flink-application ^
-Dversion=1.0-SNAPSHOT ^
-Dpackage=com.here.platform.tutorial.scala別のコンパイラーを使用してプロジェクトを生成するに -DarchetypeArtifactId は、プロパティの値を目的の原型 ID に変更します。
ローカルで実行するプロジェクトをビルドします
プロジェクトをビルドするには、プロジェクトフォルダーで次のコマンドを実行します。
mvn install
プラットフォーム で実行するプロジェクトをビルドします
プラットフォーム でパイプライン を実行する fat jar には、まずをビルドする必要があります。 ビルドするには、次のコマンドを使用します。
mvn install -Pplatform
fat jarのビルドの詳細 について は、「プロジェクトに SDK を含める」を参照してください。
結論
このチュートリアルでは、 Spark アプリケーション開発の各段階について学習しました。 プラットフォームで Spark アプリケーションを実行する方法、および Splunk、Grafana、Spark UI 、プラットフォーム請求ページなどの監視ツールについて理解するには、プラットフォーム チュートリアルの「Spark アプリケーションを実行する」を参照してください。
詳細情報
このチュートリアルで扱うトピックの詳細については、次のソースを参照してください。
- Spark アプリケーションの開発方法の詳細については、『Apache Spark プログラミングガイド』を参照してください。
- OLP CLI を使用してローカルカタログを操作する方法の詳細については、『OLP CLI ガイド』を参照してください。
- プロセスにアタッチしてアプリケーションをデバッグする方法の詳細については 、「デバッグコード開発者ガイド 」を参照してください