- Products ProductsLocation Services
Solve complex location problems from geofencing to custom routing
PlatformCloud environments for location-centric solution development, data exchange and visualization
Tracking & PositioningFast and accurate tracking and positioning of people and devices, indoors or outdoors
APIs & SDKsEasy to use, scaleable and flexible tools to get going quickly
Developer EcosystemsAccess Location Services on your favorite developer platform ecosystem
- Documentation DocumentationOverview OverviewServices ServicesApplications ApplicationsDevelopment Enablers Development EnablersContent ContentHERE Studio HERE StudioHERE Workspace HERE WorkspaceHERE Marketplace HERE MarketplacePlatform Foundation and Policy Documents Platform Foundation and Policy Documents
- Pricing
- Resources ResourcesTutorials TutorialsExamples ExamplesBlog & Release Announcements Blog & Release AnnouncementsChangelog ChangelogDeveloper Newsletter Developer NewsletterKnowledge Base Knowledge BaseFeature List Feature ListSupport Plans Support PlansSystem Status System StatusLocation Services Coverage Information Location Services Coverage InformationSample Map Data for Students Sample Map Data for Students
- Help
Last Updated: July 02, 2020
Introduction
HERE Technologies provides a number of products that developers can use to include location services for their applications.
In this article we are going to build our own application (locally hosted) that incorporates the serverless functions HERE publishes on Azure.
Geocoding and Reverse Geocoding
When finding a location, an address or description is generally used. For instance, the Washington Monument’s address is Number 2, 15th St NW, Washington, DC.
Computers, however, prefer to store locations according to the latitude and longitude. This is a geographic coordinate (Geocode) system that enables every location on Earth to be specified using a set of numbers. For instance, the Geocode of the Washington Monument is 38.8908614, -77.0387656.
Getting Started with HERE
HERE provides a number of Azure Functions that wrap APIs to make it easier to integrate geocoding functionality into an Azure-based solution.
Before we start commissioning services on Azure, though, we need to first get our HERE API key.
To do this, log into or create an account on the HERE developer site. For this tutorial we are using the free tier from HERE, but for your application you may need to upgrade to a paid tier, depending on usage.
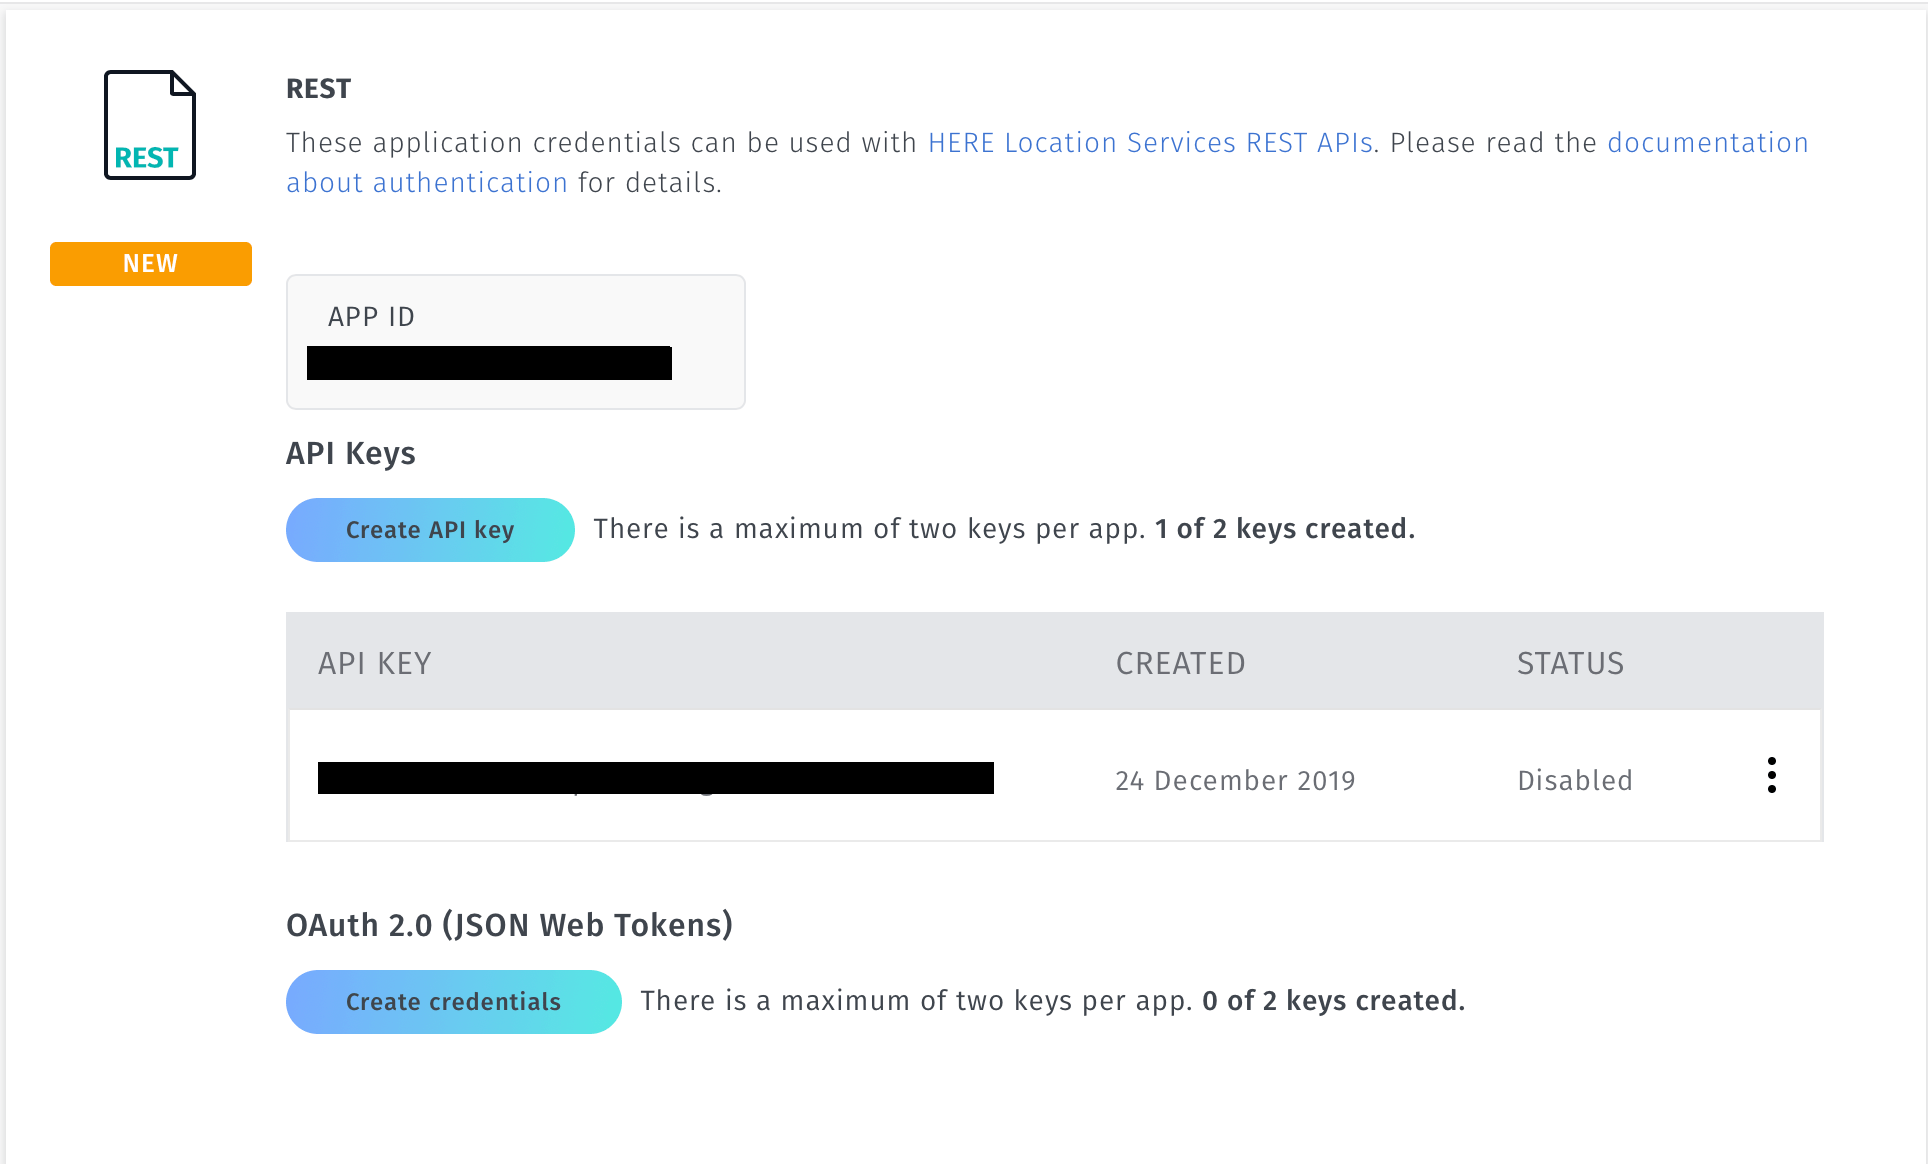
Create a new project and generate the App ID and App Code for a REST API. We will use this App ID and App Code when we create our Azure Functions.
Create the Azure Functions
Once we have our API key, go to the Azure portal and create a new service.
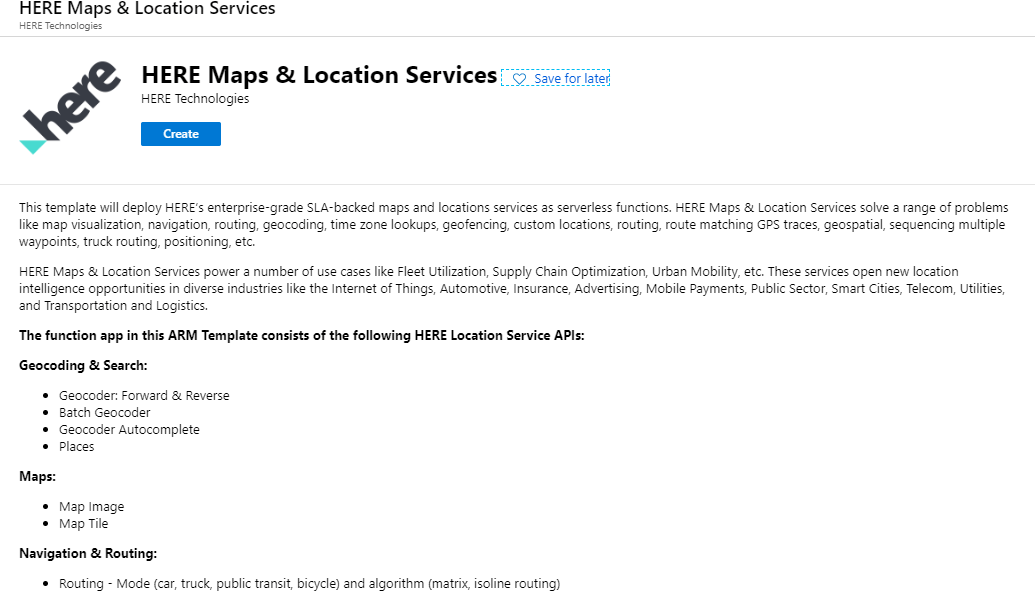
When we create a new service and search the Azure Marketplace, there is a HERE Maps & Location Services application. This application will create a number of Functions grouped under a single App Service. This template creates proxies for the HERE Geocoding, Search, Maps, Navigation, and Routing APIs.
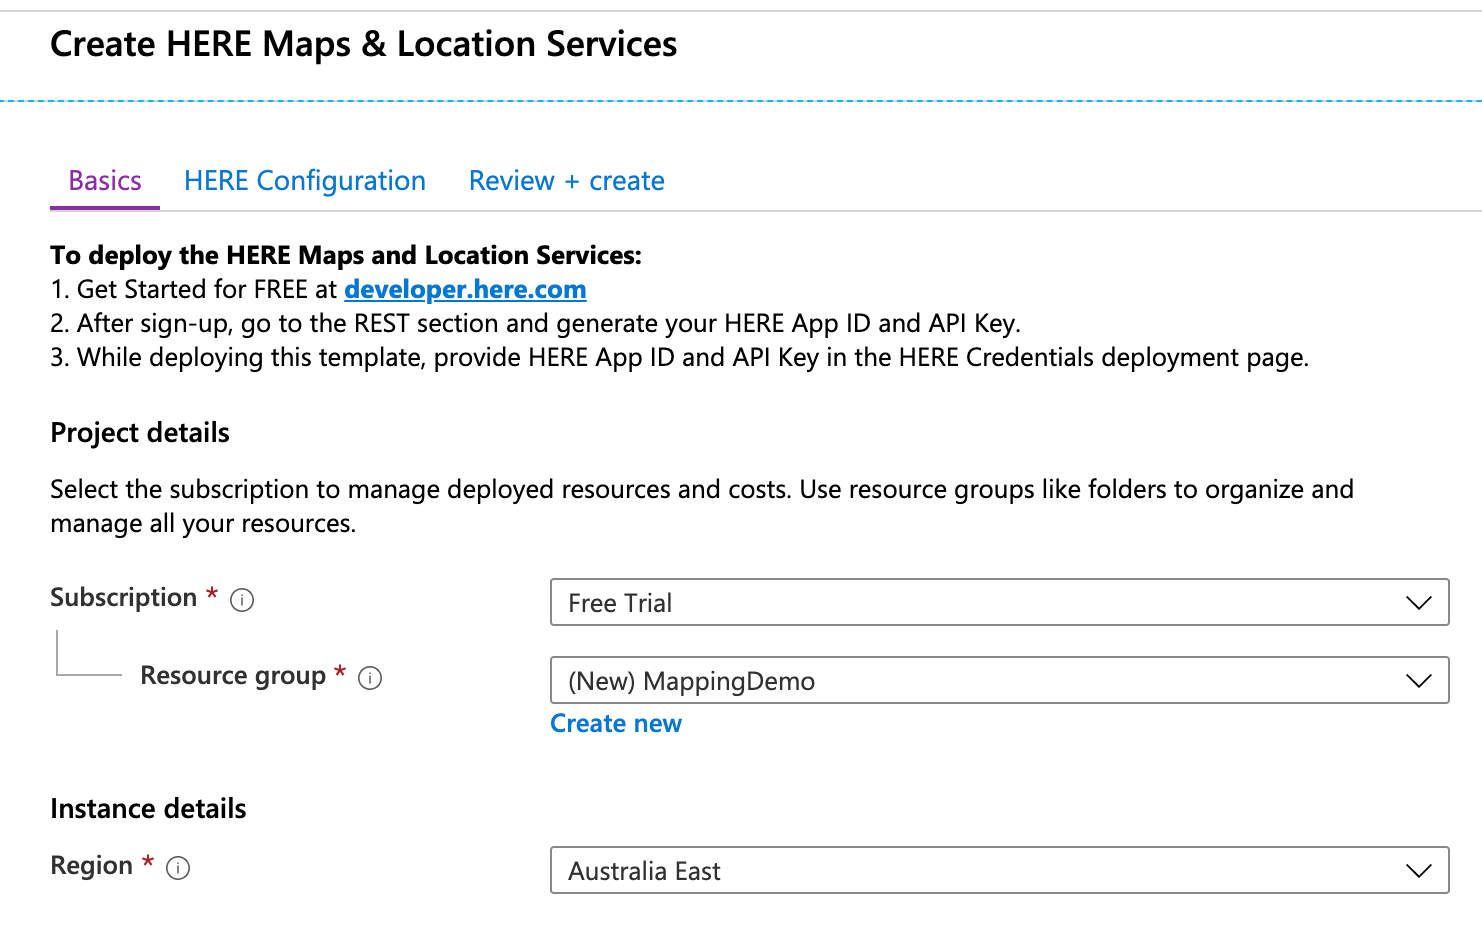
Create this service and add the basic details around the hosting of the Function, including specifying the resource group.
New Authentication
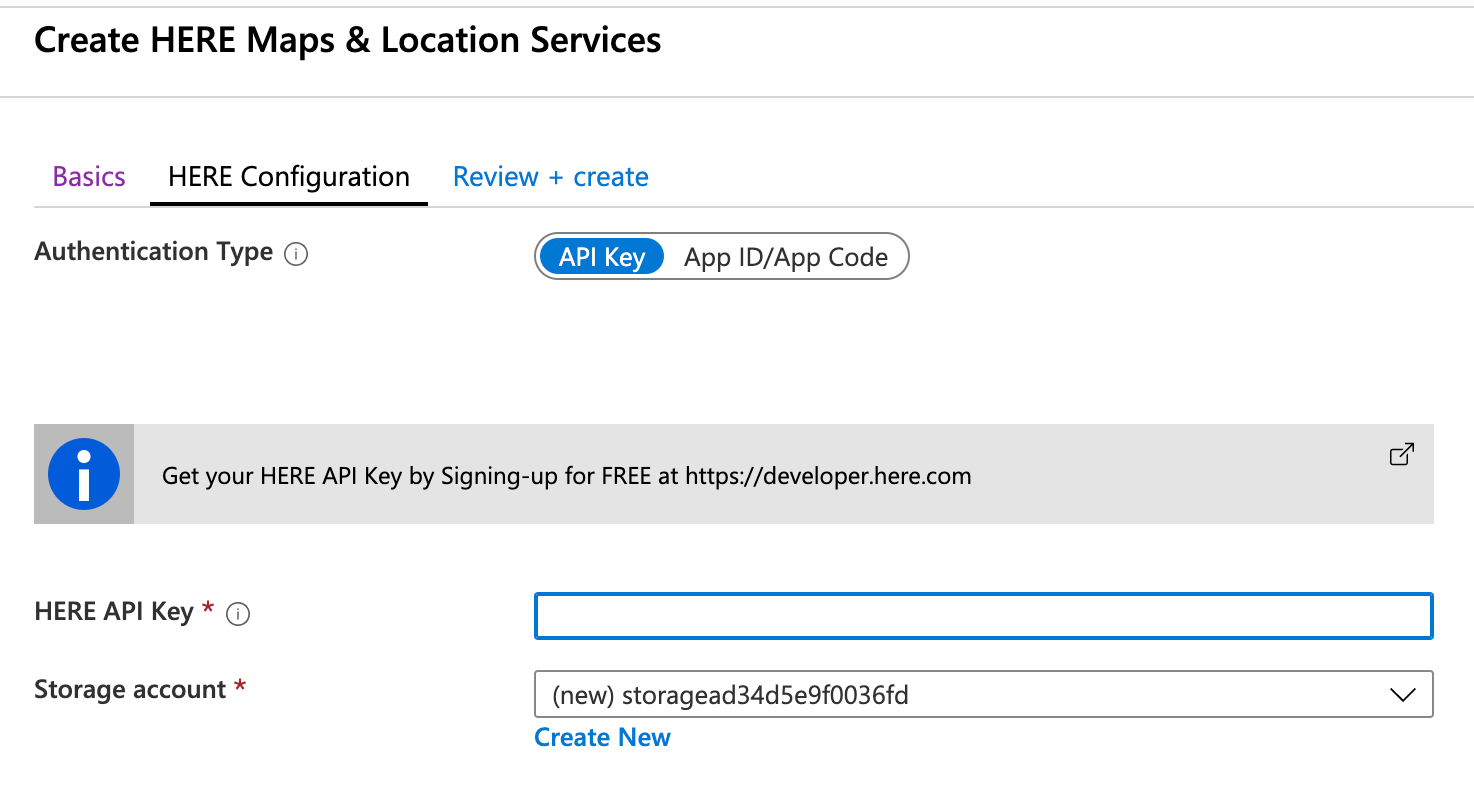
HERE recommends use of API Keys or OAuth 2.0 Tokens for improved security. Existing accounts using APP CODE credentials will continue to be supported. However, we encourage you to start transitioning to the new authentication types to take advantage of improved security.
API KEY
App Code and App ID
If you have App ID/App Code you can select the Authentication Type as shown below:
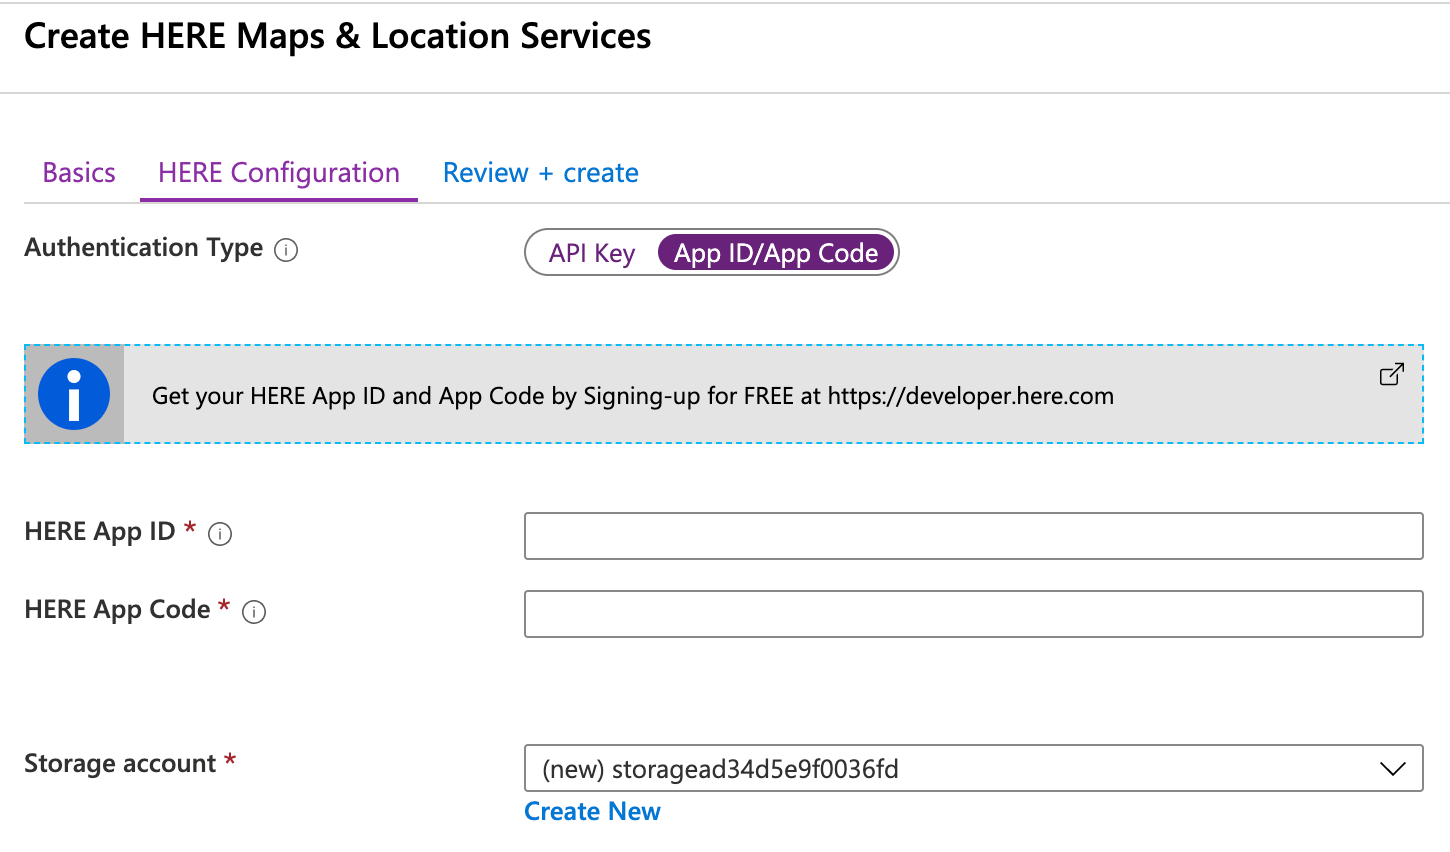
Add the App ID and App Code to the next page of the configuration, and click through to finish. This template will now take a few minutes to configure the required services in Azure.
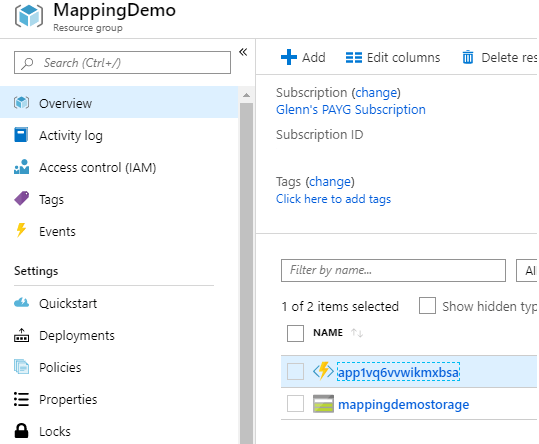
Once this has finished you will have an App Service like the one above in the resource group you specified.
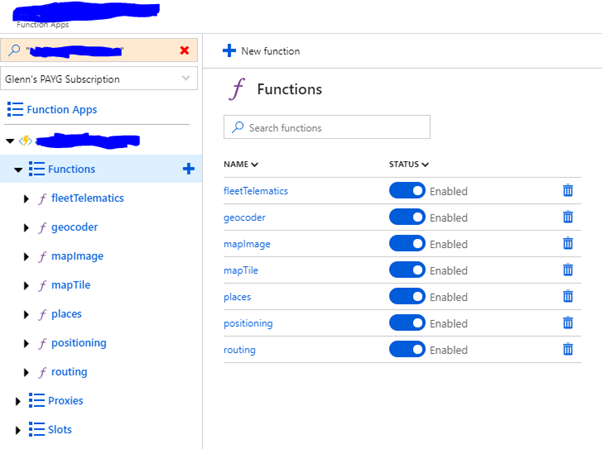 This App Service will have a randomised name and contains seven different wrapper Functions for the HERE APIs.
Creating a Simple App to Implement the Services
For this tutorial we are going to create a local application that uses the Azure hosted Functions to get the user’s current location to find coffee shops within a ten-minute walk. We are going to do this by using three different calls to the Functions service we have created:
The first call will take an address and convert it to a Geocode. Wewill use this function for adding new coffee shops.
The second call will take the user's current Geocode and convert it to an address. We will use this to store the user's address.
The third call will generate an isoline polygon that surrounds the user’s Geocode indicating a distance that can be walked in 10 minutes.
For the purposes of this tutorial, we will be developing this application locally and calling the remote Azure Functions. However, this application could be deployed to an Azure Web App Service fairly easily. We won’t go any further than this, but you could also combine other Function features to display a map with the walkable area and coffee shop within range of the user.
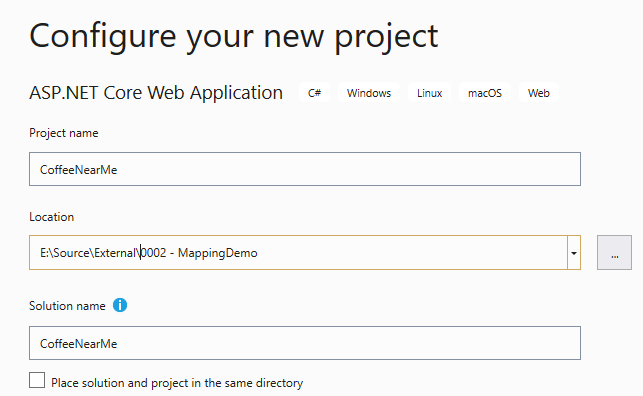
We are going to create a fairly basic ASP.NET Core Web application using the MVC template using the following common structure:
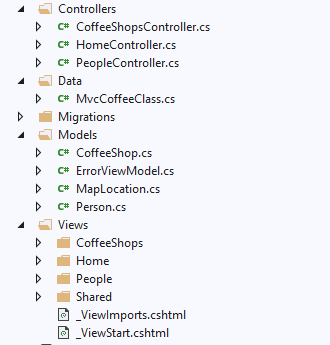
In this structure, let’s create three data models stored using Entity Framework Core (EFCore): a person, a coffee shop, and a map location.
namespace CoffeeNearMe.Models
{
    public class MapLocation
    {
        public string Id { get; set; }
        public double Latitude { get; set; }
        public double Longitude { get; set; }
        public string Label { get; set; }
        public string Country { get; set; }
        public string State { get; set; }
        public string City { get; set; }
        public string Street { get; set; }
        public string HouseNumber { get; set; }
        public string PostalCode { get; set; }
    }
}
The MapLocation model matches the relevant information retrieved from the HERE Geocoding API: latitude, longitude, and address information.
The next two models, CoffeeShop and Person, include a map location, a basic name, and the entered address. The Person model has an additional string variable to hold the IsoLine area returned from the API.
namespace CoffeeNearMe.Models
{
    public class Person
    {
        public int ID { get; set; }
        public string Name { get; set; }
        public string EnteredAddress { get; set; }
        public double Latitude { get; set; }
        public double Longitude { get; set; }
        public MapLocation Location { get; set; }
        public string IsoLineRoute { get; set; }
        public string LocationId { get; set; }
    }
}

namespace CoffeeNearMe.Models
{
    public class CoffeeShop
    {
        public int ID { get; set; }
        public string Name { get; set; }
        public string EnteredAddress { get; set; }
        public MapLocation Location { get; set; }
        public string LocationId { get; set; }
    }
}
Once you’ve set up these models, create a standard EFCore implementation (https://docs.microsoft.com/en-us/ef/core/miscellaneous/configuring-dbcontext) to save the Person and CoffeeShop models to a database. First, create the DBContext implementation:
using CoffeeNearMe.Models;
using Microsoft.EntityFrameworkCore;

namespace CoffeeNearMe.Data
{
    public class MvcCoffeeClass : DbContext
    {
        public MvcCoffeeClass(DbContextOptions<MvcCoffeeClass> options)
            : base(options)
        {
        }

        public DbSet<Person> Person { get; set; }
        public DbSet<CoffeeShop> CoffeeShop { get; set; }
        public DbSet<MapLocation> MapLocation { get; set; }
    }
}
Next, add the database class to the ConfigureServices method to inject the class as a service:
public void ConfigureServices(IServiceCollection services)
{
    services.Configure<CookiePolicyOptions>(options =>
    {
        options.CheckConsentNeeded = context => true;
        options.MinimumSameSitePolicy = SameSiteMode.None;
    });

    services.AddDbContext<MvcCoffeeClass>(options =>
        options.UseSqlServer(Configuration.GetConnectionString("MvcCoffeeClass")));

    services.AddMvc().SetCompatibilityVersion(CompatibilityVersion.Version_2_2);
}
Also add the following to your appsettings.json file to configure a local database:
"ConnectionStrings": {

    "MvcCoffeeClass": "Server=(localdb)\\MSSQLLocalDb;
                       Database=CoffeeDemo;
                       Trusted_Connection=True;
                       MultipleActiveResultSets=true"
  },

Then, open the package manager console and run Add-Migration InitialCreate and Update-Database to create the database and schema. This will initialize our local database with the correct schema.
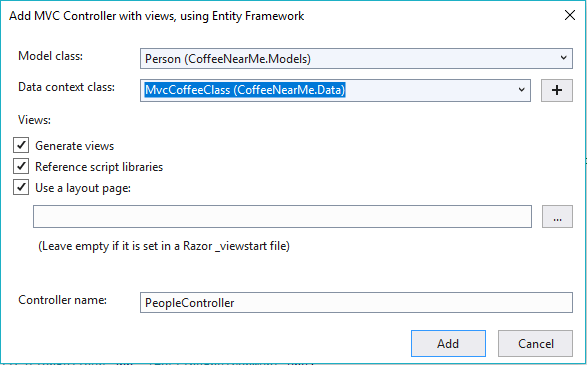
Finally, right-click on the controllers folder and scaffold out the Person model class and the CoffeeShop model class using the Add new controller option. This will create a default controller and view for these models.
Most of this code is fairly standard Entity Framework boilerplate. If you have an existing application, you probably already have this implemented and just need to add the relevant components to your existing data model.
Setting Up the API
Now that we have the basic application, let’s set up the HERE API functions.
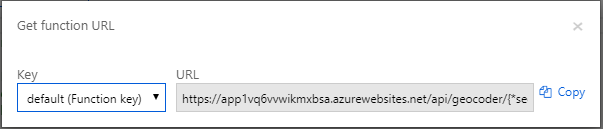
Before we jump into the code, go to the Azure portal, open the Function app and select the Geocode and Routing function. In the top left corner, click on the text </> Get function URL and retrieve the function URLs for each:

We’ll make the functions available by configuring them in our appsettings.json:
"HEREServices": {
    "GeocodeUrl": "https://<APPSERVICE>.azurewebsites.net/api/geocoder/6.2/geocode.json?code=<CODE>",
    "ReverseGeocodeUrl": "https://<APPSERVICE>.azurewebsites.net/api/geocoder/6.2/reversegeocode.json?code=<CODE>",
    "RoutingIsoLineUrl": "https://<APPSERVICE>.azurewebsites.net/api/routing/7.2/calculateisoline.json?code=<CODE>"
  }
Notice I’ve replaced the {segments*} component in the Azure Function with some specific routes to geocode, reverse geocode, and isoline services based on the documented endpoints (https://here-tech.skawa.fun/documentation). To allow the configuration to be read by the controllers, be sure to add the following line to your ConfigureServices method in the Startup class:
services.AddSingleton<IConfiguration>(Configuration);
And modify both controllers to add the following variable and initialization within the constructor (CoffeeShops example):
public CoffeeShopsController(IConfiguration configuration, MvcCoffeeClass context)
{
    geocodeUrl = configuration.GetSection("HEREServices")
        .GetSection("GeocodeUrl").Value;
    reverseGeocodeUrl = configuration.GetSection("HEREServices")
        .GetSection("ReverseGeocodeUrl").Value;
    isoLineRendering = configuration.GetSection("HEREServices")
        .GetSection("RoutingIsoLineUrl").Value;

    httpClient = new HttpClient();

    _context = context;
}
Retrieving a Geocode Using a Location
Now let’s modify the coffeeshops controller and retrieve our first geocode. Go to the Create method and modify the code to the following:
public async Task<IActionResult> Create([Bind("ID,Name,EnteredAddress")] CoffeeShop coffeeShop)
{
    if (ModelState.IsValid)
    {
        await SaveCoffeeShop(coffeeShop);
        return RedirectToAction(nameof(Index));
    }
    return View(coffeeShop);
}
We’re going to push all our functionality to the FindCoffeeShop method. Let’s implement that now and step through the parts:
private async Task SaveCoffeeShop(CoffeeShop coffeeShop)
{
    var requestString = geocodeUrl + "&searchtext=" + coffeeShop.EnteredAddress;

    using (var request = new HttpRequestMessage(HttpMethod.Get, requestString))
    {
        using (var response = await httpClient
            .SendAsync(request).ConfigureAwait(false))
        {
            string rawData = await response.Content.ReadAsStringAsync();

            dynamic rawLoc = JsonConvert.DeserializeObject(rawData);
            dynamic locResult = rawLoc.Response.View[0].Result[0].Location;

            var newLocation = await _context.MapLocation
                .FindAsync((string)locResult.LocationId);

            if (newLocation == null)
            {
                newLocation = new MapLocation();
                newLocation.Id = locResult.LocationId;

                newLocation.Latitude = locResult.DisplayPosition.Latitude;
                newLocation.Longitude = locResult.DisplayPosition.Longitude;

                newLocation.Label = locResult.Address.Label;
                newLocation.HouseNumber = locResult.Address.HouseNumber;
                newLocation.Street = locResult.Address.Street;
                newLocation.City = locResult.Address.City;
                newLocation.State = locResult.Address.State;
                newLocation.PostalCode = locResult.Address.PostalCode;
                newLocation.Country = locResult.Address.Country;
            }

            coffeeShop.Location = newLocation;
            coffeeShop.EnteredAddress = coffeeShop.Location.Label;
        }
    }

    _context.Add(coffeeShop);
    await _context.SaveChangesAsync();
}
The first line populating the requestString formats the request URL. For this example, we’re using a simple blanket search, but the API documentation (https://here-tech.skawa.fun/documentation/geocoder/topics/resource-geocode.html) explains how you can also restrict the search by address elements such as postcode, city, country, and so forth.
We then construct the HTTP request, read the response, and use JSON.NET to convert the JSON-formatted response. Because we’re using search to find the geolocation of an address, we get a list of possible locations that meet the search requirements. These are stored as an array of locations in the object path Response.View[0].Result.
For this example, we’ll assume that the first result will always return the correct address and no errors occur. We parse this location history in the Location object that indicates a coffee shop and save it to the database.
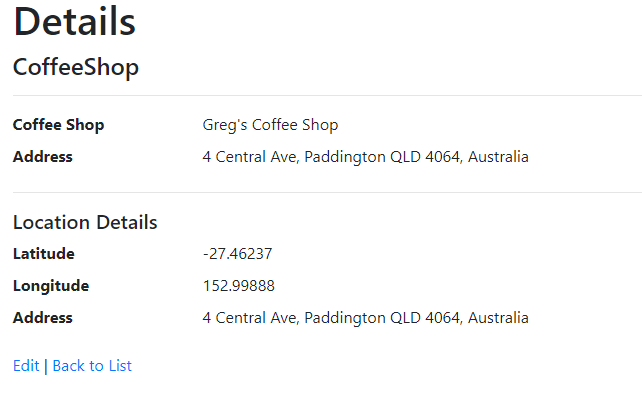
Once we update the Create and Details pages, when we enter a coffee shop name and address, the API returns the latitude, longitude, and full location address. We also update the entered address with the found address to keep things consistent.
Retrieve a Location using a Geocode
Next we’ll modify the person view and controller to take a geocode (the user’s current position) and turn that into a location. Let’s start by modifying the person controller to move all the functionality into a FindCoffeeShop method:
public async Task<IActionResult> Create([Bind("ID,Name,Latitude,Longitude")] Person person)
{
    if (ModelState.IsValid)
    {
        await FindCoffeeShop(person);
        return RedirectToAction(nameof(Index));
    }
    return View(person);
}

This method is going to work in a very similar way to the SaveCoffeeShop method. Let’s implement it now:

private async Task FindCoffeeShop(Person person)
{
    var requestString = reverseGeocodeUrl + "&mode=retrieveAddresses&prox="
        + person.Latitude + "," + person.Longitude + ",0";

    using (var request = new HttpRequestMessage(HttpMethod.Get, requestString))
    {
        using (var response = await httpClient
            .SendAsync(request).ConfigureAwait(false))
        {
            string rawData = await response.Content.ReadAsStringAsync();

            dynamic rawLoc = JsonConvert.DeserializeObject(rawData);
            dynamic locResult = rawLoc.Response.View[0].Result[0].Location;

            var newLocation = await _context.MapLocation
                .FindAsync((string)locResult.LocationId);

            if(newLocation == null)
            {
                newLocation = new MapLocation();
                newLocation.Id = locResult.LocationId;

                newLocation.Latitude = locResult.DisplayPosition.Latitude;
                newLocation.Longitude = locResult.DisplayPosition.Longitude;

                newLocation.Label = locResult.Address.Label;
                newLocation.HouseNumber = locResult.Address.HouseNumber;
                newLocation.Street = locResult.Address.Street;
                newLocation.City = locResult.Address.City;
                newLocation.State = locResult.Address.State;
                newLocation.PostalCode = locResult.Address.PostalCode;
                newLocation.Country = locResult.Address.Country;
            }

            person.Location = newLocation;
        }
    }

    _context.Add(person);
    await _context.SaveChangesAsync();
}
This time we’re taking the latitude and longitude and using the reverse geocode URL to retrieve an address and populate the MapLocation structure. The reverse geocode API documentation (https://here-tech.skawa.fun/documentation/geocoder/topics/resource-reverse-geocode.html) describes a number of other items you can return via the mode parameter, such as landmarks and areas.
To get the location, rather than providing input boxes for the user to type in, let’s use some JavaScript on the Create page to do it automatically:
<script>
    function getLocation() {
        if (navigator.geolocation) {
            navigator.geolocation.getCurrentPosition(setPosition);
        }
        else {
            document.getElementById("Latitude").value = '0';
            document.getElementById("Longitude").value = '0';
        }
    }

    function setPosition(position){
        console.log(position.coords.latitude);
        document.getElementById("Latitude").value = String(position.coords.latitude);
        document.getElementById("Longitude").value = String(position.coords.longitude);
    }

    getLocation();
</script>
This script will populate the form with the current location for the user. When the user enters their name and clicks the button, the geocode is sent to the API and an address is returned.
Adding a Walkable Area Using IsoLine Routing
Let’s also populate the IsoLine area that defines how far someone could walk in ten minutes. Add the following before _context.Add(person).
requestString = isoLineRendering +
    "&mode=shortest;pedestrian&range=600&rangetype=time&start=geo!" +
    person.Latitude + "," + person.Longitude;

using (var request = new HttpRequestMessage(HttpMethod.Get, requestString))
{
    using (var response = await httpClient
        .SendAsync(request).ConfigureAwait(false))
    {
        string rawData = await response.Content.ReadAsStringAsync();
        dynamic rawLoc = JsonConvert.DeserializeObject(rawData);
        dynamic isoLine = rawLoc.response.isoline[0].component[0].shape;

        person.IsoLineRoute = JsonConvert.SerializeObject(isoLine);
    }
}
The IsoLine routing API works a little bit differently from the other APIs. We’re using the pedestrian mode and time range (600 seconds or 10 minutes), but the documentation (https://here-tech.skawa.fun/documentation/routing/topics/resource-calculate-isoline.html) also includes other interesting combinations such as cars, public transport, distance, and so forth.
This API also returns an array of points called shape, which is used to draw the IsoLine in the response.isoline[].component[] object path.

Now, when we run the Create Person function, we get the position, address, and an array of points that can draw the shape around the position of the user that encompasses a ten-minute walking distance.
Next Steps
As you can see, the Azure Functions that HERE provides with their services are fairly easy to integrate with and consume. We could expand on this example and render a map with the IsoLine area and coffee shops flagged on it, similar to the process Michael Palermo discusses on his blog post at https://here-tech.skawa.fun/blog/using-map-image-api-in-azure.
Also, while we implemented these APIs using a .NET Core web application, we could also implement them as part of an Azure Service Bus messaging pipeline or process events through an Azure Event Grid.
The breadth of HERE’s services (https://here-tech.skawa.fun/documentation) open up a number of other capabilities including weather, traffic, geofencing, and more.