- Products ProductsLocation Services
Solve complex location problems from geofencing to custom routing
PlatformCloud environments for location-centric solution development, data exchange and visualization
Tracking & PositioningFast and accurate tracking and positioning of people and devices, indoors or outdoors
APIs & SDKsEasy to use, scaleable and flexible tools to get going quickly
Developer EcosystemsAccess Location Services on your favorite developer platform ecosystem
- Documentation DocumentationOverview OverviewServices ServicesApplications ApplicationsDevelopment Enablers Development EnablersContent ContentHERE Studio HERE StudioHERE Workspace HERE WorkspaceHERE Marketplace HERE MarketplacePlatform Foundation and Policy Documents Platform Foundation and Policy Documents
- Pricing
- Resources ResourcesTutorials TutorialsExamples ExamplesBlog & Release Announcements Blog & Release AnnouncementsChangelog ChangelogDeveloper Newsletter Developer NewsletterKnowledge Base Knowledge BaseFeature List Feature ListSupport Plans Support PlansSystem Status System StatusLocation Services Coverage Information Location Services Coverage InformationSample Map Data for Students Sample Map Data for Students
- Help
Last Updated: July 02, 2020
Introduction
You may not have implemented geocoding in your applications yet, but you’re probably using it in your daily life. Geocoding is everywhere.
In this article, we’ll create a project on the MuleSoft Anypoint Platform that uses HERE Location Services (HLS) to geocode a location and then reverse-geocode that location using coordinates.
We’ll first create an Anypoint project with a different flow for each of the desired functionalities: autocomplete, geocode, and reverse geocode. Then we’ll see how to define an HTTP trigger in our API project, invoking a HERE service, and finally transforming the geocoding data to be consumed by a Node.js app.
Geocoding

Geocoding is the process of transforming a postal address into latitude and longitude coordinates. Every place in the world can be identified by geographic coordinates. You can use these coordinates to position markers on a map, for example.
When you’re hungry after work and in the mood for a burger, geocoding can help you discover the location of available restaurants near your office. Your mobile app will access a web mapping service to display symbols showing different places to eat.
Perhaps even more important, geocoding can be used for emergency telephone services. When you call for the police or an ambulance, you communicate the location and other details to the service operator. With geocoding, these systems can get the fire or police department or the ambulance to your location very quickly.
Reverse Geocoding
Reverse geocoding is the opposite, returning the description of a location — usually a list of closest postal addresses or points of interest — from the geographical coordinates of a location.
You might notice that many websites ask if you want to share your location with them. The website must figure out what your actual position is. Since all modern browsers support the geolocation API, they can run JavaScript code to access your current location as latitude and longitude coordinates. The website then uses reverse geocoding to look up useful information such as a town, postal code, or a nearby store location with its address.
Creating an API with the Anypoint Platform
If all you want is to add geocoding capabilities to your application, you can directly consume HERE Location Services (HLS), which provides a high-precision mapping of geo-coordinates and addresses.
However, if your solution involves developing different apps across different devices and requires connecting to many services provided by different vendors, you may be in trouble.
Connecting systems is one of the hardest obstacles to overcome in IT. The old way of connecting applications by wiring point-to-point code is not sustainable—it’s expensive and the changes in APIs are too frequent and too numerous. These problems are only getting worse as the number of applications and devices increases.
Luckily, the MuleSoft Anypoint Platform can help. It provides connectivity between those systems and external applications and devices, connecting many different technologies in a standardized way.
Anypoint allows you to reuse prebuilt APIs, connectors, templates, examples, and other integration assets. Let’s see how the MuleSoft Anypoint Platform can help you integrate HERE geocoding services with other components, in a flexible way.
Setting Up the MuleSoft API with HERE Geocoding Assets
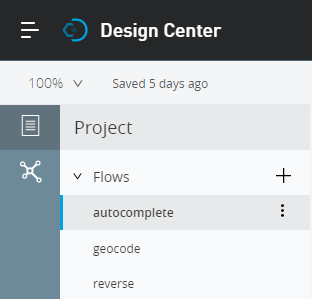
We’re going to create a new MuleSoft project with three different and independent flows: autocomplete, geocode and reverse-geocode.
Here’s the Anypoint Design Center showing the three flows in the project:
Let’s focus first on the geocode flow, represented here by a pipeline of connected components:
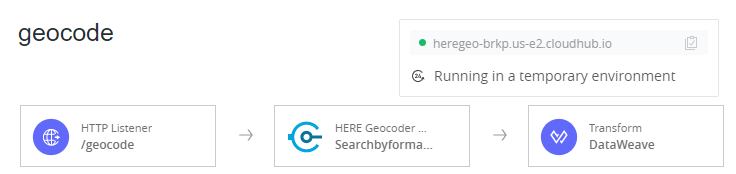
In the application demo, we want to consume the MuleSoft API from an HTTP client within a Node.js app, so the first step is to set up an HTTP Listener that will be triggered when the Node.js code makes an AJAX GET request to the /geocode endpoint, passing the address text to be converted into latitude/longitude coordinates:

In this case, the API is hosted in CloudHub, the platform as a service (PaaS) component of the Anypoint Platform.
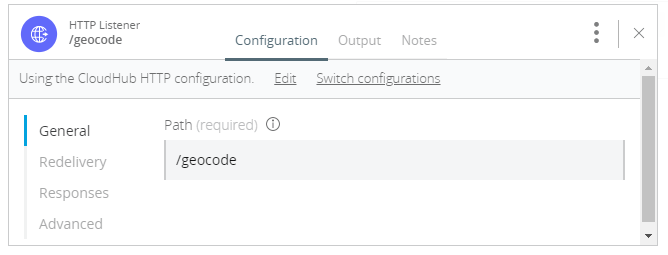
Notice that we’re creating a basic configuration for the HTTP Listener, so the only parameter needed here is the Path, which is set to /geocode. As a result, our Node.js app will access the geocode flow through the URL:
http://[MY-API-NAME].cloudhub.io/geocode
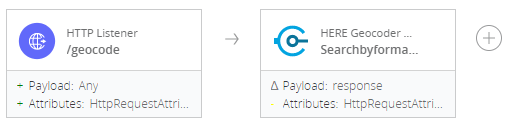
The next step is to take the payload returned by the HTTP Listener and pass it to the geocoding component.
Mulesoft HERE Geocoding Assets
Click the plus sign on the right side of the HTTP Listener to connect it to a new component in the flow. Filter the list to see only the HERE geocoding assets:
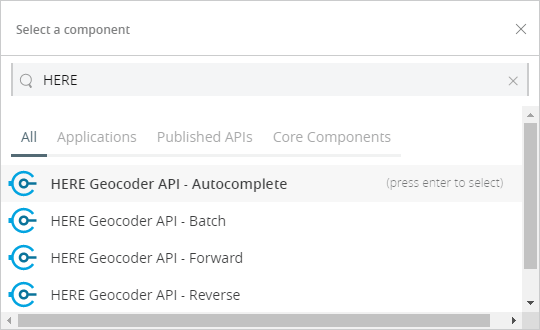
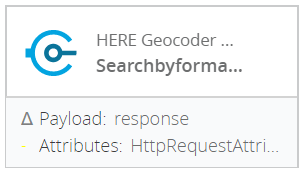
Although our example project uses more than one HERE asset, let’s focus on the HERE Geocoder API - Forward method:
We now connect this asset at the end of the HTTP Listener, within the geocode flow.
The HERE Geocoder API - Forward asset configuration is a bit more complicated than the one for the HTTP Listener. But, even so, we’re just providing the minimal set of parameters so this service can run our request. Notice in the images below how we filled in the configuration parameters:
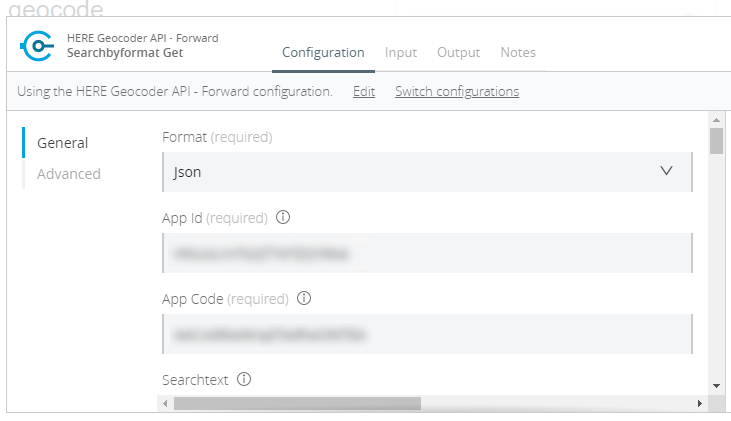
Format tells Anypoint to return the result in JSON format.
App Id and App Code are my secret HERE app identification codes. You can get yours after you register as a new developer on the HERE Developer website.
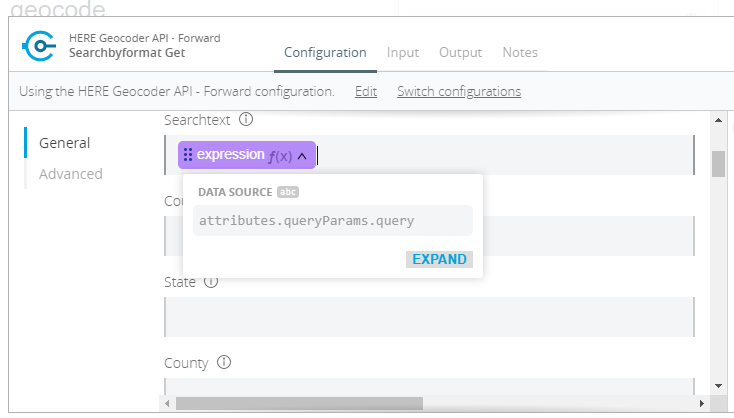
Searchtext was set to attributes.queryParams.query. This is an expression that takes the value within the query string in the HTTP request made by the client.
The API pipeline first passes the HTTP Listener payload data to the HERE Geocoder asset. The HERE component makes a request to HERE Location Services, which returns JSON code like the following:
{
   "Response":{
      "MetaInfo":{
         "Timestamp":"2019-09-29T03:54:21.553+0000"
      },
      "View":[
         {
            "ViewId":0,
            "Result":[
               {
                  "Relevance":0.89,
                  "MatchLevel":"district",
                  "MatchQuality":...,
                  "Location":{
                     "LocationId":"NT_TzRviOATvikhbCon4tN6KC",
                     "LocationType":"area",
                     "DisplayPosition":{
                        "Latitude":50.0725,
                        "Longitude":-5.16657
                     },
                     "Address":{
                        "Label":"St Martin, Helston,
                        England, United Kingdom",
                        ...
                     }
               ...
If the HERE Geocoder asset is the last component in your flow, this JSON code is what your client app will receive once your MuleSoft API call returns.
Transforming Geocoding Results with DataWeave
As data travels through your MuleSoft API, it can be grouped, ordered, filtered, and transformed in other ways to fit your needs. Let’s see how this is done.
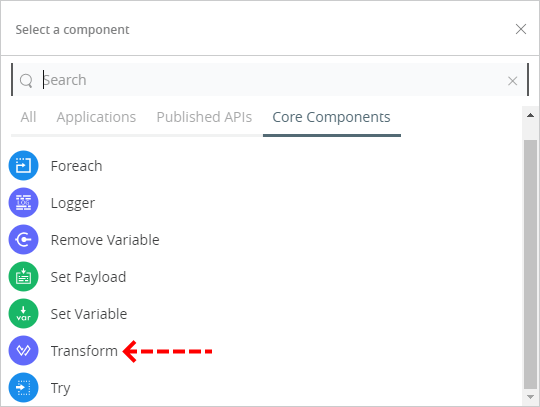
Click the plus sign at the right side of the HERE Geocoder API - Forward asset to connect it to a new component in the flow. Open the Core Components tab and select Transform:
Then select DataWeave, a powerful template engine and language that allows you to access and transform data to and from many formats, including XML, CSV, JSON, and Maps.
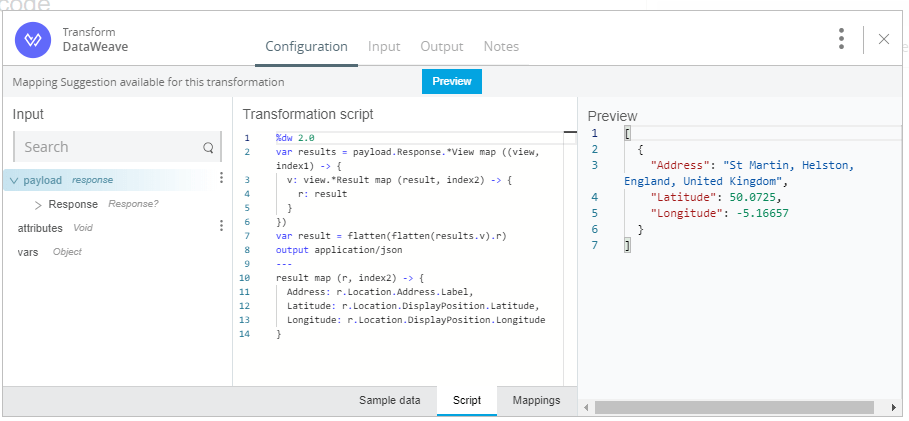
DataWeave scripts process data in a Mule event. You can create such scripts using the Mule Expression Language (MEL) to access and transform data in the message payload:
%dw 2.0
var results = payload.Response.*View map ((view, index1) -> {
 v: view.*Result map (result, index2) -> {
   r: result
 }
})
var result = flatten(flatten(results.v).r)
output application/json
---
result map (r, index2) -> {
 Address: r.Location.Address.Label,
 Latitude: r.Location.DisplayPosition.Latitude,
 Longitude: r.Location.DisplayPosition.Longitude
}
The DataWeave script above gets the structured JSON generated by the HERE asset and outputs that data to a new data format. From that point on, the pipeline passes back the simplified data to the API client.

Here’s the resulting JSON code when you consume the API directly via a browser HTTP Get request:

The API Client Node.js Application
We’ve already implemented our API, so let’s see how a new application created with Node.js can consume the test service endpoints published on the MuleSoft cloud.
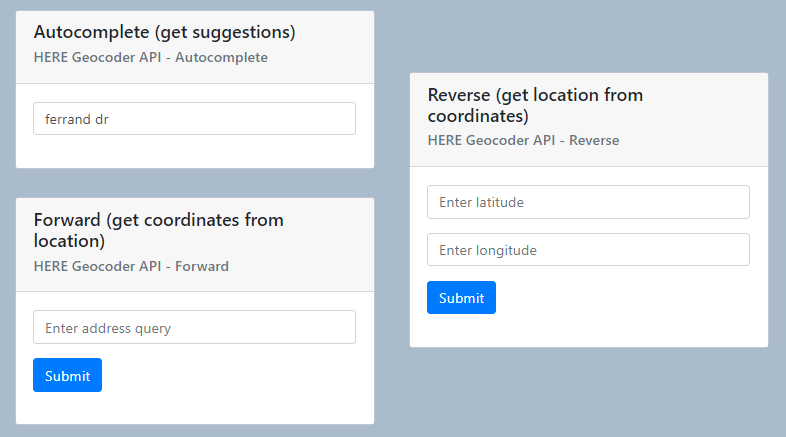
What you’ll see is a Node.js app that uses HERE Location Services assets through the MuleSoft Anypoint Platform API. We’ll start showing the autocomplete feature, then use HERE’s geocoding and reverse geocoding capabilities.
Please download the code from this GitHub repository: https://github.com/marcelooliveira/HERE-Mulesoft
With your command line utility, run the following command to install all app dependencies:
npm install
Then run the app locally by executing:
node app.jsNavigate to http://localhost:3000 to open the app in a browser page:
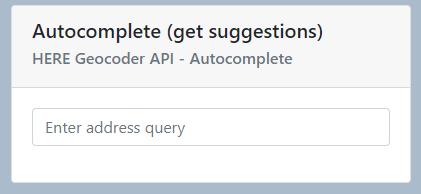
Let’s say you’re developing an address form. Here, you can type in some location text so the app can request suggestions to autocomplete the address for you.

How does that work?
This JavaScript code is triggered when you stop typing for 500 milliseconds:
const AUTOCOMPLETION_URL = '/autocomplete';
const TIMEOUT = 500;
// lines excerpted for clarity. . .
$.ajax({
    type: 'GET',
    url: AUTOCOMPLETION_URL + '?query=' + encodeURIComponent(searchtext),
    dataType: "json",
    success: function(data){
        $('.autocompleteResults').empty();

        $.each(data, function (index, suggestion) {
            let suggestionLink = $('<a>');
            $(suggestionLink).html(suggestion);
            $(suggestionLink).attr('href', 'javascript:void(0)');
            $(suggestionLink).click(function() {
                $("#autocompleteQuery").val(suggestion);
                $('.autocompleteResults').empty();
            });

            $('.autocompleteResults')
                .append($('<li>').append(suggestionLink));
        });
    },
    error:function(a, b,c) {
        console.log(b);
    }
})
The AJAX call above will execute the server-side code of the Node.js app, which in turn will invoke the http://heregeo-aqwr.us-e2.cloudhub.io/geocode API endpoint:
var express = require('express')
  , cors = require('cors')
  , app = express();

var http = require('http');

const FORWARD_URL = 'http://heregeo-aqwr.us-e2.cloudhub.io/geocode';

app.use(express.static('public'));

var corsOptions = {
  origin: 'http://localhost:3000',
  optionsSuccessStatus: 200
}

app.use(cors(corsOptions))

app.options('*', cors(corsOptions)) // include before other routes

app.get('/autocomplete', function (req, res) {
    http.get(AUTOCOMPLETION_URL + '?query=' + encodeURIComponent(req.query.query), (resp) => {
      let data = '';

      // A chunk of data has been received.
      resp.on('data', (chunk) => {
        data += chunk;
      });

      // The whole response has been received.
      resp.on('end', () => {
        var obj = JSON.parse(data);
        res.json(obj);
      });

    }).on("error", (err) => {
      console.log("Error: " + err.message);
    });
});

app.listen(3000, function () {
  console.log('Example app listening on port 3000!');
});
You can download the code and try it out yourself, but don’t forget to replace the Anypoint URL with your own project URL.
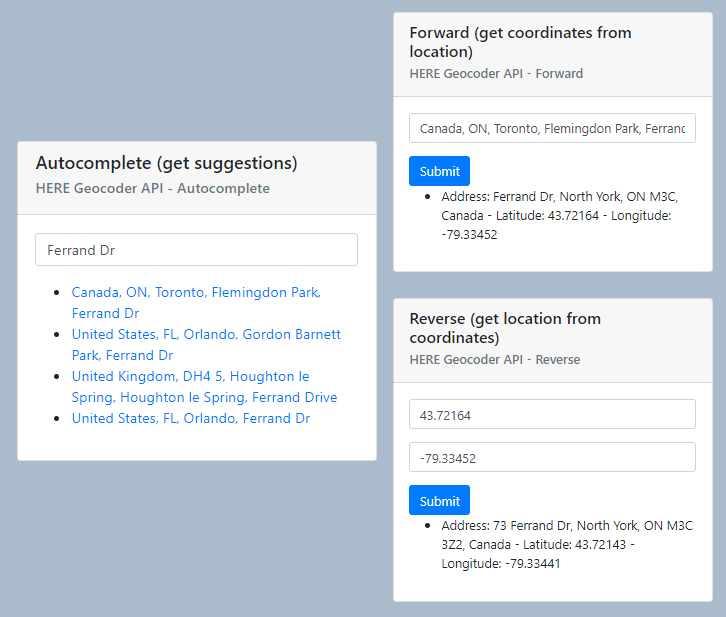
Once your Node.js application is running, you can see how it interacts with the MuleSoft Anypoint API:
Conclusion
I showed you how to quickly create and test an API project with a pipeline that integrates the HERE geocoding service through the Anypoint Platform.
I also demonstrated how to provide a Node.js app with autocomplete, geocoding, and reverse geocoding data coming from our own Anypoint API project.
You can check other interesting posts by following these links from HERE developer blog:
Getting Started with Harp.gl and Angular to Map Your Data
Highlight Regions of a Map with Angular and a Reverse Geocoder