- Products ProductsLocation Services
Solve complex location problems from geofencing to custom routing
PlatformCloud environments for location-centric solution development, data exchange and visualization
Tracking & PositioningFast and accurate tracking and positioning of people and devices, indoors or outdoors
APIs & SDKsEasy to use, scaleable and flexible tools to get going quickly
Developer EcosystemsAccess Location Services on your favorite developer platform ecosystem
- Documentation DocumentationOverview OverviewServices ServicesApplications ApplicationsDevelopment Enablers Development EnablersContent ContentHERE Studio HERE StudioHERE Workspace HERE WorkspaceHERE Marketplace HERE MarketplacePlatform Foundation and Policy Documents Platform Foundation and Policy Documents
- Pricing
- Resources ResourcesTutorials TutorialsExamples ExamplesBlog & Release Announcements Blog & Release AnnouncementsChangelog ChangelogDeveloper Newsletter Developer NewsletterKnowledge Base Knowledge BaseFeature List Feature ListSupport Plans Support PlansSystem Status System StatusLocation Services Coverage Information Location Services Coverage InformationSample Map Data for Students Sample Map Data for Students
- Help
Last Updated: July 31, 2020
Introduction
Duration is 3 min
This developer lab will walk you through the steps to add Routing to the sample web application Waterfall Express.
This demonstrates concepts of microservices by introducing the AWS Serverless Application Repository (AWS SAR) and the HERE Routing Serverless Application made available by HERE Technologies.
Scenario
You are creating the web site for a start-up specializing in bespoke Adventure Travel Itineraries: Waterfall Express.
Clients select their starting point and multiple destinations by searching for locations of interest, and Waterfall Express then plans and displays the route based on the client’s preferred mode of transport.
This is the third step of several towards a feature rich online experience, with this developer lab focusing on the tasks of adding directions (routing) to the interactive map based on the user’s selected destinations.
What is the Routing API
"The HERE Routing API calculates routes between two or more locations and provides additional route-related information, such as real-time traffic updates.
Route information consists of a graphical representation of the route and a detailed turn-by-turn route description. It enables mapping applications to render the geographical representation of the route together with the map data, so that the route is displayed on the map.
The Routing API is customizable so that the route calculation and additional information can be adapted to both consumer and enterprise applications and specific application use cases."
What you’ll learn
- How to call the HERE Routing API.
- How to deploy a Serverless Application from the AWS SAR, and the benefits of Serverless Applications.
- How to centralize the App ID and App Code using the AWS SAR, so those secrets are not distributed in client-side code.
What you’ll need
- Access to an account with HERE Location Services
- Access to an account with Amazon Web Services (AWS)
What is a Proxy
In this tutorial, the term “proxy” refers to an intermediary between the caller of an API and the implementation of the API.
A proxy is important when calling external APIs for many reasons, including:
- Unexpected failures need to be handled gracefully
- Credentials need to be managed centrally
- Version changes of the external API may need to be masked from various callers
- And so forth
For more information on these various patterns, please see Microservices Patterns, for example the Circuit Breaker, as described on martinfowler.com.
For those who are familiar with Enterprise Integration Patterns, a related topic is the Smart Proxy.
What is the Routing Serverless Application
The Routing Serverless Application consists of an API Gateway and two Lambdas.
The purpose of the Routing Serverless Application is to be a proxy - an intermediary - between your application and the native Routing REST API.
The Routing Serverless Application consists of two Lambdas because there are two REST methods related to routing: the well known Routing API and the Waypoints Sequence Extension for calculating a sequence-optimized route.
Why use a Serverless Application as a Proxy for Routing
One of the benefits of using the Routing Serverless Application as a proxy is the ability to centrally manage your API credentials (App ID and App Code).
In addition, you benefit from all the features of AWS API Gateways and AWS Lambdas because you can modify the deployed Serverless Application in-place. In this tutorial we will see how to modify a Lambda.
Get set up
Duration is 3 min
Set up a HERE Location Services Account
Set up an account with HERE Location Services, either Basic (free) or Free Trial.
Set up an AWS Account
Set up an account with Amazon Web Services (AWS).
Deploy the Sample
Complete the procedure in the tutorial “DevLab - Waterfall Express 01 - Map - v1” to deploy the sample web site and add the map. Then complete the procedure in the tutorial “DevLab - Waterfall Express 02 - Autocomplete - v1” to add autocomplete to the search queries.

Once you have the map displayed as above, you are ready to proceed with this lab.
Add Routing
Duration is 12 min
In this step we add jQuery to make a call to the Routing API.
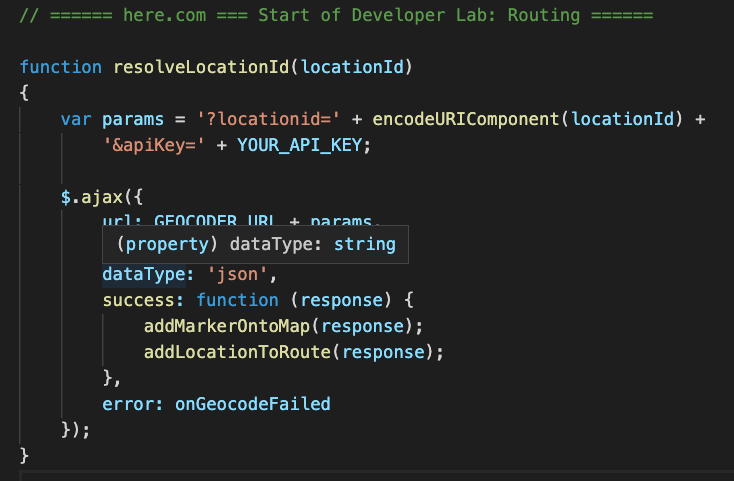
Find this comment in the file index.html and then add the provided JavaScript just below the comment:

In the file index.html insert the below JavaScript into the function resolveLocationId:
var params = '?locationid=' + encodeURIComponent(locationId) +
    '&apiKey=' + YOUR_API_KEY;

$.ajax({
    url: GEOCODER_URL + params,
    type: 'get',
    dataType: 'json',
    success: function (response) {
        addMarkerOntoMap(response);
        addLocationToRoute(response);
    },
    error: onGeocodeFailed
});
The above function resolveLocationId is already set to be called whenever a location is selected from the previous developer lab autocomplete suggestions. The above code is only focused on initiating a second call to the Geocoder to retrieve the specific location information we need to facilitate routing.
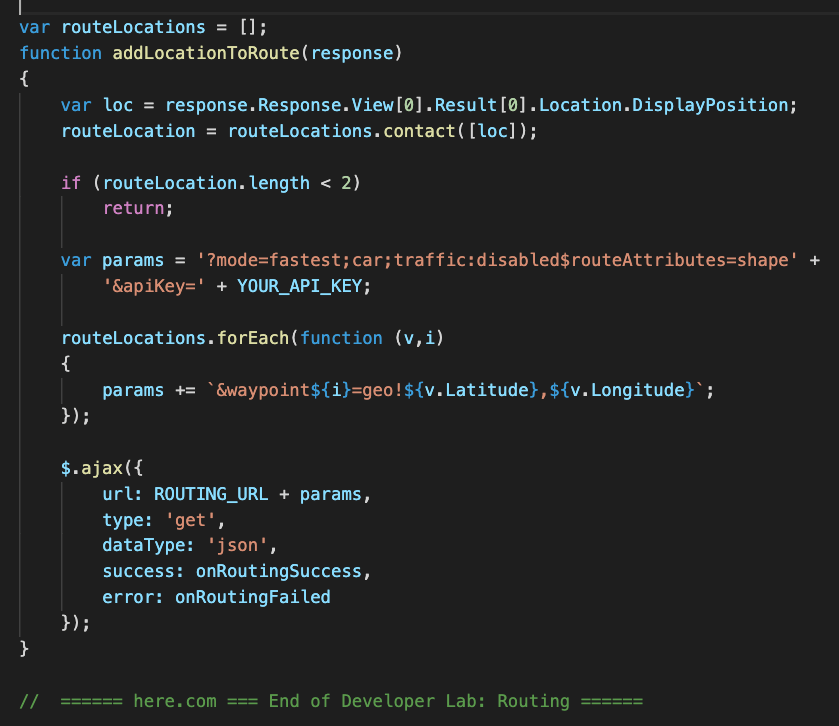
In the file index.html insert the below JavaScript into the function addLocationToRoute:
var loc = response.Response.View[0].Result[0].Location.DisplayPosition;
routeLocations = routeLocations.concat([loc]);

if (routeLocations.length < 2)
    return;

var params = '?mode=fastest;car;traffic:disabled&routeAttributes=shape' +
    '&apiKey=' + YOUR_API_KEY;

routeLocations.forEach(function (v,i)
{
    params += `&waypoint${i}=geo!${v.Latitude},${v.Longitude}`;
});

$.ajax({
    url: ROUTING_URL + params,
    type: 'get',
    dataType: 'json',
    success: onRoutingSuccess,
    error: onRoutingFailed
});
The above function maintains the list of destinations and submits the list to the Routing API for producing a route. Further code is provided for displaying the results on the map as can be seen in the function onRoutingSuccess.
Deploy from AWS SAR
Duration is 6 min
In this step we deploy the Routing Serverless Application from the AWS Serverless Application Repository (AWS SAR).
Navigate to AWS SAR
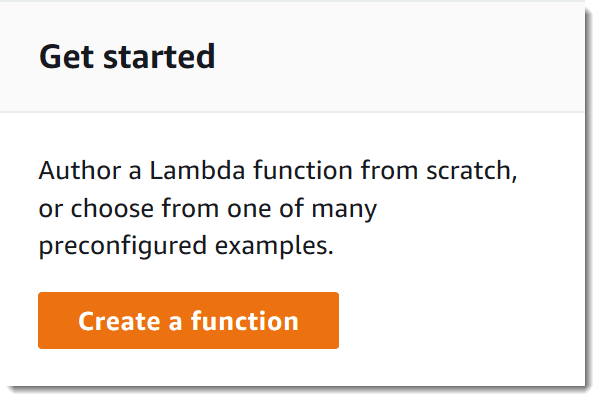
Navigate to https://console.aws.amazon.com/lambda and click Create Function.
On the next screen select Serverless Application Repository.
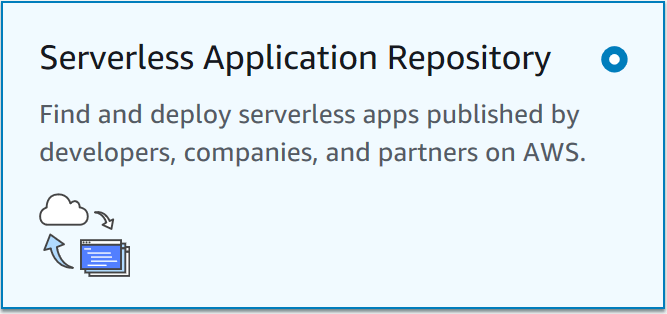
Use the search to locate the Routing Serverless Application shown below.
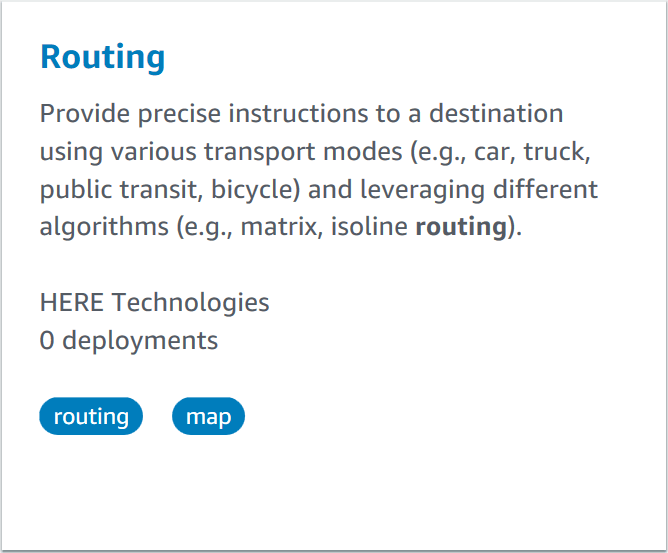
Click on Routing, then review then review, configure, and deploy the Serverless Application.
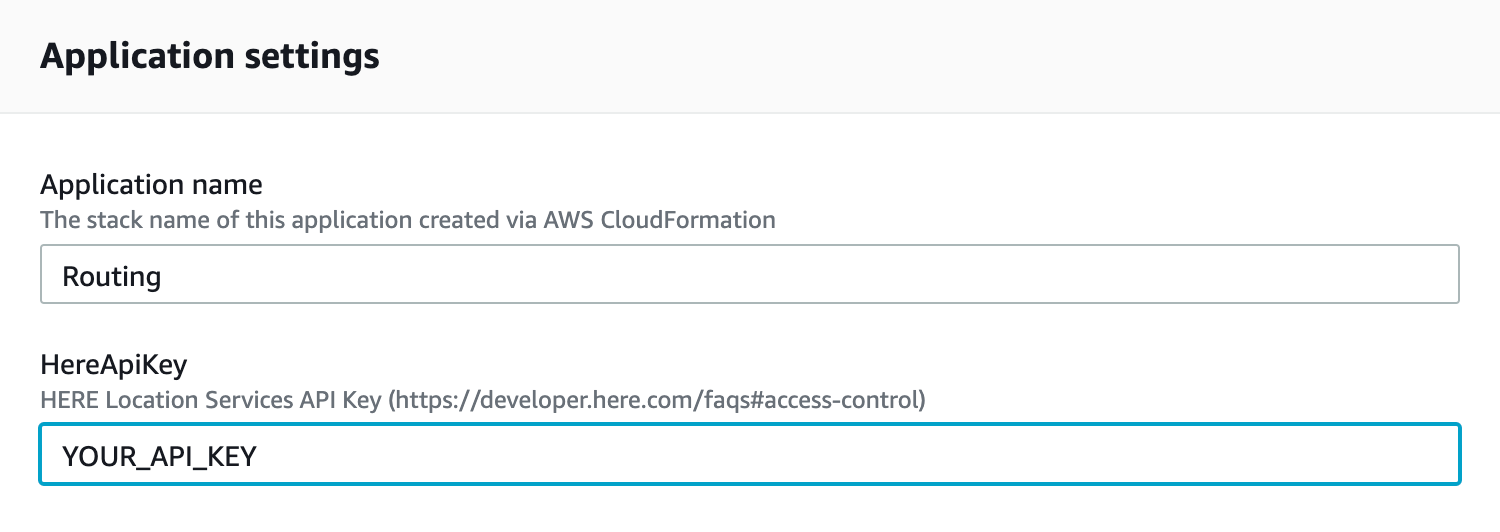
Configure Application Parameters
This deployment of the Serverless Application from AWS SAR requires input parameters. These parameters are shown at the bottom right of the screen, as shown in the screenshot below.
The Geocode Serverless Application requires the App ID and App Code previously obtained by signing up at here.com.
Click Deploy and watch AWS CloudFormation do all the work for you!

Explore the Serverless Application
Duration is 6 min
Once the deployment completed successfully (all green Status similar to the below screenshot), click on “View CloudFormation Stack”.
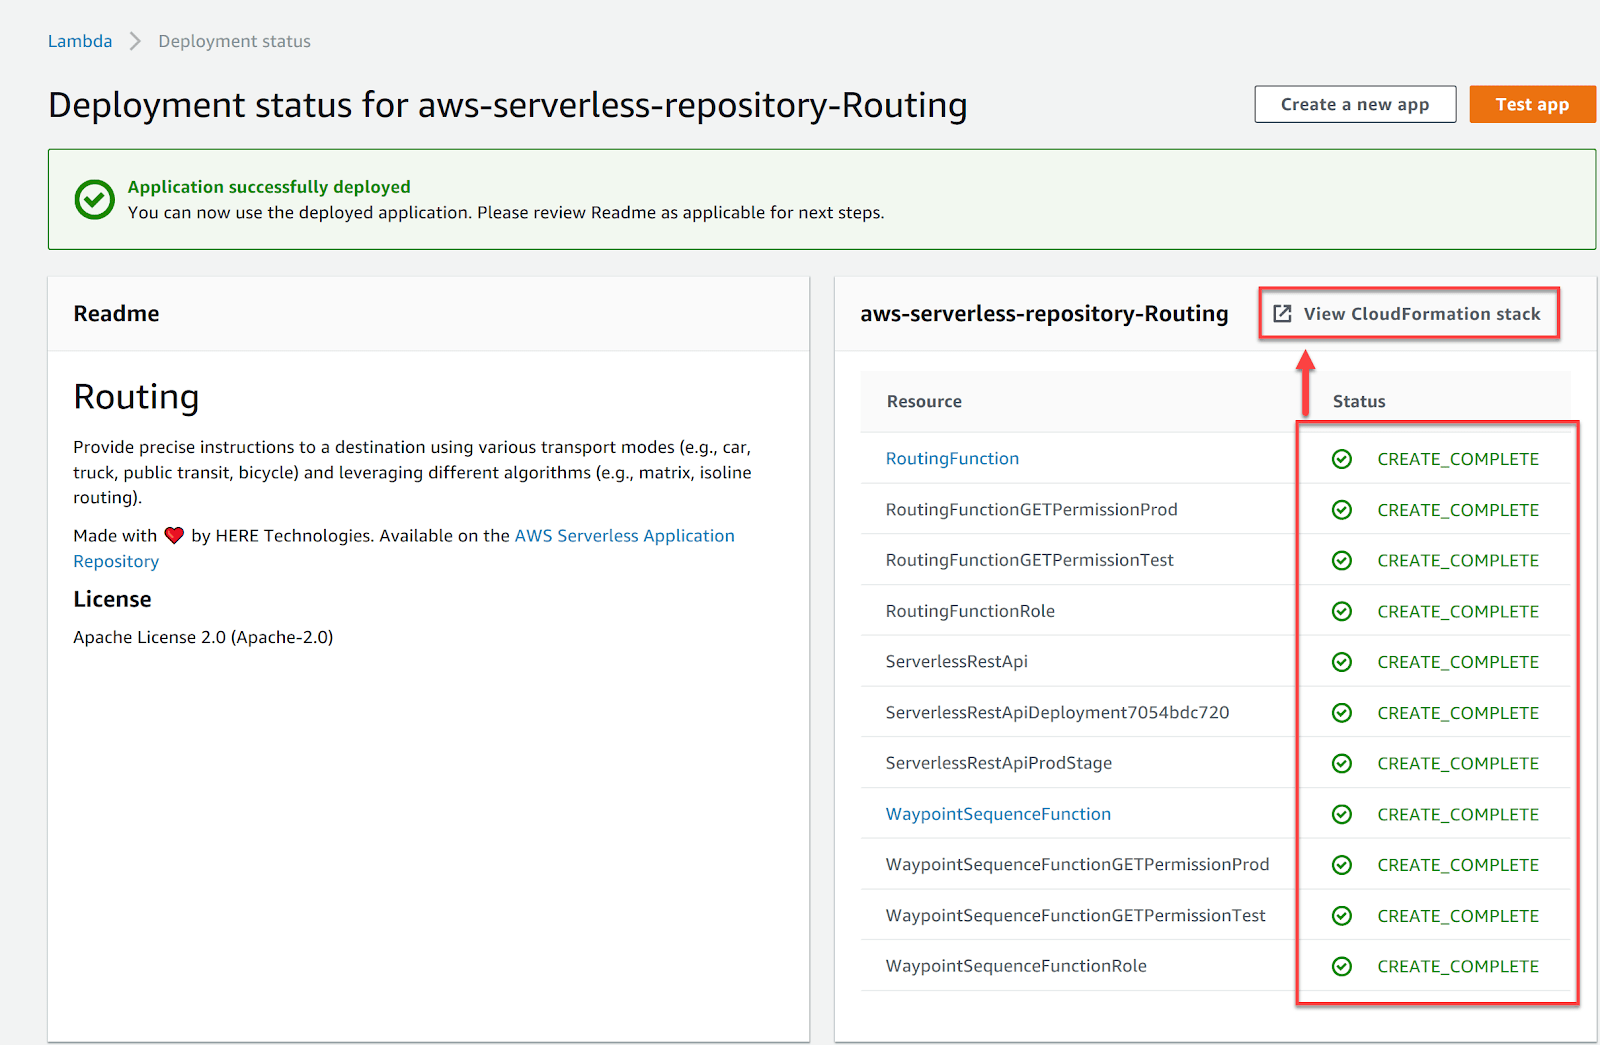
An error message may be displayed if you click on the “View CloudFormation Stack” link too soon, or if you switch between multiple AWS Regions. You can always start navigating again from the AWS Console home page to ensure you select the correct CloudFormation Stack.
Retrieve URL from Stack Output
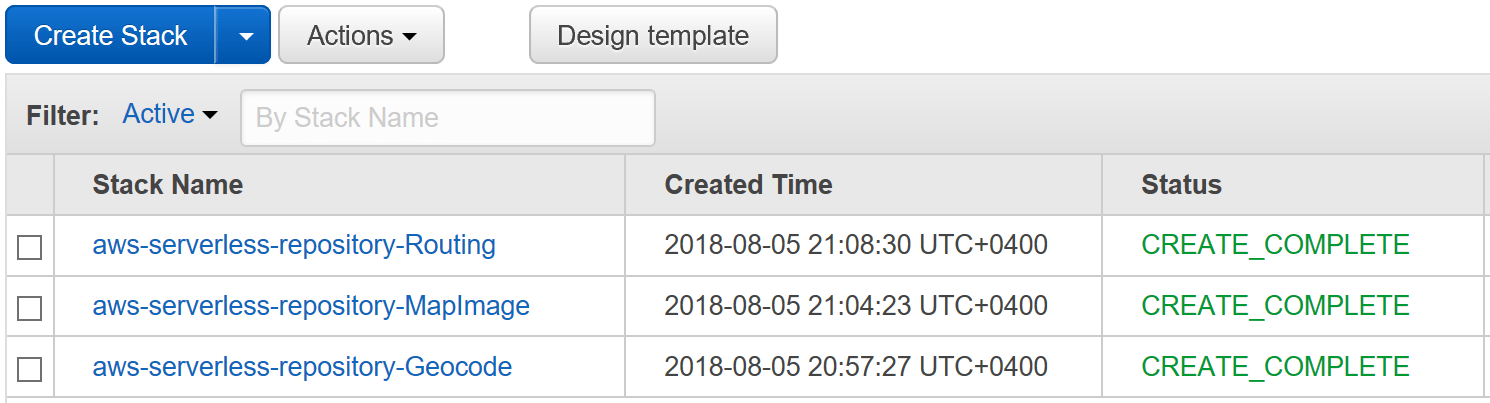
Once the deployment from AWS SAR completes, confirm from AWS CloudFormation that the Stack was successfully created at this link.
The Stack consists of all the configuration elements needed to make the Serverless Application work, including the AWS API Gateway and the AWS Lambdas.
Click on the Stack Name and expand the section titled Outputs. Copy the value for the HereApiURL for later use.
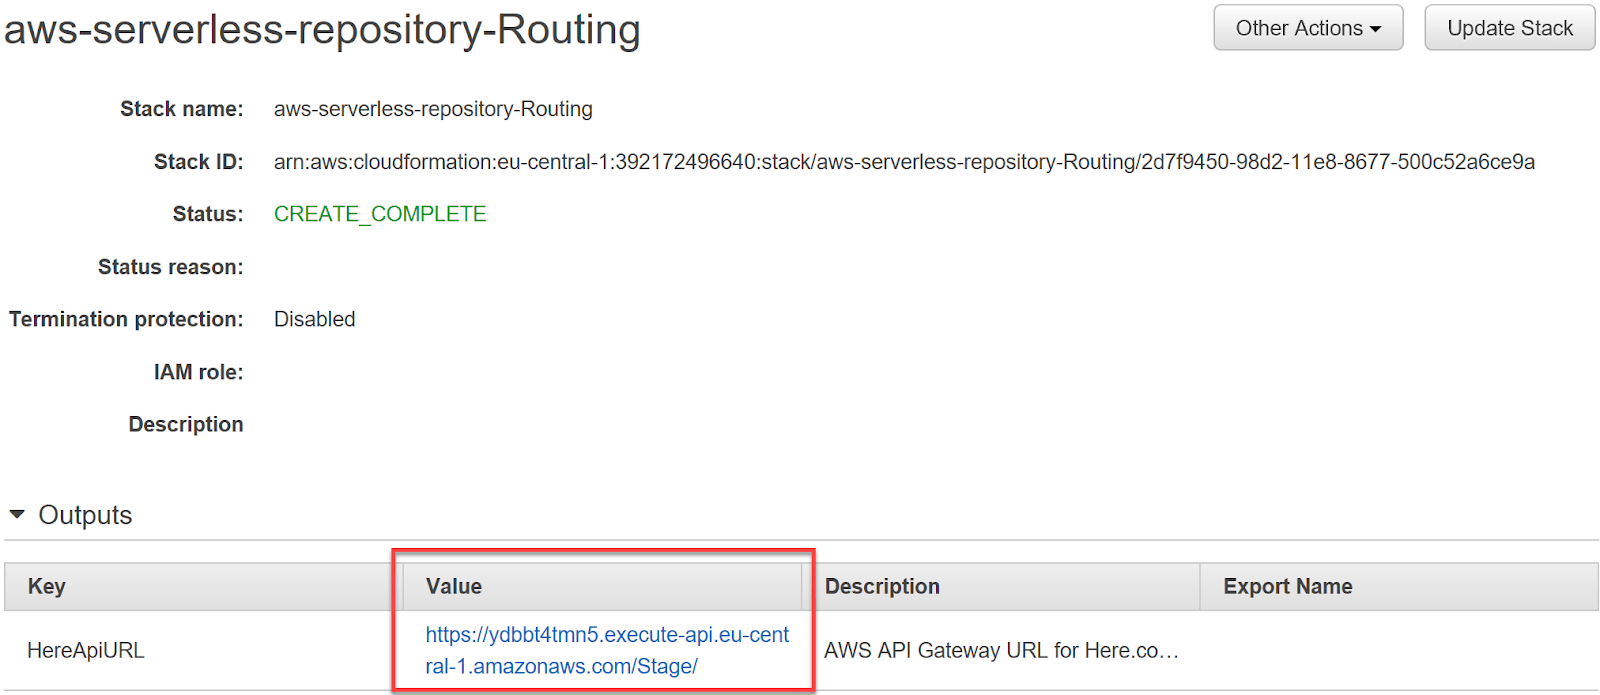
Copy the Value from the Outputs section for the key HereApiURL - you’ll need it in the next step.
Update the Serverless Application
One of the advantages of using a Serverless Application is the ability to modify the deployed services. In this example we must modify the AWS Lambda to ensure the caller receives a specific HTTP Response Header to ensure compliance with CORS.
Spot the Error: if you attempt to call the Routing Serverless Application prior to adding CORS support, jsFiddle may fail silently. You can see the error details by pressing F12 to open your browser’s developer tools - in the Console it should show the error relating to a missing HTTP Response Header.
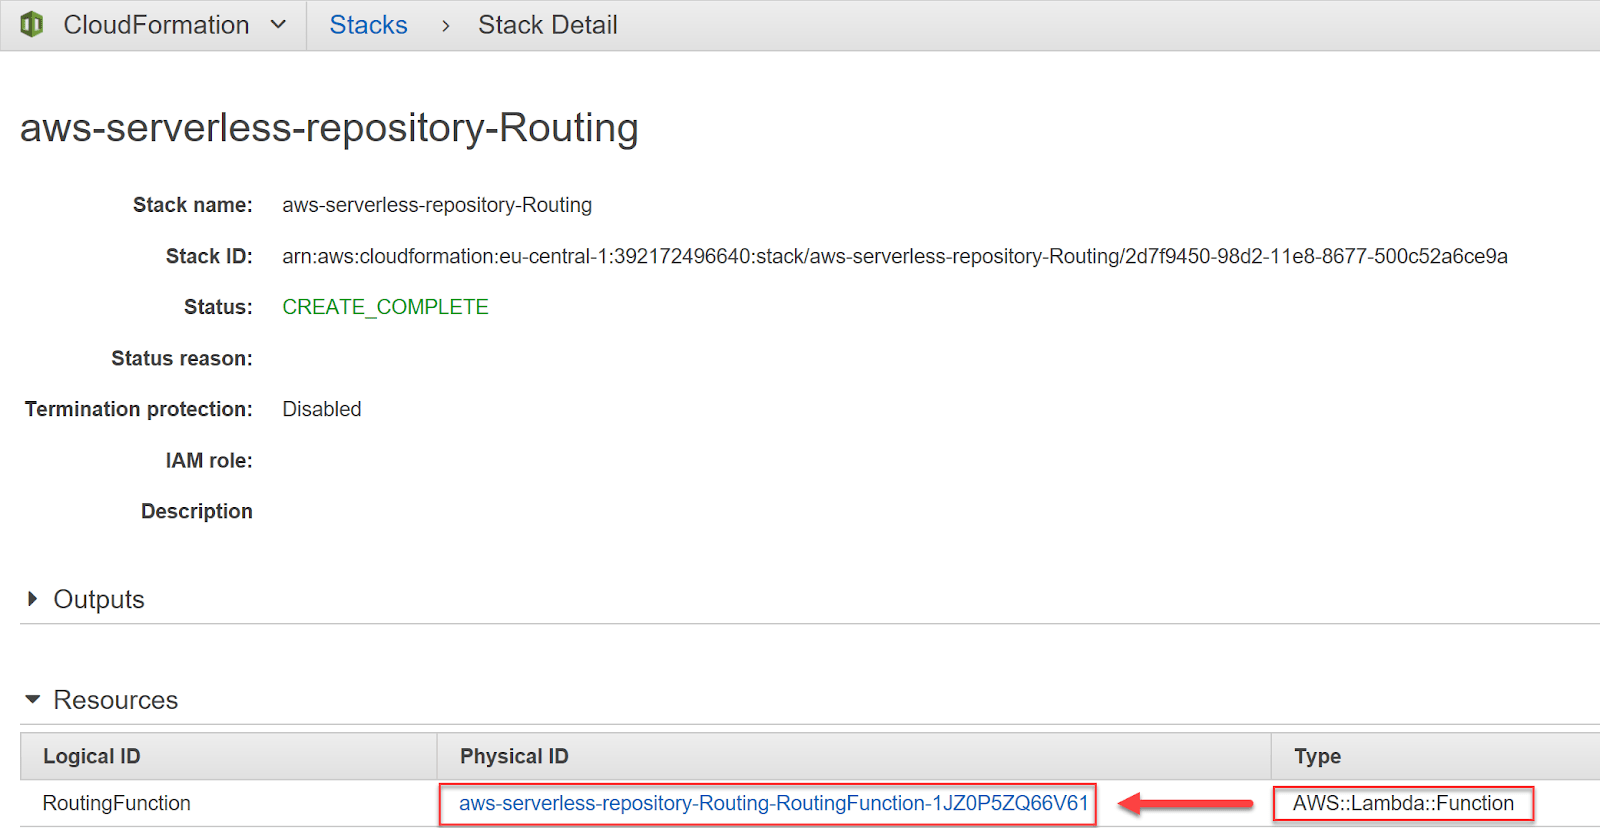
Navigate to the AWS CloudFormation Stack deployed above, expand the section labelled Resources, and find the Resource of type “Function”. Click the name in the column “Physical ID” to navigate to the AWS Lambda “RoutingFunction”.
On the Lambda configuration page, in the section titled “Function Code”, remove the two forward slash characters (“//”) on line 58 as highlighted below.
By adding the below line of code, the Lambda will add an HTTP Response Header when responding to requests through the API Gateway. You may edit the code of the Lambda to fit your requirements, for example replacing the asterisk with the domain of your web site from which you’re calling the Lambda.
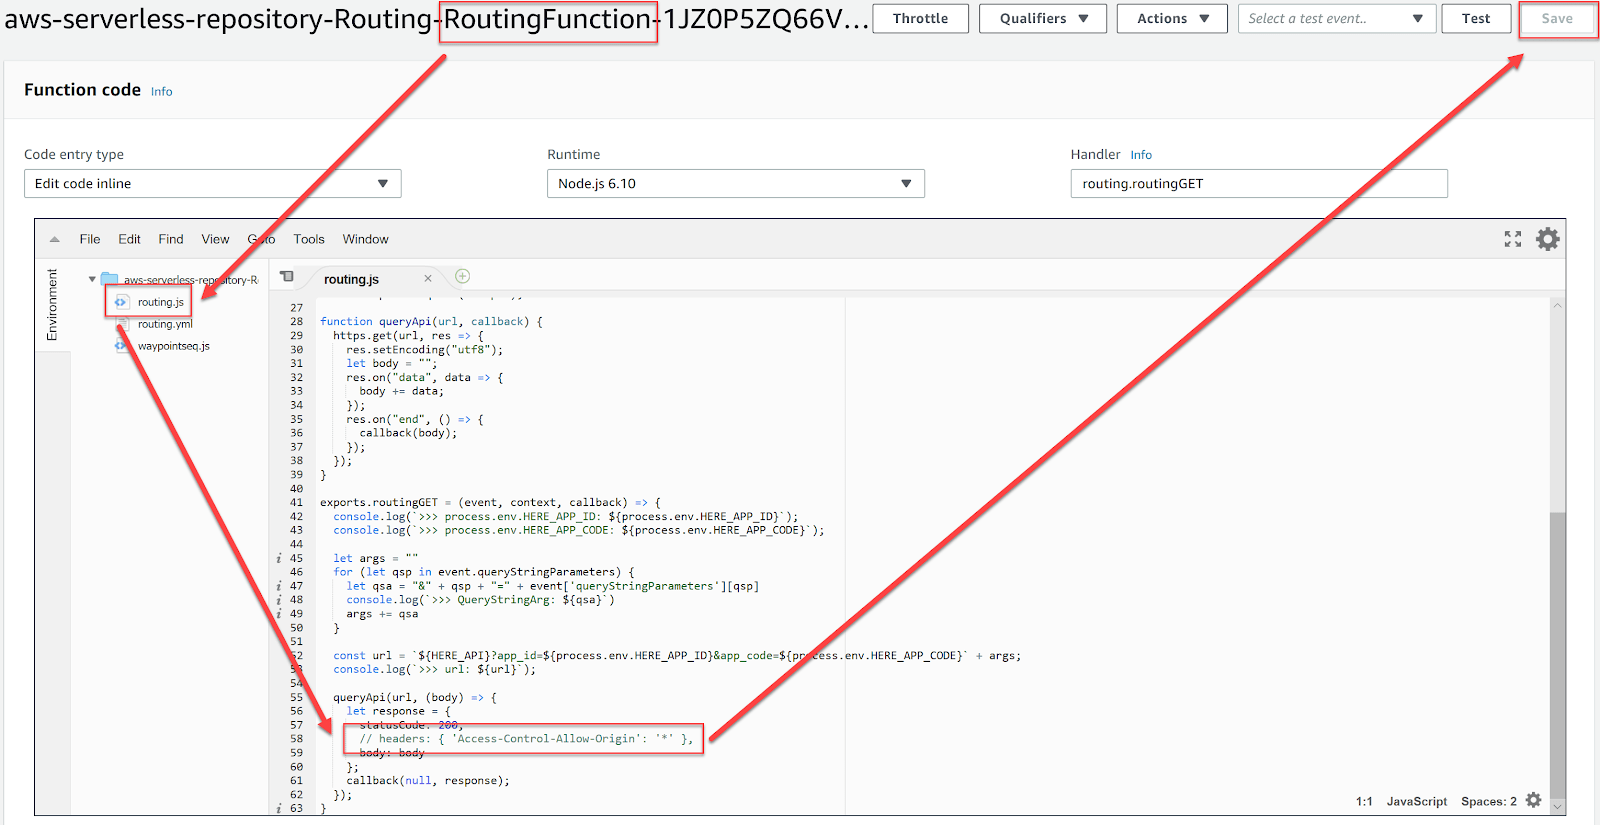
Remember to click Save after editing the Lambda.
Now that you have updated the Lambda, proceed to updating the calling jQuery to point to the Lambda.
Redirect API Call
Duration is 5 min
Now that you have the Routing Serverless Application deployed you can replace the complex URI with a simpler pattern thanks to the combination of an AWS API Gateway and an AWS Lambda.
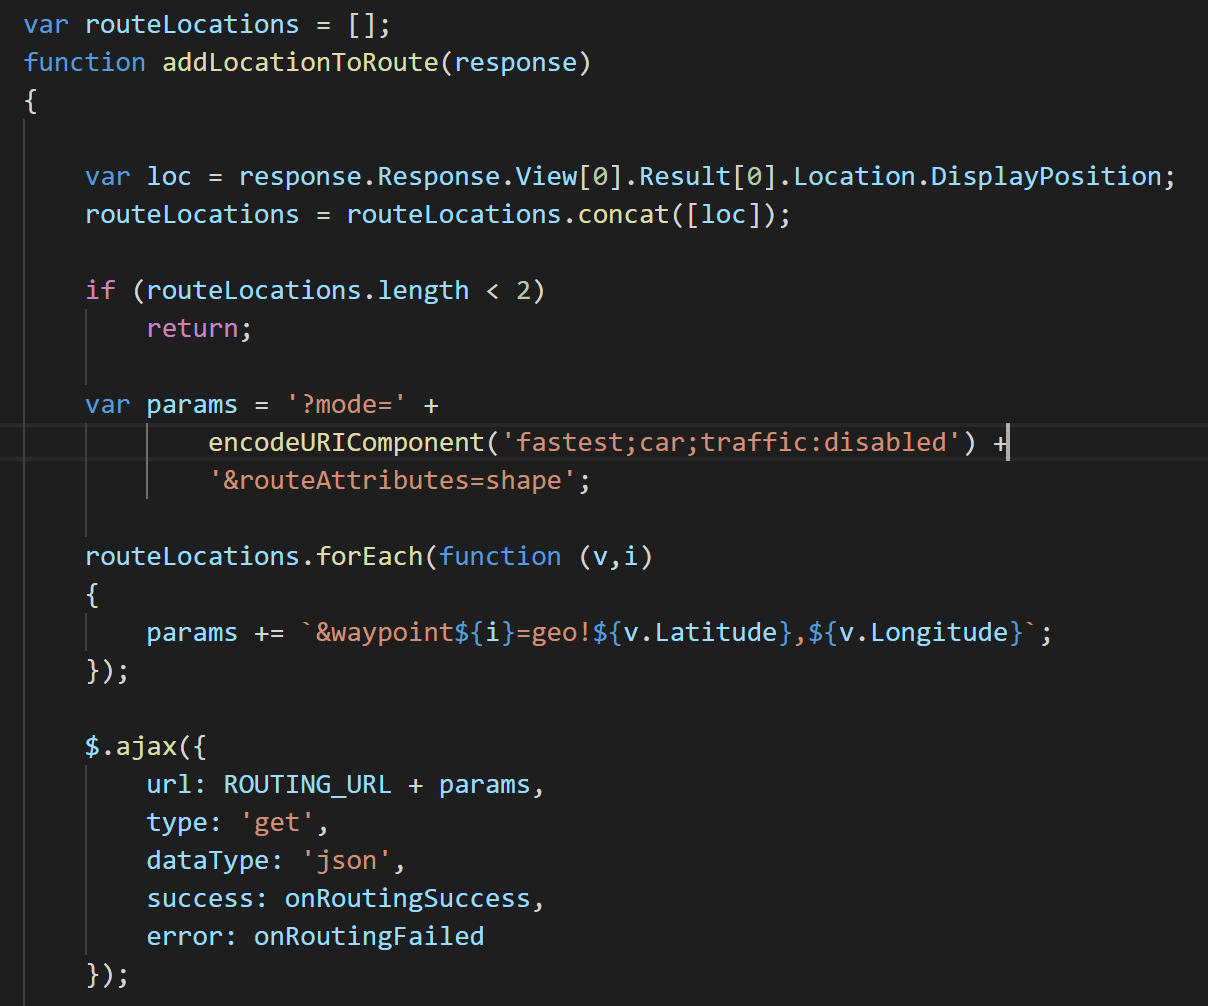
Update the ROUTING_URL with the Invoke URL (the HTTP endpoint of the AWS Gateway) deployed above and remove the app_id and app_code variables from the JavaScript making the call to the Routing API
var ROUTING_URL = "https://xxx.";
You can now remove the APPLICATION_ID and APPLICATION_CODE from the function ‘addLocationToRoute’.
There is one catch: the parsing done by the AWS API Gateway as the call goes through to the Lambda will cause trouble if we don’t URL-encode the parameters, so do add the call to the JavaScript method to URL-encode the value for the ‘mode’ parameter.
The below screenshot shows one way of updating the function ‘addLocationToRoute’.
Review
Duration is 2 min
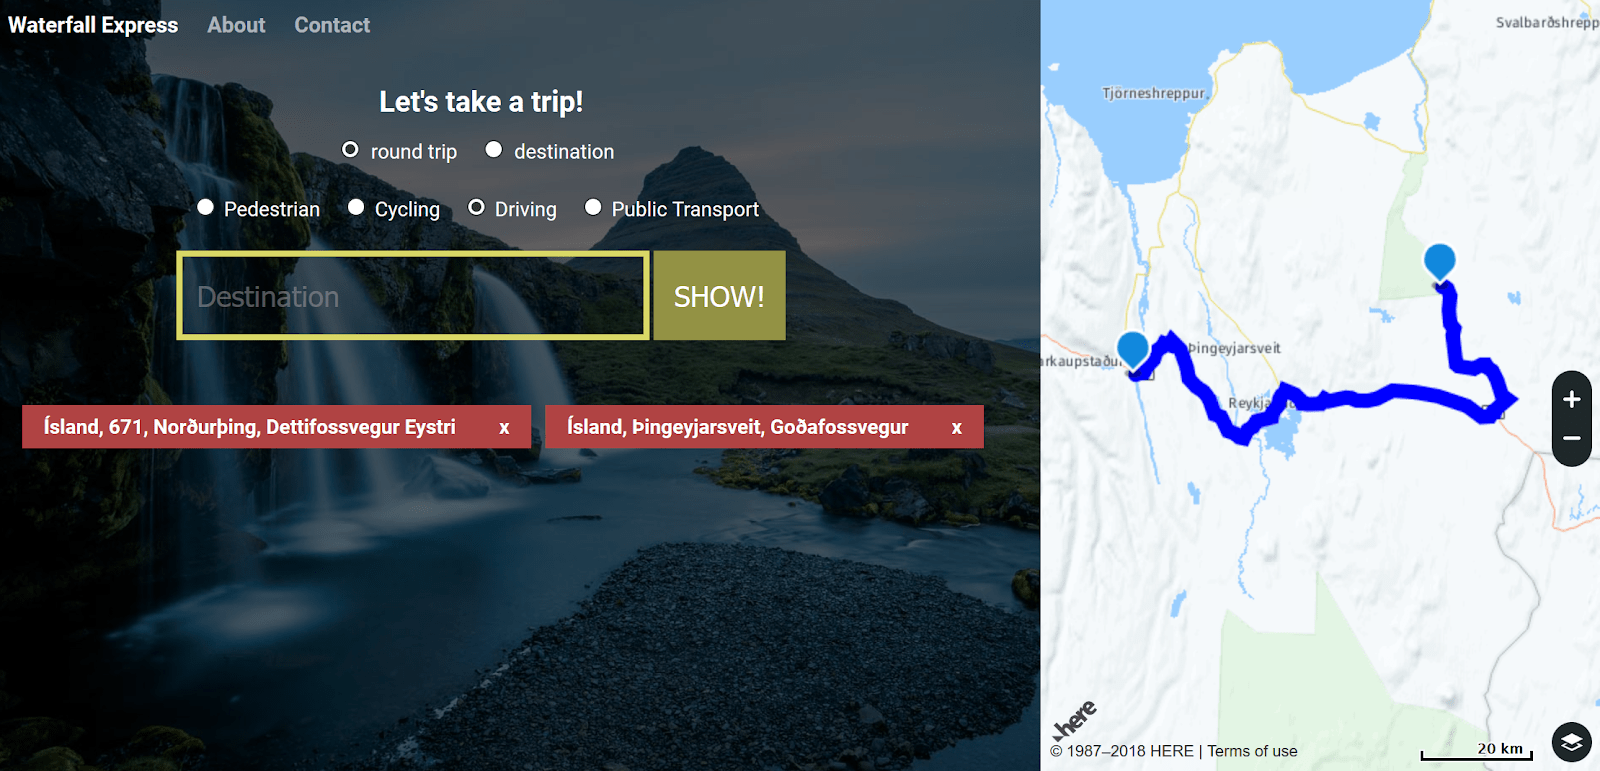
When you see the route displayed based on the destinations listed, you have successfully completed this lab!
You have successfully added jQuery to react to user input, provide routing suggestions (navigation directions) based on the Routing API, and then replaced the direct API call with a call via an AWS API Gateway & Lambda from the AWS SAR, which you deployed into your AWS account.
Well done!
Glossary
AWS
What is AWS API Gateway
The AWS API Gateway is a layer between the caller and the implementation, providing services to the consumers of APIs and the publishers of APIs, including monitoring, authentication, and facilitating API-related management tasks such as versioning.
In this tutorial we will deploy an AWS API Gateway to benefit from its ability to modify incoming requests. We will modify the incoming request to add the App ID and App Code previously obtained from here.com.
In this tutorial you will see the benefits of using an AWS API Gateway by first creating a call to the Map Image REST API directly. Then you will substitute the direct call with a call through the AWS API Gateway.
What is a Lambda
The AWS Lambda is a snippet of code associated with an event. In this tutorial we will attach a snippet of JavaScript to an HTTP endpoint. The HTTP endpoint will be provided by an AWS API Gateway. On receiving an HTTP request, the API Gateway will invoke the JavaScript we provided.
To get the most out of this tutorial, please familiarize yourself with AWS Lambdas.
What is Serverless
The term serverless was first associated with AWS Lambda because there is no management or cost overhead imposed for the underlying servers.
In this tutorial you will use a Serverless Application published by Here Technologies. The Geocoder Serverless Application consists of one AWS API Gateway and two AWS Lambdas. The Serverless Application will be deployed to your AWS account, but you will only be charged for usage, and there are no servers (EC2 instances) for you to manage, hence serverless.
For an in depth discussion on the terminology and related microservices approach to architecture, start with this article on Serverless.
What is AWS SAR
In 2017 AWS launched an “app store” for Serverless Applications. Named the AWS Serverless Application Repository (AWS SAR), it is a collection of open source Serverless Applications published by various vendors and open source developers.
Serverless Applications published in the AWS SAR are described using the Serverless Application Model. You should review the SAM provided at the time of deployment, known as a Template, and the related source code because the AWS SAR deployment will be to your AWS account.