- 製品 製品ロケーションサービス
ジオフェンスからカスタム ルート検索まで、ロケーションに関する複雑な課題を解決します
プラットフォームロケーションを中心としたソリューションの構築、データ交換、可視化を実現するクラウド環境
トラッキングとポジショニング屋内または屋外での人やデバイスの高速かつ正確なトラッキングとポジショニング
API および SDK使いやすく、拡張性が高く、柔軟性に優れたツールで迅速に作業を開始できます
開発者エコシステムお気に入りの開発者プラットフォーム エコシステムでロケーションサービスにアクセスできます
- ドキュメント ドキュメント概要 概要サービス サービスアプリケーション アプリケーションSDKおよび開発ツール SDKおよび開発ツールコンテンツ コンテンツHERE Studio HERE StudioHERE Workspace HERE WorkspaceHERE Marketplace HERE Marketplaceプラットフォーム基盤とポリシーに関するドキュメントプラットフォーム基盤とポリシーに関するドキュメント
- 価格
- リソース リソースチュートリアル チュートリアル例 例ブログとリリースの公開 ブログとリリースの公開変更履歴 変更履歴開発者向けニュースレター 開発者向けニュースレターナレッジベース ナレッジベースフィーチャー 一覧フィーチャー 一覧サポートプラン サポートプランシステムステータス システムステータスロケーションサービスのカバレッジ情報ロケーションサービスのカバレッジ情報学習向けのサンプルマップデータ学習向けのサンプルマップデータ
- ヘルプ
チュートリアル : HERE マップを Android Auto に統合
このチュートリアルでは 、 Android Auto を使用して車両のインフォテイメントディスプレイでMapViewをレンダリングする方法を示します。 Android Auto は、自動車の実際のハードウェアにインストールされているアプリ です。 開発マシンで実行されているデスクトップヘッドユニット(DHU)アプリ を使用してシミュレートできます。
商用の Android Automotive ソリューションとの統合については、HERE では扱いませんが、これらの Android サンプルアプリと同じ原則に従います。
DHU の設定には時間がかかることがあります。そのため、前述の car-app-library の公式の Android サンプルアプリを使用して、ローカル設定をテストすることをお勧めします。
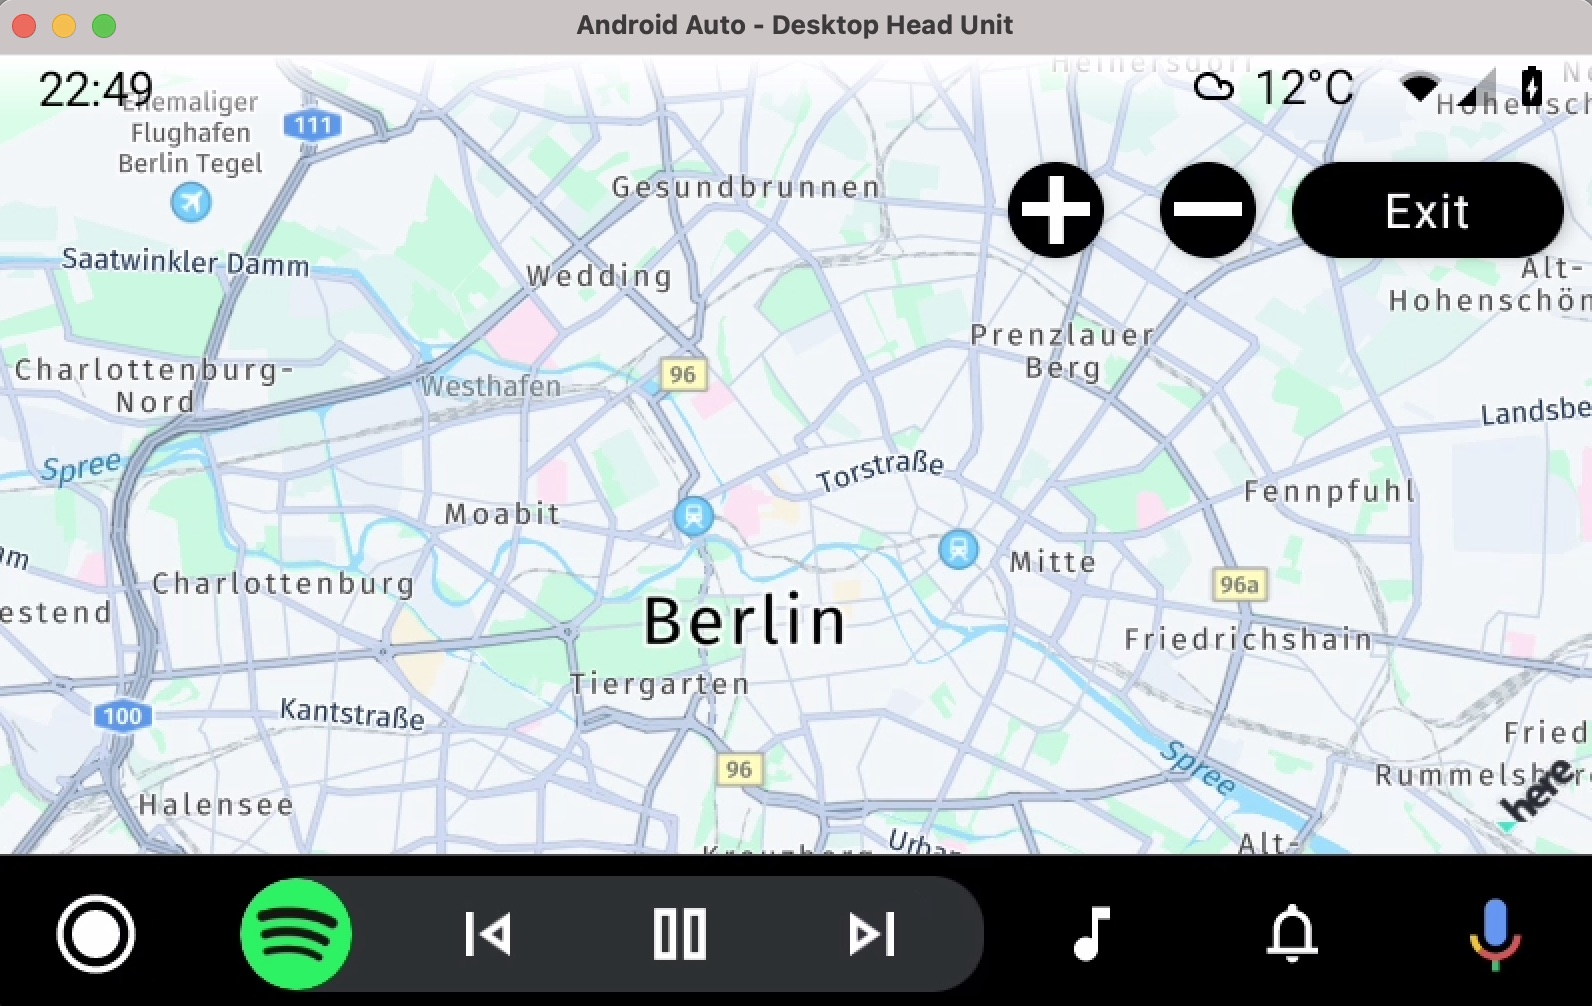
このチュートリアルの結果として作成されるアプリ に MapView は、ズームインボタン (+) とズームアウトボタン (-) を使用して、 DHU のインスタンスが表示されます。 MapView DHU に接続されているモバイル機器 の画面に別のインスタンスが表示されます。 完成した HelloMapAndroidAuto のサンプルアプリ は 、 GitHub にあります。
注
Android Auto は、 Android 6.0 ( API レベル 23 )以降を実行しているスマホとのみ互換性があります。
ステップ 1 - Android Auto およびデスクトップヘッドユニット( DHU )の設定
この手順については 、 Android Auto の公式ドキュメントに従ってください。
本質的に :
- モバイル テストデバイスに Google Play サービスをインストールするか、最新バージョンを使用していることを確認してください。
- モバイル機器 で、 Play ストアに移動し、最新 の Android Auto アプリ がインストールされていることを確認します。 Samsung デバイスの場合 - またはお使いのデバイスに Android Auto が見つからない場合:
Settingsアプリ に移動し、「 Android Auto 」を検索します。 - モバイル機器でデバイスと Android Auto アプリの両方の Android 開発者設定(https://developer.android.com/studio/debug/dev-options)を有効にします。
- モバイル機器で Android Auto アプリの 不明なソース(https://developer.android.com/training/cars/testing#step1)を有効にします。
- 開発 マシンに DHU をインストールします。 DHU 1.1 をテストに使用しました。
- DHU を実行 し 、 Android Auto サンプルアプリをインストールして、設定が有効かどうかを確認します。
DHU のテストおよび実行には、実際のモバイル機器 を使用してください。 テストにはエミュレータを使用しないでください。
テストの開始方法 :
- USB 経由でデバイスをコンピュータに接続します。
- Android Auto アプリ で 、 Android ヘッドユニットサーバー が起動していることを確認します。 「設定 」「アプリ 」で「 Android Auto 」を検索し、「ヘッドユニットサーバーを開始」をクリックします。 トーストメッセージが表示されます。 " ヘッドユニットサーバーを開始しています ..." 。
- コマンド ライン ウィンドウを開き、次のように Android Auto のインストールディレクトリに移動します。
cd /Users/yourname/Library/Android/sdk/extras/google/auto - 進行中のセッションをリセットするには、
adb kill-serverと入力します。 - ADBにデバイスを接続するには、
adb forward tcp:5277 tcp:5277と入力します。 「 daemon started successfully at TCP: 5037 」または同等のメッセージが表示されます。 - 次のように入力して、 DHU を開始します。
./desktop-head-unit。 - 数秒待ちます。 画面が黒くなることがあります。 お使いのデバイスおよび DHU の権限に関するプロンプトを表示します ( 表示されている場合 ) 。 問題が解決しない場合は、上記のすべての手順を繰り返します。
- 別のウィンドウが開き、インストールされているすべての Android Auto アプリとともに DHU が表示されます。
-
quitと入力すると、セッションを終了できます。 お使いのデバイスで、「ヘッドユニットサーバーを停止」という指示をスマホに忘れずにかけるようにしてください。
注
この操作を初めて行う場合 は、デバイスおよび DHU のセットアッププロセスを必ず実行してください。 多くのライセンスと権限を承認する必要があります。 問題が解決 しない場合は、下の「トラブルシューティング」セクションを参照してください。
成功すると、 DHU で実行されているいくつかの Android Auto アプリが表示されます。 ご自身のアプリ をテストするには、 USB/ADB 経由でデバイスに展開します。デバイスの画面と DHU の画面が自動的に更新されます。
注
Android Auto アプリを Google Play ストア経由ですでに配布していない限り、実店舗の Android Auto アプリを試用することはできません。 Google のこのメモも参照してください。
ステップ 2 - Android Auto を既存のアプリ に統合
このチュートリアルでは GitHub にある HelloMap アプリを使用します。 デフォルト では、デバイスにMapView が表示されます。 次に、このアプリ を拡張して 、 DHU 上のMapViewの 2 番目のインスタンスを表示したいとします。 このためには、 Android Auto を統合する必要があります。
注
アプリの結果 は、テスト目的でのみ使用されます。 実稼働環境で使用できるアプリ については、Android Auto のガイドラインに従って、車両環境に関連するアプリの設計方法を確認してください。
Android Auto は Android 6.0 以降でのみサポートされているため、アプリのbuild.gradleファイルで minSdkVersionバージョンが 23 以降に設定されていることを確認してください。
minSdkVersion 23
同じファイルで、閉じる際dependencies に Android Auto を統合
dependencies {
    ...
    implementation "androidx.car.app:app:1.2.0-rc01"
}
AndroidManifest ファイルに、次の必要な権限を追加します。
<!-- Declare Android Auto specific permissions. -->
<uses-permission android:name="androidx.car.app.ACCESS_SURFACE"/>
<uses-permission android:name="androidx.car.app.NAVIGATION_TEMPLATES"/>
同じファイルで 、タグapplicationに次のものを追加します。
<!-- Declare the CarAppService for use with Android Auto. -->
<service
    android:name="com.here.hellomapandroidauto.HelloMapCarAppService"
    android:exported="true">
    <intent-filter>
        <action android:name="androidx.car.app.CarAppService"/>
        <category android:name="androidx.car.app.category.NAVIGATION"/>
    </intent-filter>
</service>

<!-- Declare the Android Auto API Level and layout template. -->
<meta-data
    android:name="androidx.car.app.minCarApiLevel"
    android:value="1"/>
<meta-data
    android:name="com.google.android.gms.car.application"
    android:resource="@xml/automotive_app_desc"
    tools:ignore="MetadataTagInsideApplicationTag"/>
ご自身のアプリ に従って、パスとクラス名 (com.here.hellomapandroidauto.HelloMapCarAppService) を変更します。以下にクラスHelloMapCarAppService を作成します。必要 なテンプレート automotive_app_desc.xml も作成します。 この例では、このファイルには次の内容のみが含まれています。
<?xml version="1.0" encoding="utf-8"?>

<automotiveApp>
    <uses name="template" />
</automotiveApp>
新しい "xml" フォルダーを作成し、ファイルapp/src/main/res/xml/automotive_app_desc.xmlを追加します。
次に、 Java クラス / ファイルHelloMapCarAppService を作成します。 また、必要に応じて Kotlin を使用することもできます。 HERE Java を使用している場合 :
package com.here.hellomapandroidauto;

import android.content.Intent;
import android.content.pm.ApplicationInfo;

import androidx.annotation.NonNull;
import androidx.annotation.Nullable;
import androidx.car.app.CarAppService;
import androidx.car.app.Screen;
import androidx.car.app.Session;
import androidx.car.app.validation.HostValidator;

/**
 * Entry point for the hello map app.
 *
 * <p>{@link CarAppService} is the main interface between the app and the car host. For more
 * details, see the <a href="https://developer.android.com/training/cars/apps">Android for
 * Cars Library developer guide</a>.
 */
public final class HelloMapCarAppService extends CarAppService {

    public HelloMapCarAppService() {
        // Exported services must have an empty public constructor.
    }

    @Override
    @NonNull
    public Session onCreateSession() {
        return new Session() {
            @Override
            @NonNull
            public Screen onCreateScreen(@Nullable Intent intent) {

                // Ensure the HERE SDK is initialized (if it is not already initialized
                // via MainActivity).
                HereSDKInitializer.run(HelloMapCarAppService.this);

                return new HelloMapScreen(getCarContext());
            }
        };
    }

    @NonNull
    @Override
    public HostValidator createHostValidator() {
        if ((getApplicationInfo().flags & ApplicationInfo.FLAG_DEBUGGABLE) != 0) {
            return HostValidator.ALLOW_ALL_HOSTS_VALIDATOR;
        } else {
            return new HostValidator.Builder(getApplicationContext())
                    .addAllowedHosts(androidx.car.app.R.array.hosts_allowlist_sample)
                    .build();
        }
    }
}
すべての Android Auto アプリは少なくとも CarAppServiceを拡張する必要があります。 HelloMapScreenを表示するために使用します。 このチュートリアルでは、 DHU に表示する唯一の画面です。 このクラスの他の部分については、 Android Auto のドキュメントを参照してください。 すべてのCarAppService で必要とされる一般的なボイラープレートコードを示します。
次のステップでは、 HelloMapScreen 次のようにを作成します。
package com.here.hellomapandroidauto;

import android.util.Log;

import androidx.annotation.NonNull;
import androidx.annotation.Nullable;
import androidx.car.app.AppManager;
import androidx.car.app.CarContext;
import androidx.car.app.Screen;
import androidx.car.app.SurfaceCallback;
import androidx.car.app.SurfaceContainer;
import androidx.car.app.model.Action;
import androidx.car.app.model.ActionStrip;
import androidx.car.app.model.CarIcon;
import androidx.car.app.model.Template;
import androidx.car.app.navigation.model.NavigationTemplate;
import androidx.core.graphics.drawable.IconCompat;

import com.here.sdk.core.GeoCoordinates;
import com.here.sdk.core.Point2D;
import com.here.sdk.core.Size2D;
import com.here.sdk.mapview.MapError;
import com.here.sdk.mapview.MapMeasure;
import com.here.sdk.mapview.MapScene;
import com.here.sdk.mapview.MapScheme;
import com.here.sdk.mapview.MapSurface;

/**
 * A screen that shows a HERE SDK map view.
 *
 * <p>See {@link HelloMapCarAppService} for the app's entry point to the car host.
 */
public class HelloMapScreen extends Screen implements SurfaceCallback {

    private MapSurface mapSurface;
    private CarContext carContext;

    public HelloMapScreen(@NonNull CarContext carContext) {
        super(carContext);
        this.carContext = carContext;

        Log.d("HelloMapScreen", "Register surface callback");
        carContext.getCarService(AppManager.class).setSurfaceCallback(this);

        // Since the MapSurface implements MapViewBase, it behaves like a MapView, except that it
        // renders on the DHU running Android Auto.
        mapSurface = new MapSurface();
    }

    @NonNull
    @Override
    public Template onGetTemplate() {
        CarIcon zoomInIcon = new CarIcon.Builder(
                IconCompat.createWithResource(carContext, R.drawable.plus)).build();
        CarIcon zoomOutIcon = new CarIcon.Builder(
                IconCompat.createWithResource(carContext, R.drawable.minus)).build();

        // Add buttons to zoom in/out the map view and to exit the app.
        ActionStrip.Builder actionStripBuilder = new ActionStrip.Builder();
        actionStripBuilder.addAction(
                new Action.Builder()
                        .setIcon(zoomInIcon)
                        .setOnClickListener(this::zoomIn)
                        .build());
        actionStripBuilder.addAction(
                new Action.Builder()
                        .setIcon(zoomOutIcon)
                        .setOnClickListener(this::zoomOut)
                        .build());
        actionStripBuilder.addAction(
                new Action.Builder()
                        .setTitle("Exit")
                        .setOnClickListener(this::exit)
                        .build());

        NavigationTemplate.Builder builder = new NavigationTemplate.Builder();
        builder.setActionStrip(actionStripBuilder.build());
        return builder.build();
    }

    @Override
    public void onSurfaceAvailable(@NonNull SurfaceContainer surfaceContainer) {
        Log.d("HelloMapScreen", "Received a surface.");
        mapSurface.setSurface(
                carContext,
                surfaceContainer.getSurface(),
                surfaceContainer.getWidth(),
                surfaceContainer.getHeight());

        mapSurface.getMapScene().loadScene(MapScheme.NORMAL_DAY, new MapScene.LoadSceneCallback() {
            @Override
            public void onLoadScene(@Nullable MapError mapError) {
                if (mapError == null) {
                    double distanceInMeters = 1000 * 10;
                    MapMeasure mapMeasureZoom = new MapMeasure(MapMeasure.Kind.DISTANCE, distanceInMeters);
                    mapSurface.getCamera().lookAt(new GeoCoordinates(52.530932, 13.384915), mapMeasureZoom);
                } else {
                    Log.d("HelloMapScreen", "Loading map failed: mapError: " + mapError.name());
                }
            }
        });
    }

    @Override
    public void onSurfaceDestroyed(@NonNull SurfaceContainer surfaceContainer) {
        mapSurface.destroySurface();
    }

    private void zoomIn() {
        double zoomFactor = 2;
        mapSurface.getCamera().zoomBy(zoomFactor, getCenterPoint());
    }

    private void zoomOut() {
        double zoomFactor = 0.5;
        mapSurface.getCamera().zoomBy(zoomFactor, getCenterPoint());
    }

    private void exit() {
        carContext.finishCarApp();
    }

    private Point2D getCenterPoint() {
        Size2D viewport = mapSurface.getViewportSize();
        return new Point2D(viewport.width * 0.5, viewport.height * 0.5);
    }
}
これが私たちのアプリの最も興味深い部分です。 AndroidManifestで Android Auto をサポートするサービスとしてアプリを宣言したため、インストール時、または後で Android Auto アプリ経由で直接起動するときに、DHU に HelloMapScreen が自動的に表示されます。
コンテンツをレンダリングするには、アプリ を Surfaceにレンダリングする必要があります。 このために、すべての Android Auto 画面にSurfaceCallback が実装され、surfaceが利用可能になったときに通知が送られます。 便宜上、HERE SDK はパラメータとして SurfaceContainer を受け入れる MapSurfaceクラスを提供します。
mapSurface.setSurface(
        carContext,
        surfaceContainer.getSurface(),
        surfaceContainer.getWidth(),
        surfaceContainer.getHeight());
アプリ が Android Auto からSurfaceContainer を受信すると、出発の準備が整います。 HERE SDK MapSurface は MapViewMapViewBase 、インターフェイスを実装するため、通常のように動作します。 この例では、同じアプリの MainActivityで行うのと同じように、これを使用してマップ シーンをロードします。基本的に、MapViewインスタンスの代わりに MapSurfaceインスタンスを使用します。
注
HERE SDK MapSurface では、ジェスチャがサポートされています。 上部にあるボタンを使用して、マップを操作できます。 パンの動きなどのタッチジェスチャーをサポートしていない車両もあります。
この例では、 2 つのボタンを使用してマップを操作します。 これらのボタンは Android Autoの ActionStrip.Builder で作成します。 コールバック では、基本的なマップ操作を実行してマップをズームします。
double zoomFactor = 2;
mapSurface.getCamera().zoomBy(zoomFactor, getCenterPoint());
パンなど、マップと対話するためのボタンを追加できます。 ただし 、ドライバー の注意をそらさないように、 Android Auto のガイドラインに従ってください。 Android のCarIcon代わり に、MapImageOverlayクラスを使用してMapSceneにオーバーレイとして画像を固定することもできます。これにより、マップと一緒に移動、拡大縮小、またはチルトしないビットマップグラフィックをマップ ビュー の上に表示できます。
アプリの結果 は次のようになります。
ジェスチャー操作
HERE SDK に ScrollHandlerは 、ScaleHandlerおよびFlingHandlerのインターフェイスがあります。 これらのハンドラは 、対応する getter を呼び出すことによって、クラスGestures から取得できます。(例:Gestures.getScaleHandler)
各ハンドラは、ジェスチャ処理をトリガーする単一のメソッドを提供します。
-
onScroll(float distanceX, float distanceY)マップをパンします。 -
onScale(float focusX, float focusY, float scaleFactor)指定した点を中心にして倍率をズームします。 -
onFling(float velocityX, float velocityY)指定した初期速度の運動移動を行います。
これらのハンドラは 、 Android Auto でMapSurface を使用する場合にジェスチャーを処理するのに役立ちます。 GitHub の HelloMapAndroidAuto アプリで使用例を探します。 GitHub の HelloMapSurface サンプルアプリに、 OpenGL ES の例が示されています。 RenderListenerの助けを借りて、マップ ビューで簡単な図形をレンダリングする方法を示します。
トラブルシューティング
Android Auto ( または Android ツール ) をテスト用に設定するのは面倒です。 HERE には役立つヒントがいくつかあります。
- ADB を実行すると、「 command not found: adb」 : と表示されます。 これは、パス 変数に Android の ADB がまだ設定されていないことを意味します。 ADB は、コンソール端末からコンピューターにデバイスを接続するためのツールです。 以下に、 Mac で zsh シェルを使用する場合の解決策の例を示します。 まず 、 [ ツール ] -> [Android] -> SDK [Android Manager] の順に選択して Android の SDK マネージャを起動し、最新 の Android SDK プラットフォーム - ツールがインストールされていることを確認します。 インストールされていない場合は、インストールしてください。 ADB ツール は、 Android SDK プラットフォームのツールの一部です。 次に、シェル環境で ADB を認識するように設定する必要があります。 次のコマンドを実行して、を使用してパス変数を更新 します。たとえば、
nano $HOME/.zshrcを使用してnanoエディターを更新します。 以下の行を追加し、「 control + x 」キーを押してから「 y 」キーを押して保存します。 以下の例をお使いの環境に合わせて調整してください。 その後、を実行source ~/.zshrcします。
export PATH=$PATH:~/Library/Android/sdk/platform-tools
export ANDROID_HOME=~/Library/Android/sdk
export PATH="$HOME/.bin:$PATH"
export PATH="~/Library/Android/sdk/platform-tools":$PATH
次に行く場所
このチュートリアルでは、既存のアプリ に Android Auto のサポートを追加する方法を示しました。デバイスとヘッドユニットの 2 つの個別の MapView インスタンスを実行しますが、両方の MapView インスタンスが同じアプリ ライフサイクル内で実行されるため、デバイスとヘッドユニットの間で機能をハンドオーバーできます。 たとえば、自宅のモバイル機器でルートプランを作成し、車内 USB でデバイスを接続して運転を開始できます(アプリが Navigate Edition を使用している場合)。 ナビゲーションの進行状況は車両のヘッドユニットに表示され、デバイスは操作の詳細などのサポート情報を表示できます。
ドライバーの注意を散漫にしないように注意してください。 では、アプリ と対話するために音声コントロールを最前面に実装しないのはなぜでしょうか。 その他のアイデア :
- ヘッドのユニットディスプレイに現在有効な制限速度を表示し、超過した場合に音響的に警告する速度調整アシスタントを追加します。
- 現在走行中の道路のサポート道路属性情報を表示します。
- ガソリンスタンド、レストラン、観光名所など、近隣のアプリ の場所情報を表示するを実装します。