- Products ProductsLocation Services
Solve complex location problems from geofencing to custom routing
PlatformCloud environments for location-centric solution development, data exchange and visualization
Tracking & PositioningFast and accurate tracking and positioning of people and devices, indoors or outdoors
APIs & SDKsEasy to use, scaleable and flexible tools to get going quickly
Developer EcosystemsAccess Location Services on your favorite developer platform ecosystem
- Documentation DocumentationOverview OverviewServices ServicesApplications ApplicationsDevelopment Enablers Development EnablersContent ContentHERE Studio HERE StudioHERE Workspace HERE WorkspaceHERE Marketplace HERE MarketplacePlatform Foundation and Policy Documents Platform Foundation and Policy Documents
- Pricing
- Resources ResourcesTutorials TutorialsExamples ExamplesBlog & Release Announcements Blog & Release AnnouncementsChangelog ChangelogDeveloper Newsletter Developer NewsletterKnowledge Base Knowledge BaseFeature List Feature ListSupport Plans Support PlansSystem Status System StatusLocation Services Coverage Information Location Services Coverage InformationSample Map Data for Students Sample Map Data for Students
- Help
Implement GeoJSON Renderer
Objectives: Implement the GeoJSON rendering plugin using the Data Inspector
Complexity: Beginner
Time to complete: 30 min
Prerequisites: Get your credentials, Verify your credentials, Publish Protobuf schema to the platform
HERE platform catalogs contain layers with location data that is mostly partitioned geographically. The Data Inspector Library allows rendering Protobuf-encoded, geographically partitioned data on top of the base map with the help of custom GeoJSON rendering plugins.
This tutorial demonstrates how to implement a simple GeoJSON rendering plugin that visualizes the geographic marker by the specified coordinates.
The tutorial covers the following topics:
- Prepare resources for GeoJSON rendering plugin
- Implement GeoJSON rendering plugin
- Attach GeoJson rendering plugin to schema
Prepare resources for GeoJSON rendering plugin
Before starting to implement the GeoJSON rendering plugin, we need to create the resources for which this rendering plugin will be used.
First, let's generate a proto schema using the following OLP CLI command:
olp schema generate com.here.platform.tutorial render_schema --type proto
Note
The group ID should usually include a team/product hierarchy to the group ID, such as com.some-company.automated-driving.schema. This way, different teams can manage their schemas independently.
When you deploy a schema to the Artifact Service, its group ID is being reserved by your organization, and no other realm can reuse it in this case. So, specifying generic group ID values like com.example, com.here.schema, and com.here.example, may make it impossible to upload the schema to the Artifact Service repository and, thus, using it in catalogs or sharing it with other users.
The OLP CLI should return the following output:
Schema has been successfully generated in /home/user/render_schema.
To get more information about Protobuf schemas, see the Publish Protobuf schema to the platform tutorial.
We are going to implement a rendering plugin that should visualize the geographic marker by the specified coordinates. Therefore, we need to update the proto/src/main/proto/com/here/platform/tutorial/render_schema/v1/render_schema.proto file in the generated schema by setting the type of the lat and lon parameters to double and adding the new hint parameter with the type string that will contain additional information:
  syntax = "proto3";
  package com.here.platform.tutorial.render_schema.v1;

   message MainProtobufMessage {
       double lat = 1;
       double lon = 2;
       string hint = 3;
   }
Now we can deploy the schema using the following OLP CLI command from the root schema project:
olp schema put
The OLP CLI should return the following output:
Schema hrn:here:schema::realm:com.here.platform.tutorial:render_schema_v1:1.0.0 has been created.
Save the schema HRN as it will be used in the next steps.
Once the schema is created, we can move on to create a catalog with a versioned layer.
Let's start with creating a catalog by executing the following OLP CLI command:
olp catalog create render-tutorial-catalog "Renderer Catalog" --summary "Renderer Catalog" --description "Renderer Catalog"
The OLP CLI should return the following output:
Catalog hrn:here:data::realm:renderer-tutorial-catalog has been created.
Save the catalog HRN to use in the next steps.
The next step is to add a versioned layer to the catalog created above.
Let's add the versioned renderer-layer with application/x-protobuf content type, heretile:12 partitioning and the schema created above.
Linux
Windows
olp catalog layer add hrn:here:data::realm:render-tutorial-catalog renderer-layer renderer-layer --summary "Renderer layer" \
--description "Renderer layer" --coverage "DE" --versioned --content-type application/x-protobuf \
--partitioning heretile:12 --schema hrn:here:schema::realm:com.here.render.tutorial:render_schema_v1:1.0.0
olp catalog layer add hrn:here:data::realm:render-tutorial-catalog renderer-layer renderer-layer --summary "Renderer layer" ^
--description "Renderer layer" --coverage "DE" --versioned --content-type application/x-protobuf ^
--partitioning heretile:12 --schema hrn:here:schema::realm:com.here.platform.tutorial:render_schema_v1:1.0.0Note
If a billing tag is required in your realm, update the config file by adding the billingTags: ["YOUR_BILLING_TAG"] property to the layer section.
The OLP CLI should return the following output:
Layer renderer-layer has been added to the catalog.
Note
With the Data Inspector Library, you can visualize these types of layers: versioned, volatile and object store.
Now, we can populate the renderer-example.partition on the layer with the OLP CLI. The renderer-example.partition contains protobuf-serialized data with geographic coordinates of the Golden Gate Bridge in San Francisco:
Serialized
"lat": 37.82171
"lon": -122.47881
"hint": "Golden Gate Bridge in San Francisco"
To serialize proto data, you can use the _java or _scala bindings as follows:
Java
Scala
File serializedProto = new File("serializedProto.txt");
serializedProto.createNewFile();
Render.MainProtobufMessage.newBuilder()
        .setLon(13)
        .setLat(52)
        .setHint("Golden Gate Bridge in San Francisco")
        .build().writeTo(Files.newOutputStream(serializedProto.toPath()));
val serializedProto = new File("serializedProto.txt")
serializedProto.createNewFile
Render.MainProtobufMessage.newBuilder
.setLon(-122.47881)
.setLat(37.82171)
.setHint("Golden Gate Bridge in San Francisco")
.build.writeTo(Files.newOutputStream(serializedProto.toPath))To upload the partition to the layer, execute the following OLP CLI command:
olp catalog layer partition put hrn:here:data::realm:renderer-tutorial-catalog renderer-layer --partitions=19319036:renderer-example.partition
The OLP CLI should return the following output:
 100% [===========================================================] 1/1 (0:00:00 / 0:00:00)

Partition 19319036 was successfully uploaded.
Let's move to the next section to add a GeoJSON rendering plugin to visualize uploaded data.
Implement GeoJSON rendering plugin
You can develop your custom GeoJSON rendering plugins using one of the following environments:
-
Data Inspector online standalone tool: An online standalone tool hosted on the HERE platform that makes it easy for you to write a rendering plugin for your schema so that the data can be visualized.
No installations are needed, you just upload a local partition file, specify a schema (local or HRN), and write and test your plugin.
-
HERE platform Data Inspector: In the HERE platform portal, go to a layer's details' page and select the
Inspecttab or execute theolp catalog inspect <catalog HRN>OLP CLI command.For this option to work, you do not need to install Node.js, additional Data Inspector Library modules, or any third-party components. Just log in to the portal with your platform credentials.
-
Local Data Inspector: For this option to work, you need to install Node.js and the Data Inspector Library along with the example applications.
In this tutorial, we will use the first approach: Data Inspector online standalone tool.
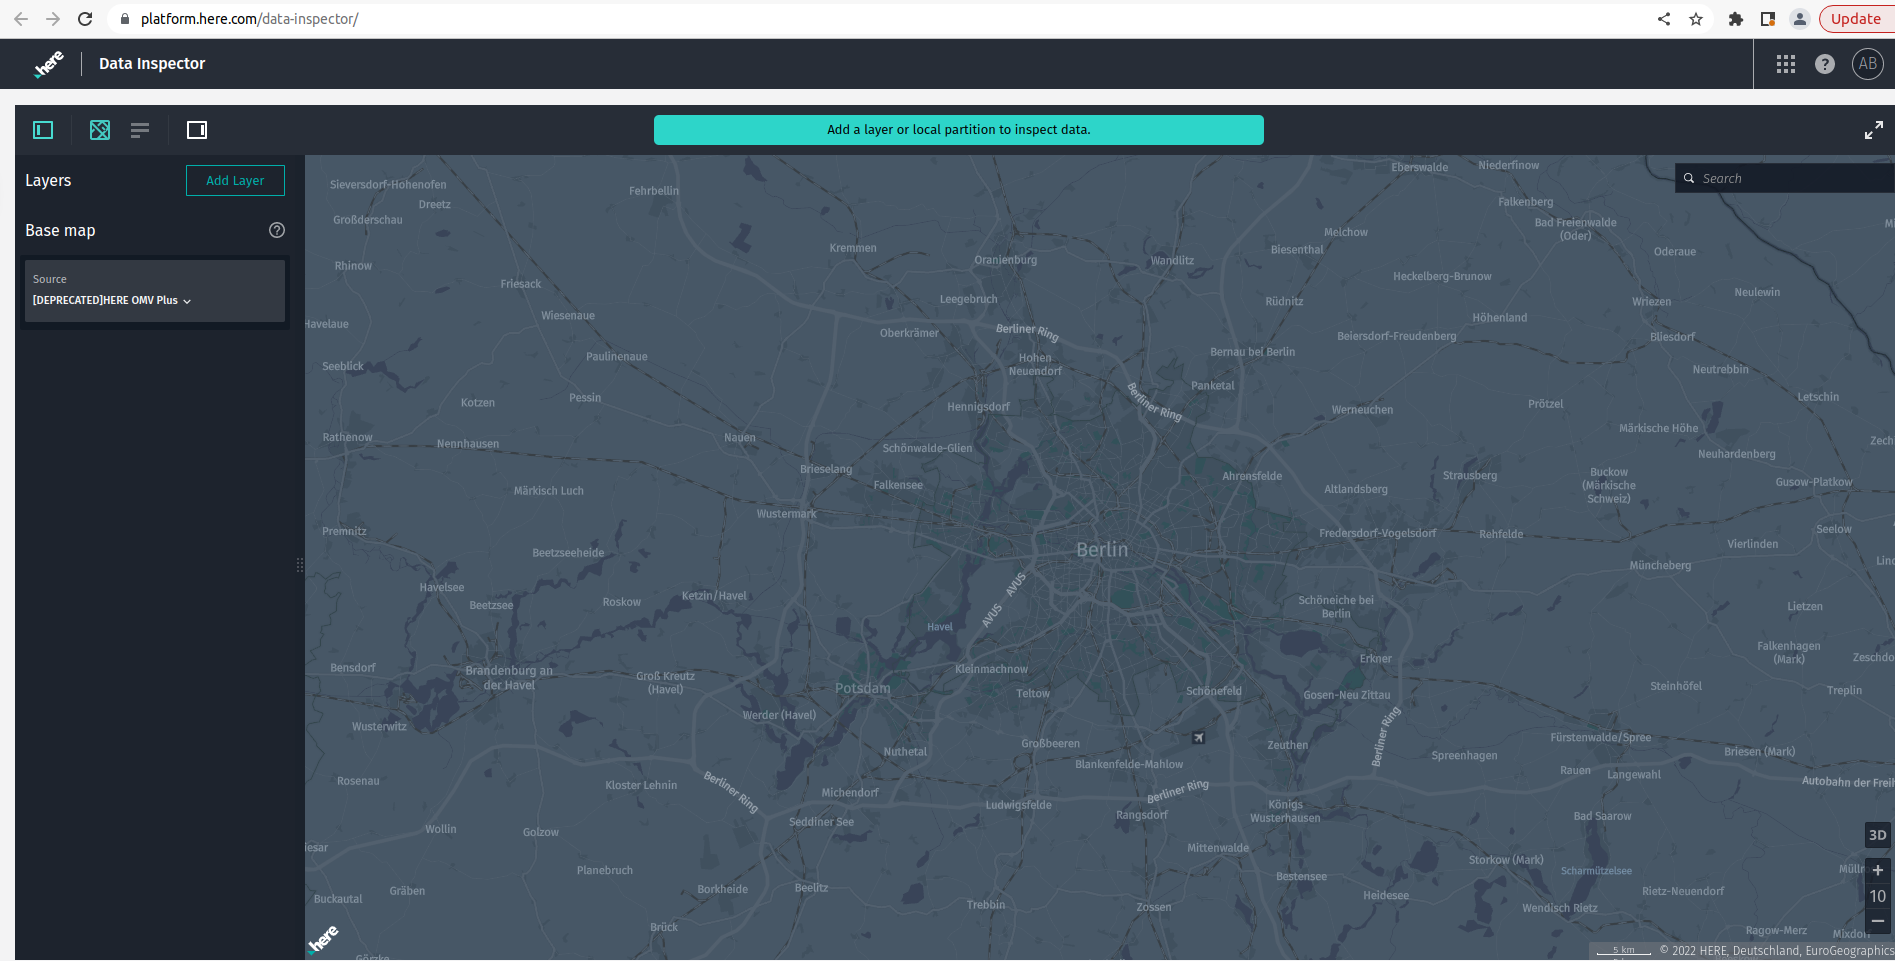
Let's open the Data Inspector online standalone tool.
You should see the following page:
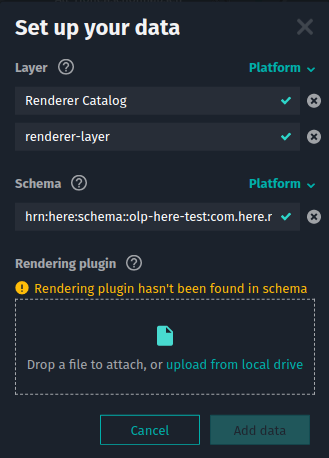
Now click Add layer and select the catalog and layer created in the previous section. Click Add data:
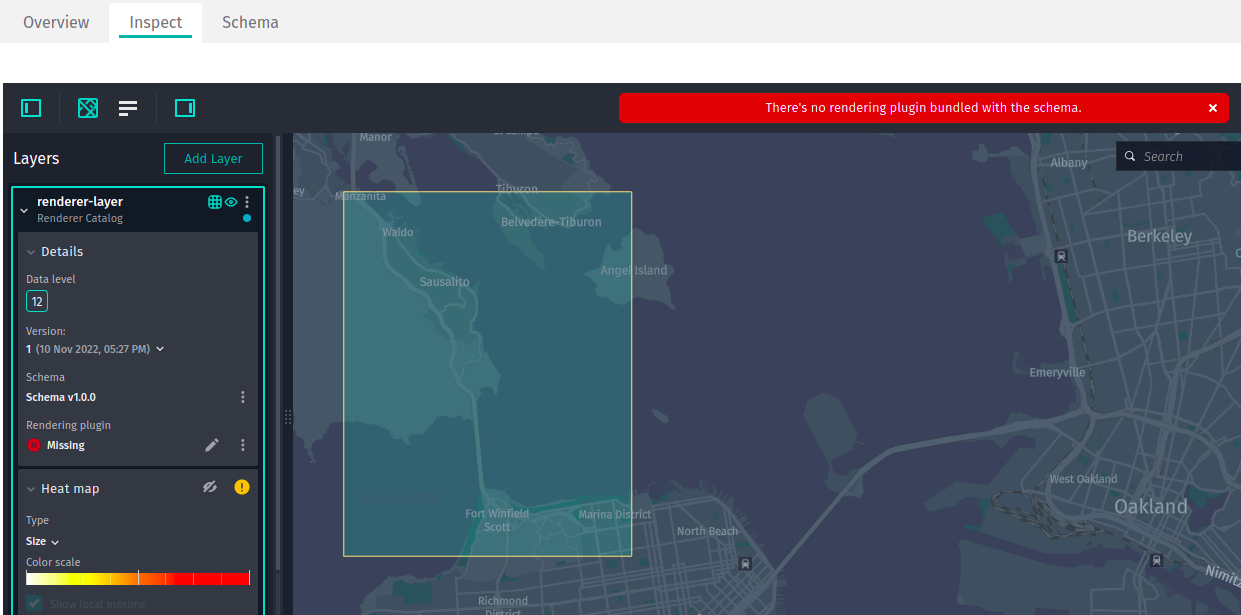
Once you have added your catalog with a layer to the Data Inspector page, you can see the uploaded partition on the map and There's no rendering plugin bundled with the schema. message.
The next step is to configure the GeoJSON rendering plugin.
We are going to implement the rendering plugin that should visualize the geographic marker by the specified coordinates. Previously, we uploaded the following encoded partition to the versioned layer:
"lat": 37.82171
"lon": -122.47881
"hint": "Golden Gate Bridge in San Francisco"
So, the rendering plugin should visualize the tooltip with the defined hint and provided coordinates. In our case, it should visualize the Golden Gate Bridge in San Francisco, because we uploaded the partition with the coordinates of the bridge.
To add the rendering plugin, navigate to the Control panel and click Create plugin in the Rendering plugin section.
When you click Create plugin, the Data Inspector should open the code editor with the following code:
/**
* Renderer plugin to convert JSON data to GeoJSON.
*
* Generated GeoJSON must be created according to GeoJSON Specification:
* https://tools.ietf.org/html/rfc7946
*
* This template is an example of plugin to generate the GeoJSON object based on decoded partition
* content (the same data structure as in Decoded Data panel).
*
* Renderer plugin must return an object with one of these functions in it:
*
*
* getGeoJSON: function (params) { ... }
* getGeoJSONAsync: async function (params) { ... }
*
*
* Both synchronous `getGeoJSON` and asynchronous `getGeoJSONAsync` functions return
* an object with GeoJSON data in property `body`:
*
* {
*     contentType: "application/geo+json; charset=utf-8",
*     body: geoJsonData
* }
*
*
* Only one of these functions must be declared, if both are present plugin will not be used.
  */
  (() => {
  "use strict";

  /** @type {RendererPlugin} */
  const plugin = {
  /**
  * Generates object with GeoJSON data.
  *
  * @param {object} params.logger Logger to log information to console.
  * @param {object} params.layer All properties as well as dataUrl, name, partitioning and
  * originalConfiguration.
  * @param {object} params.decodeResult Decoded data of the partition.
  * @param {object} params.mapUtils Various converters like `mercatorConverter`,
  * `heretileToQuad`, `hdmapCoordinateToLonLat`, etc.
  * @param {object} params.geometryDataProviders Various geometry data providers to map data.
  * @returns {object} An object with generated GeoJSON data.
  */
  getGeoJSON: function (params) {
  // Implement either this or `getGeoJSONAsync` function.
  // See more detailed description in the header of this file.

           // By default, logger will display only messages of `warn` and `error` levels.
           // To enable all of them, set level to `0`.
           const logger = params.logger;
           logger.level = 0;
           logger.info(`Creating GeoJSON for tile ${params.decodeResult.partitionId}`);

           // To debug plugin, put a `debugger` keyword and activate browser's developer tools.
           // Dev tools will activate a breakpoint at each occurrence of `debugger` keyword:
           // debugger;

           // Returning sample empty GeoJSON object
           return {
               contentType: "application/geo+json; charset=utf-8",
               body: { // Add your GeoJSON features here
                   "type": "FeatureCollection",
                   "features": []
               }
           }
       }
  };

  return plugin;
  })();
This is the main file where we need to implement the GeoJSON rendering plugin). By default, this JavaScript returns an empty FeatureCollection meaning that nothing is visualized yet. We need to update this JavaScript file by adding GeoJSON) that contains the tooltip property with a hint value and Point with lon and lat coordinates:
            // Prepare GeoJSON to visualize
            var result = {
                "type": "FeatureCollection",
                "features": [
                    {
                        "type": "Feature",
                        "properties": {
                            "tooltip" : data.hint
                        },
                        "geometry": {
                            "type": "Point",
                            "coordinates": [
                                data.lon,
                                data.lat
                            ]
                        }
                    }
                ]
            };
The updated JavaScript file should look as follows:
    (() => {
    "use strict";
    const plugin = {
        getGeoJSON:function (params) {

            // Destructuring of the `params` object.
            const {logger, decodeResult } = params;

            // Partition data decoded with the schema protobuf
            var data = decodeResult.data;

            logger.info("Data successfully loaded");

            // Prepare GeoJSON to visualize
            var result = {
                "type": "FeatureCollection",
                "features": [
                    {
                        "type": "Feature",
                        "properties": {
                            "tooltip" : data.hint
                        },
                        "geometry": {
                            "type": "Point",
                            "coordinates": [
                                data.lon,
                                data.lat
                            ]
                        }
                    }
                ]
            };

            // Return an object with GeoJSON data
            return {
                contentType: "application/vnd.geo+json; charset=utf-8",
                body: result
            };
        }
    };
    return plugin;
})();
You can debug rendering plugin code with your browser's built-in developer tools. To launch developer tools on most of the popular browsers, use the Ctrl(Cmd)+Shift+J shortcut. Because plugin code and its evaluated object are not accessible through a global scope object or the <script> tag, you need to add debugger; statements to those lines of code on which you want the debugger to pause execution.
Let's add the debugger; statement before the return statement to verify that the result variable contains the correct FeatureCollection object:
    (() => {
    "use strict";
    const plugin = {
        getGeoJSON:function (params) {
            const {logger, decodeResult } = params;
            var data = decodeResult.data;

            logger.info("Data successfully loaded");
            var result = {
                "type": "FeatureCollection",
                "features": [
                    {
                        "type": "Feature",
                        "properties": {
                            "tooltip" : data.hint
                        },
                        "geometry": {
                            "type": "Point",
                            "coordinates": [
                                data.lon,
                                data.lat
                            ]
                        }
                    }
                ]
            };

            // DEBUGGER: Application will stoped at this line
            debugger;
            // DEBUGER: Application will stoped at this line

            return {
                contentType: "application/vnd.geo+json; charset=utf-8",
                body: result
            };
        }
    };
    return plugin;
})();
Now you can paste the code above to the code editor and use the Ctrl(Cmd)+Shift+J shortcut to open developer tools in your browser. Then click the Run button. The debugger should pause the application at the line where you added the debugger; statement, and you will be able to debug the application state.
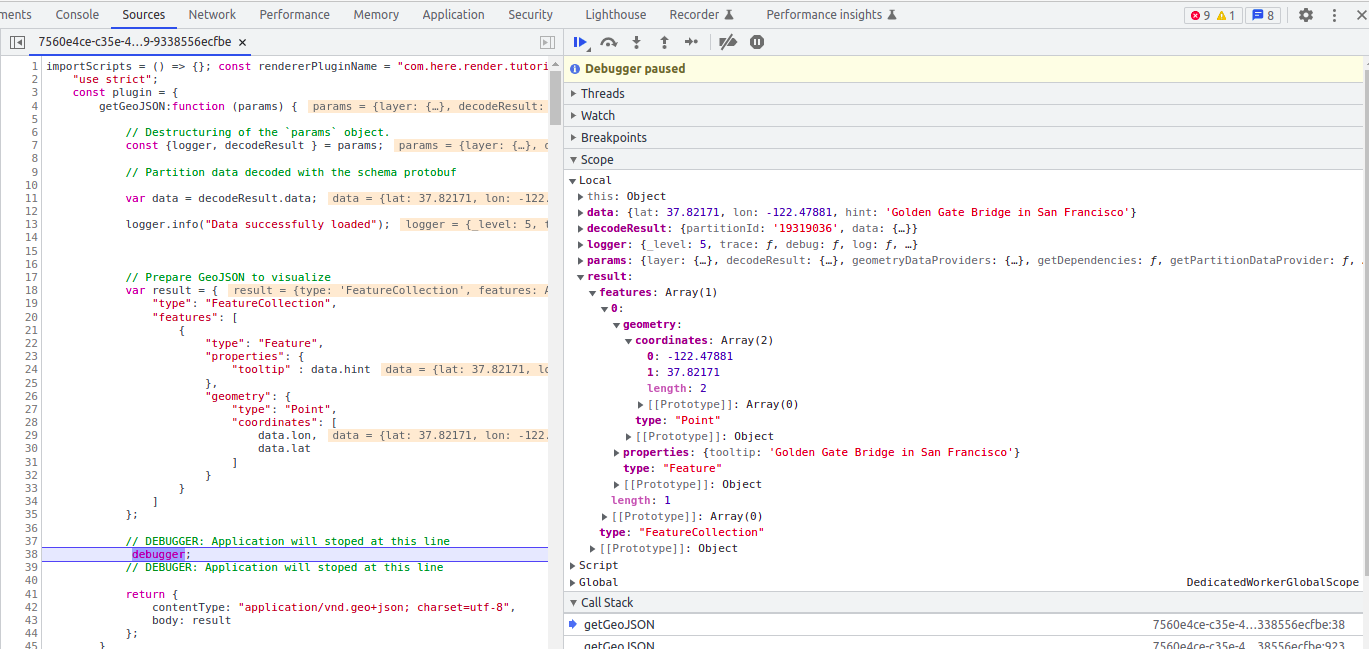
From the picture above, we can see that the result variable contains the FeatureCollections with the same data we uploaded to the partition.
Now we can verify that the GeoJSON provided in the code snippet above can be properly visualized, remove the debugger; statement from the code and paste this code into code editor in the Data Inspector and click Run.
If everything is set up correctly, you should get the following result:
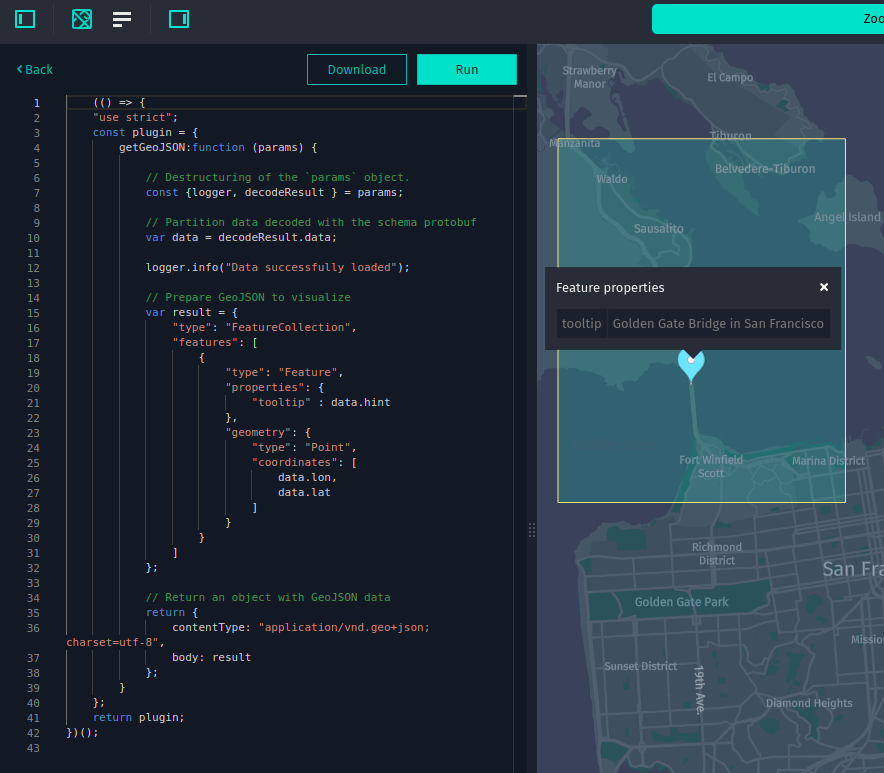
Now we can proceed to attach this rendering plugin to the schema created in the Prepare resources for GeoJSON rendering plugin section.
Attach GeoJson rendering plugin to schema
Once we have implemented the GeoJSON rendering plugin and verified that it works properly, we can attach it to the schema in order to use this plugin by default in all catalogs that contain a layer with our schema.
To attach the rendering plugin to the schema, create a GeoJSON renderer file ds/src/main/resources/renderers/com.here.platform.tutorial.render_schema.v1.MainProtobufMessage.js and use the JavaScript code implemented in the previous section.
Note
When you implement the rendering plugin, make sure that you properly name your rendering plugin file. Its name (without the .js extension) should match the message field in the META-INF/layer.manifest.json manifest file of the built artifact (ZIP archive) of the data schema (ds) module.
Now we can redeploy the schema with the GeoJSON rendering plugin included. For this purpose, execute the following OLP CLI command from the root schema project:
olp schema put
The OLP CLI should return the following output:
Schema hrn:here:schema::realm:com.here.platform.tutorial:render_schema_v1:1.0.0 has been created.
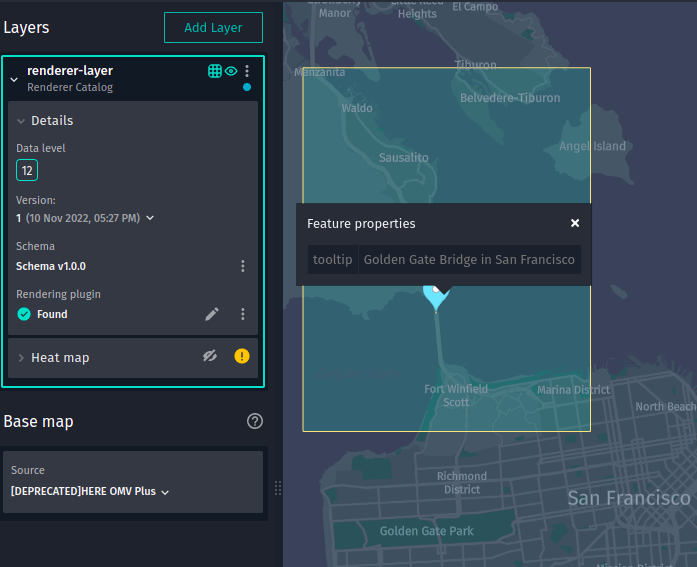
Once you have deployed the schema with the rendering plugin, you can open the Data Inspector and verify that the Control panel shows the rendering plugin by default and that the partition is visualized:
Conclusion
In this tutorial, you have practiced implementing the GeoJSON rendering plugin to visualize partitions in the versioned layer using the Data Inspector.
Further information
- For more information on how to use the Data Inspector, see the Data Inspector Guide
- For more information on how to create rendering plugins using the Data Inspector, see the Create Rendering Plugins Guide.
- For more information on how to debug the rendering plugin, see the Data Inspector Development Environment Guide.
- For more information on how to work with schemas using the OLP CLI, see the OLP CLI Guide.