- Products ProductsLocation Services
Solve complex location problems from geofencing to custom routing
PlatformCloud environments for location-centric solution development, data exchange and visualization
Tracking & PositioningFast and accurate tracking and positioning of people and devices, indoors or outdoors
APIs & SDKsEasy to use, scaleable and flexible tools to get going quickly
Developer EcosystemsAccess Location Services on your favorite developer platform ecosystem
- Documentation DocumentationOverview OverviewServices ServicesApplications ApplicationsDevelopment Enablers Development EnablersContent ContentHERE Studio HERE StudioHERE Workspace HERE WorkspaceHERE Marketplace HERE MarketplacePlatform Foundation and Policy Documents Platform Foundation and Policy Documents
- Pricing
- Resources ResourcesTutorials TutorialsExamples ExamplesBlog & Release Announcements Blog & Release AnnouncementsChangelog ChangelogDeveloper Newsletter Developer NewsletterKnowledge Base Knowledge BaseFeature List Feature ListSupport Plans Support PlansSystem Status System StatusLocation Services Coverage Information Location Services Coverage InformationSample Map Data for Students Sample Map Data for Students
- Help
Map Controls and UI
The HERE Maps API for JavaScript provides a set of ready-made map controls through the UI module (mapsjs-ui.js). In addition, the module supports the creation of info bubbles.
The UI allows you to add the following default components to the map:
-
MapSettingsControl– allows the user to change the base map -
ZoomControl– allows the user to change the map zoom level -
Scalebar– shows the current map scale
Adding UI Components to the Map
The following example demonstrates how to add UI components to the map.
The first step is to add a <script> tag to the <head> element of the page to load the API's UI module and a link to the CSS file as shown in the code below:
<!DOCTYPE html>
<html>
  <head>
      <meta name="viewport" content="initial-scale=1.0,
            width=device-width" />
        <script src="https://js.api.here.com/v3/3.1/mapsjs-core.js"
            type="text/javascript" charset="utf-8"></script>
        <script src="https://js.api.here.com/v3/3.1/mapsjs-service.js"
            type="text/javascript" charset="utf-8"></script>
        <script src="https://js.api.here.com/v3/3.1/mapsjs-ui.js"
            type="text/javascript" charset="utf-8"></script>
        <link rel="stylesheet" type="text/css"
            href="https://js.api.here.com/v3/3.1/mapsjs-ui.css" />
  </head>
Next, create a map object with the default map types in the script section for the application logic.
Note
The default UI requires a map instance as well as a collection containing the default map layers.
<script type="text/javascript" charset="utf-8">
    //Initialize the Platform object:
    var platform = new H.service.Platform({
        'apikey': '{YOUR_API_KEY}'
    });

    // Get the default map types from the Platform object:
    var defaultLayers = platform.createDefaultLayers();

    // Instantiate the map:
    var map = new H.Map(
        document.getElementById('mapContainer'),
        defaultLayers.vector.normal.map,
        {
            zoom: 10,
            center: { lng: 13.4, lat: 52.51 }
        });

    // Create the default UI:
    var ui = H.ui.UI.createDefault(map, defaultLayers);
</script>
In the image below, the resulting map shows the default controls (the scale bar at the bottom, the zoom control on the right, and the map selector in the bottom right corner).

When you create the default UI, an instance of each control is added to the UI object. The controls can be enabled or disabled (removed) individually via calls to the method getControl() defined on the H.ui.UI class. To identify the control you wish to manipulate, you must use the appropriate key:
-
'mapsettings'– identifies theMapSettingsControl -
'zoom'– identifies theZoomControl -
'scalebar'– identifies theScaleBar
The code below shows how to use the method getControl() and a control identifier to disable the zoom control:
ui.getControl('zoom').setDisabled(false)
Changing the UI Language
The UI module comes with localizations for the following languages:
-
en-US– English (United States) -
de-DE– German -
es-ES– Spanish -
fi-FI– Finnish -
fr-FR– French -
it-IT– Italian -
nl-NL– Dutch -
pl-PL– Polish -
pt-BR– Portuguese (Brazil) -
pt-PT– Portuguese (Portugal) -
ru-RU– Russian -
tr-TR– Turkish -
zh-CN– Chinese (China)
The code that follows uses a language identifier to present the map user interface in German.
<script type="text/javascript" charset="utf-8">
    //Initialize the Platform object:
    var platform = new H.service.Platform({
        'apikey': '{YOUR_API_KEY}'
    });

    // Get the default map types from the Platform object:
    var defaultLayers = platform.createDefaultLayers();

    // Instantiate the map:
    var map = new H.Map(
        document.getElementById('mapContainer'),
        defaultLayers.vector.normal.map,
        {
            zoom: 10,
            center: { lng: 13.4, lat: 52.51 }
        });

    // Create the default UI:
    var ui = H.ui.UI.createDefault(map, defaultLayers, 'de-DE');
</script>
The image below shows the effect of this code as seen by the application user.
Managing the Position of UI Controls
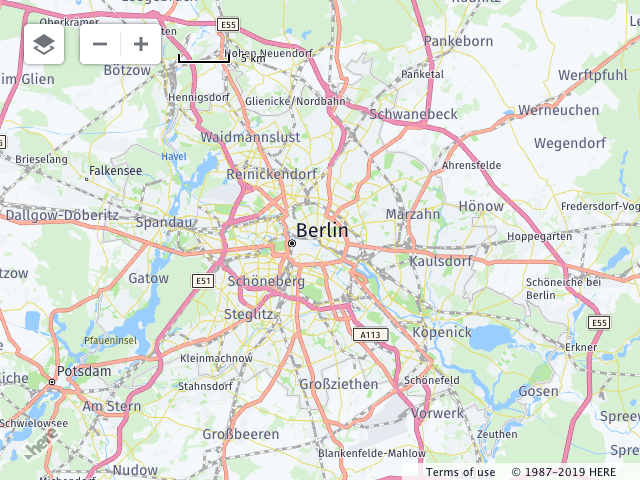
The Maps API supports changing the position of the UI controls. In the following example, all map controls are moved to the top-left corner of the map viewport.
The code extends the previous example by obtaining an instance of each of the default UI controls and then setting alignment on the controls to the top-left corner.
var mapSettings = ui.getControl('mapsettings');
var zoom = ui.getControl('zoom');
var scalebar = ui.getControl('scalebar');

mapSettings.setAlignment('top-left');
zoom.setAlignment('top-left');
scalebar.setAlignment('top-left');
The image below shows the results of executing this code.
Info Bubbles
In addition to map controls, the UI module supports info bubbles. An info bubble allows you literally to show a 'bubble' containing HTML content on the map, for example, text or images.
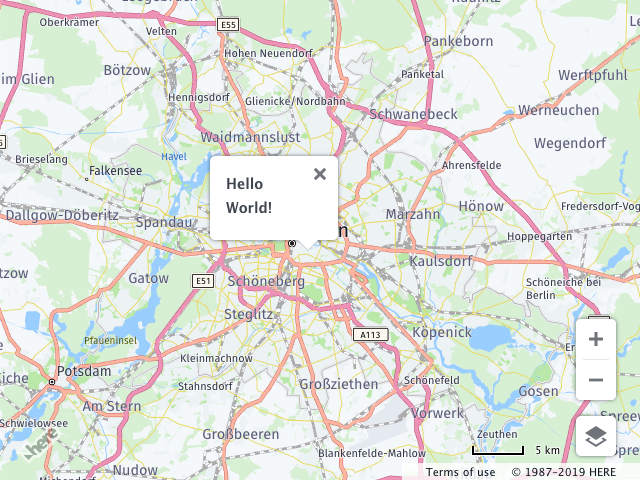
The code below extends the first example in this article by adding an info bubble to the map display. It creates an instance of InfoBubble, specifying the geographic coordinates of the location at which it should appear, and the HTML content, which in this case is the text string "Hello World!" in bold. The last line adds the info bubble object to the UI instance.
// Create an info bubble object at a specific geographic location:
var bubble = new H.ui.InfoBubble({ lng: 13.4, lat: 52.51 }, {
                content: '<b>Hello World!</b>'
             });

// Add info bubble to the UI:
ui.addBubble(bubble);
The image below shows the results of executing the code.