- Products ProductsLocation Services
Solve complex location problems from geofencing to custom routing
PlatformCloud environments for location-centric solution development, data exchange and visualization
Tracking & PositioningFast and accurate tracking and positioning of people and devices, indoors or outdoors
APIs & SDKsEasy to use, scaleable and flexible tools to get going quickly
Developer EcosystemsAccess Location Services on your favorite developer platform ecosystem
- Documentation DocumentationOverview OverviewServices ServicesApplications ApplicationsDevelopment Enablers Development EnablersContent ContentHERE Studio HERE StudioHERE Workspace HERE WorkspaceHERE Marketplace HERE MarketplacePlatform Foundation and Policy Documents Platform Foundation and Policy Documents
- Pricing
- Resources ResourcesTutorials TutorialsExamples ExamplesBlog & Release Announcements Blog & Release AnnouncementsChangelog ChangelogDeveloper Newsletter Developer NewsletterKnowledge Base Knowledge BaseFeature List Feature ListSupport Plans Support PlansSystem Status System StatusLocation Services Coverage Information Location Services Coverage InformationSample Map Data for Students Sample Map Data for Students
- Help
Marker Objects
One of the most common use cases for a mapping application is to show points of interest (POIs) on the map. The HERE Maps API for JavaScript, makes the implementation very easy by allowing you to represent POIs as markers.
The Maps API offers two sorts of markers:
| Marker type | Class | Description |
|---|---|---|
| Marker | H.map.Marker | A "normal" marker that uses a static image as an icon. Large numbers of markers of this types can be added to the map very quickly and efficiently. |
| DOM marker | H.map.DomMarker | A marker which supports HTML (and SVG) content, which can be dynamic. Markers of this type are best displayed individually or in small sets. |
A marker of either type consists of a geographical point defined by its latitude and longitude and a visual representation, which is an icon. Marker icons are rendered in screen-space, meaning that their size never changes regardless of the zoom level of the map.
Marker and DomMarker require different icon types. A Marker object accepts Icon instances (H.map.Icon) and a DomMarker needs an instance of DomIcon (H.map.DomIcon). This scheme allows icons to be reused in multiple marker objects.
It is also important to note that Markers and DomMarkers are rendered in separate rendering steps. Markers are rendered in the map scene and therefore appear behind any DomMarkers which are rendered as an overlay on top of the map.
Marker with a Static SVG Icon
The code below shows how to instantiate a marker with an SVG icon.
// Create a map:
var map = new H.Map(...);

// Define a variable holding SVG mark-up that defines an icon image:
var svgMarkup = '<svg width="24" height="24" ' +
    'xmlns="http://www.w3.org/2000/svg">' +
    '<rect stroke="white" fill="#1b468d" x="1" y="1" width="22" ' +
    'height="22" /><text x="12" y="18" font-size="12pt" ' +
    'font-family="Arial" font-weight="bold" text-anchor="middle" ' +
    'fill="white">H</text></svg>';

// Create an icon, an object holding the latitude and longitude, and a marker:
var icon = new H.map.Icon(svgMarkup),
    coords = {lat: 52.53075, lng: 13.3851},
    marker = new H.map.Marker(coords, {icon: icon});

// Add the marker to the map and center the map at the location of the marker:
map.addObject(marker);
map.setCenter(coords);
When executed, the code creates:
- A map object (see also Get Started).
- An SVG icon image (as a string).
- An object containing the geographic coordinates of a location, and a "normal" marker.
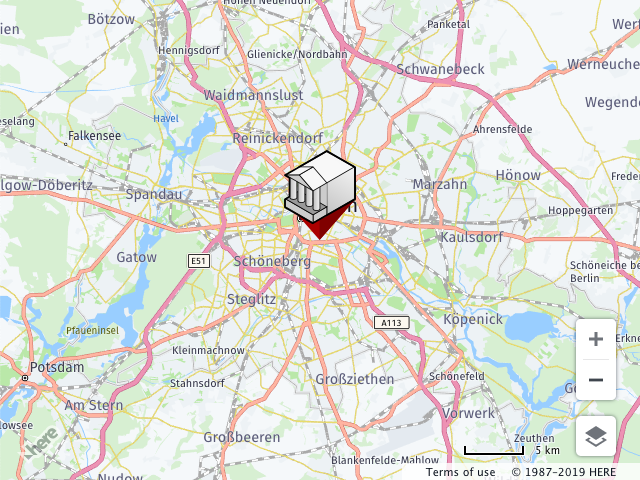
The last line of code adds the newly created marker to the map.
The resulting map centered on the location of the marker is shown in the image below.
Note
For improved performance, reuse icons between the markers.

Marker with a Static Image
The following code snippet shows how to instantiate an icon and a marker from an image URL.
// Create a map:
var map = new H.Map(...);

// Create a marker icon from an image URL:
var icon = new H.map.Icon('graphics/markerHouse.png');

// Create a marker using the previously instantiated icon:
var marker = new H.map.Marker({ lat: 52.5, lng: 13.4 }, { icon: icon });

// Add the marker to the map:
map.addObject(marker);
When executed, the code creates:
- A map object (see also Get Started)
- An icon using the URL of a bitmap (PNG image)
- A "normal" marker initialized with the bitmap.
The last line of the code adds the marker to the map.
The image below shows the map centered on the location of the marker that uses a bitmap icon.
This example uses a basic set of parameters to create a marker with a custom image icon. However, icons and markers provide further customization options, which can be passed to the constructors as parameters. These options include, for example, custom hit-areas and anchors for image icons. For the full documentation, see the API Reference.
Note
The icon property of a marker is one of the optional parameters as well. The API provides a default icon for markers to which a custom icon has not been assigned.
Marker with HTML / SVG content
Image markers are a good way to highlight points of interest on a map with static graphical content. In certain use-cases, it is desirable to provide markers with interactive or animated HTML content (for example animated GIFs, animated SVGs or hover effects), rather than pre-rendered images. The Maps API provides the DomMarker class for such use-cases.
The following example shows how a DomMarker can be used to create a marker with animated SVG content. In this case, the animated marker icon is a bouncing ball.
// Create a map object:
var map = new H.Map(...);

// Define a variable holding SVG mark-up that defines an animated icon image:
var animatedSvg =
    '<svg version="1.1" xmlns="http://www.w3.org/2000/svg" x="0px" ' +
    'y="0px" style="margin:-112px 0 0 -32px" width="136px"' +
    'height="150px" viewBox="0 0 136 150"><ellipse fill="#000" ' +
    'cx="32" cy="128" rx="36" ry="4"><animate attributeName="cx" ' +
    'from="32" to="32" begin="0s" dur="1.5s" values="96;32;96" ' +
    'keySplines=".6 .1 .8 .1; .1 .8 .1 1" keyTimes="0;0.4;1"' +
    'calcMode="spline" repeatCount="indefinite"/>' +
    '<animate attributeName="rx" from="36" to="36" begin="0s"' +
    'dur="1.5s" values="36;10;36" keySplines=".6 .0 .8 .0; .0 .8 .0 1"' +
    'keyTimes="0;0.4;1" calcMode="spline" repeatCount="indefinite"/>' +
    '<animate attributeName="opacity" from=".2" to=".2"  begin="0s" ' +
    ' dur="1.5s" values=".1;.7;.1" keySplines=" .6.0 .8 .0; .0 .8 .0 1" ' +
    'keyTimes=" 0;0.4;1" calcMode="spline" ' +
    'repeatCount="indefinite"/></ellipse><ellipse fill="#1b468d" ' +
    'cx="26" cy="20" rx="16" ry="12"><animate attributeName="cy" ' +
    'from="20" to="20" begin="0s" dur="1.5s" values="20;112;20" ' +
    'keySplines=".6 .1 .8 .1; .1 .8 .1 1" keyTimes=" 0;0.4;1" ' +
    'calcMode="spline" repeatCount="indefinite"/> ' +
    '<animate attributeName="ry" from="16" to="16" begin="0s" ' +
    'dur="1.5s" values="16;12;16" keySplines=".6 .0 .8 .0; .0 .8 .0 1" ' +
    'keyTimes="0;0.4;1" calcMode="spline" ' +
    'repeatCount="indefinite"/></ellipse></svg>';

// Create an icon object, an object with geographic coordinates and a marker:
var icon = new H.map.DomIcon(animatedSvg),
    coords = {lat: -22.8906, lng: -43.2283},
    marker = new H.map.DomMarker(coords, {icon: icon});

// Set map center and zoom, add the marker to the map:
map.setCenter(coords);
map.setZoom(18);
map.addObject(marker);
When executed, the code creates:
- A map object (see also Get Started).
- A variable that holds the definition of an animated SVG image.
- An icon (initialized with the SVG image).
- An object containing the geographic coordinates of the location.
- A "normal" marker.
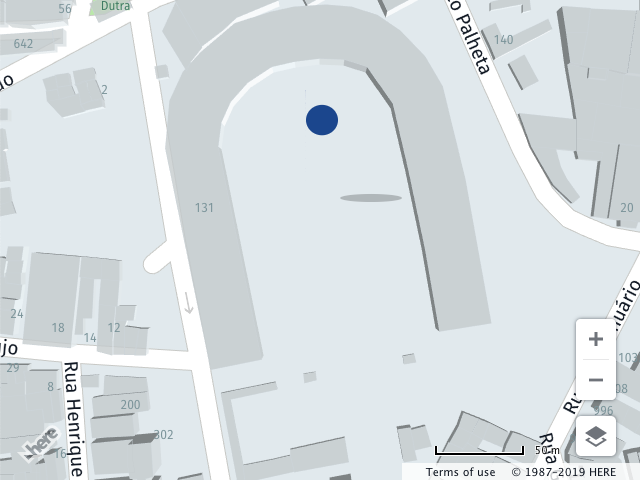
The last two lines add the marker to the map and center the map using the object holding the geographic coordinates.
The image below shows the map with a marker that uses an animated icon.
Elevated markers
Users of the WebGL rendering engine have a possibility to modify the tilt of the map. Sometimes it is necessary to elevate the marker to highlight a particular location. This can be done in two ways:
- By specifying the altitude value (works both for the
Markerand theDomMarker). - By elevating the marker icon by using a
stickHeightoption of theH.map.Icon(works only for theMarker).
The image below highlights those cases. The red marker is positioned on the roof of the building using an altitude property, and the blue one on the ground, but using the stick height and color properties. Those features can be also combined.
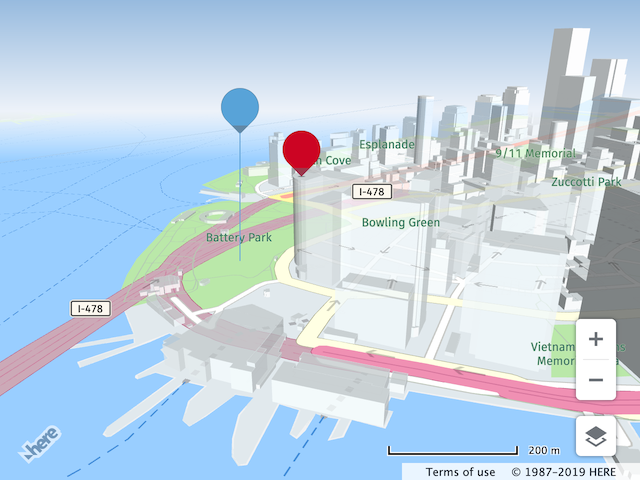
When stickHeight is specified, the icon is elevated in the screen space's Y axis according to the current tilt angle of the map. A straight line is rendered to connect the elevated and the original anchor points. Color of the icon stick can be specified using a stickColor property.
The specified value is the stick's maximum height in CSS pixels on a 90° tilt. On tilt angle of 0° the icon is not elevated and therefore the stick not visible.